As indicated in the Stambia DI and Elasticsearch article, it is possible to connect to Elasticsearch servers from Stambia.
If you never used it yet in Stambia, or if you need a little remind on how to install and use it, you are at the good place.
You'll find in this article the basics, from the installation to the first Mapping, with some explanations on the reverse by the way.
Prerequisites: Stambia DI Designer S18.2.3 or higher
Note:
A demonstration project featuring examples and samples can be found here
Note:
Stambia DI is a flexible and agile solution. It can be quickly adapted to your needs.
If you have any question, any feature request or any issue, do not hesitate to contact us.
Installation
Connector Installation
The first step consists of installing the Stambia Elasticsearch connector into the Designer.
For this, we let you take a look at this article that explains how to install plugins into the Designer.
The download section for the connector can be found in the presentation article.
Template installation
The next step consists of importing generic templates and Elasticsearch templates into your workspace.
After having downloaded them from the presentation article or download page, simply import them as usual.
Additional Library installation
The final step is to install the additional Elasticsearch libraries which are required to use Elasticsearch's API.
This is the point where it will be different depending on Elasticsearch server version.
Elasticsearch versions prior to 5.x
For Elasticsearch server versions prior to 5.x, such as 2.x or 1.x:
- Lead to elasticsearch server installation folder
- Copy the content of the lib/ folder and paste it into the <Stambia Designer>/stambiaRuntime/lib/addons/elasticsearch folder
- Restart the Designer and Runtime
Elasticsearch versions 5.x, 6.x, 7.x
For Elasticsearch server versions 5.x and higher:
- Lead to elasticsearch server installation folder
- Copy the content of the lib/ folder and paste it into <Stambia Designer>/stambiaRuntime/lib/addons/elasticsearch folder
- Copy the content of the modules/ folder and paste it into <Stambia Designer>/stambiaRuntime/lib/addons/elasticsearch folder
- Copy Elasticsearch client transport library corresponding to your server version, which can be retrieved from maven (E.g. transport-5.4.0.jar), and paste it into <Stambia Designer>/stambiaRuntime/lib/addons/elasticsearch folder
- Remove the log4j-x.x-api-x.x.jar library, because it conflicts with our log4j library
- Restart the Designer and Runtime
Troubleshooting
When executing Elasticsearch Mappings, if you have exceptions about netty library issues hae a look at the following article.
ElasticSearch Metadata
Metadata creation and configuration
Stambia's Elasticsearch connector offers the possibility to reverse indexes, document types, and queries, which will next be used to perform data operations in Mappings.
Therefore, the first step before being able to make those operations, is to reverse or design the Metadata, starting by configuring the server properties.
Now that everything is installed and started, we can begin creating and configuring it in the Designer.
For this, process as below:
- In the Project Explorer (Designer), select the Project in which you want to create the Elasticsearch Metadata file.
- Create a new Metadata, and select the "elasticsearch" technology. Click on Next, choose a name, and click on Finish.
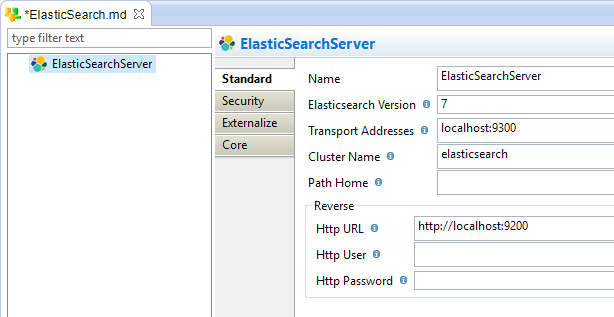
- In the metadata file, select the Server Node and fill-in the server properties.
Example:
Available properties:
| Property | Description |
| Name | Elastic Search Server name (you can give any name, it is a label for the metadata). |
| Elasticsearch Version |
Elasticsearch server version, which will be used to know which API to use. This is mandatory for the connector to work properly. |
| Transport Addresses | Comma separated list of addresses that will be used for data operations with the java API, using the following format: <hostname>:<port> |
| Cluster Name | Elasticsearch cluster name |
| Path Home |
Elasticsearch installation path on the server. You can use "." to tell the Elasticsearch driver to use the current installation. This is used for clusters secured with searchguard. |
| Http URL | HTTP URL that will be used for reverse operations on the cluster. |
| Http User | HTTP user which will be used when performing reverse operations on the cluster. |
| Http Password | HTTP password which will be used when performing reverse operations on the cluster. |
Creating and reversing indexes
The server node being configured, we can now start reversing indexes.
- Right click on the server node and choose New > Index
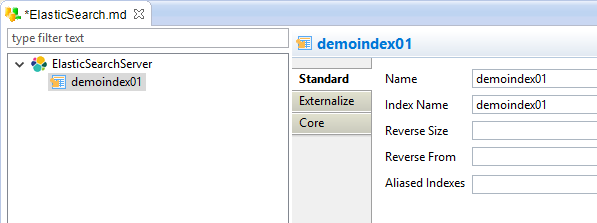
- Fill-in the index properties
Example:
Available properties:
| Property | Description |
| Name | Logical Stambia name for the Index (you can give any name, it is a label for the metadata) |
| Index Name |
Elastic Search physical name of the index. This is the name that will be used during data and reverse operations. Note that you can also enter an Elasticsearch Index Alias here instead of a real Index name. |
| Reverse Size |
Number of documents retrieved to analyze the structures. As all the documents do not necessarily have the same structure, this permit to analyze multiple documents to retrieve all the possible elements. |
| Reverse from |
The offset from which the reverse will fetch the documents. E.g. If set to 20 the analysis will start on the 20th document. |
| Aliased Indexes |
The list of indexes the Alias is pointing to, when the specified 'Index Name' is an Alias. It is filled automatically at reverse. |
The connector supports both using the real name of an Index, or an Alias Name pointing to this index.
- When reversing an Index using an Alias as Index Name, make sure that the Alias is existing in the Elasticsearch server.
- After the reverse, you'll notice that the 'Aliased Indexes' property will be filled automatically with all the Indexes the alias is pointing to.
Reversing all the document types of an Index
If the Index Name property matches an existing index or alias on the server, you can right click on it and select Actions > Reverse All to reverse all the document types of the index.
As the reverse is done through parsing the document structures, one document, at least, must exist on the server for being able to reverse its type.
The Reverse All action can also be used for updating the already existing Metadata if you already reversed it.
In this case, note that if you have multiple document metadata with the same Document Type Name, only the first will be updated.
From Elasticsearch 7.x servers and higher, document types are deprecated and only one is allowed per index.
In Stambia, starting from Elasticsearch 7.x, document type is therefore not taken into account for reverse operations, and replaced with "_doc" instead.
Reversing a single document type
If you don't want to reverse all the document types contained in an index, you can reverse manually each required type.
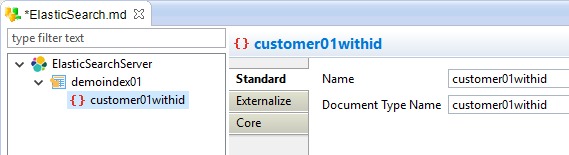
Create first the Type by right clicking on the Index node and choosing "New > Type".
Then, specify its Name and Document Type Name.
Example:
Available Properties:
| Property | Description |
| Name | Logical Stambia name for the Type (you can give any name, it is a label for the metadata) |
| Document Type Name |
Elasticsearch physical name of the document type. This is the name that will be used for data and reverse operations. |
Finally, right click on it and choose Actions > Reverse
As for the Reverse All action of the Index, one document, at least, must exist on the server for this type to be able to reverse its structure.
Similarly, the reverse action updates the Metadata if it already exists.
From Elasticsearch 7.x servers and higher, document types are deprecated and only one is allowed per index.
In Stambia, starting from Elasticsearch 7.x, document type is therefore not taken into account for reverse operations, and replaced with "_doc" instead.
Defining document types manually
Alternatively, you can define the document type manually if it does not exist yet on the server.
Elasticsearch documents are structured using JSON format.
To define manually the structure of a document type:
- Create the type with Right click > New > Type.
- Specify its Name and Document Type Name.
- Define the structure with right click on the type and new > [Object | Value | Array]
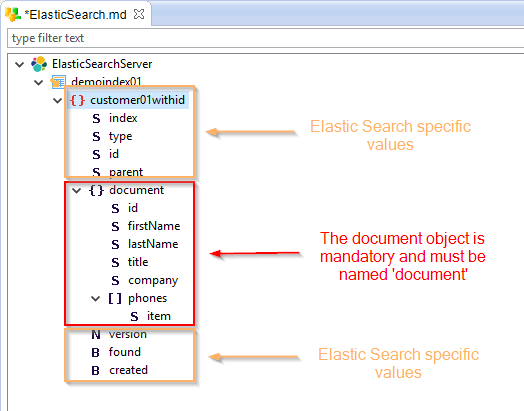
Elastic Search has specific values such as version, creation date, id, at the root of the document type node.
Moreover, all the values of your document must be on a child JSON object named "document", which is mandatory.
Standard Elastic Search document structure:
Creating and reversing Search queries
Elasticsearch queries can be configured and reversed easily in the Metadata.
- Right click on the server node and choose New > Search
- Specify the search properties
- Finally, right click on the search node and choose Actions > reverse. This will execute the query and parse the response to get the structure returned.
Example:
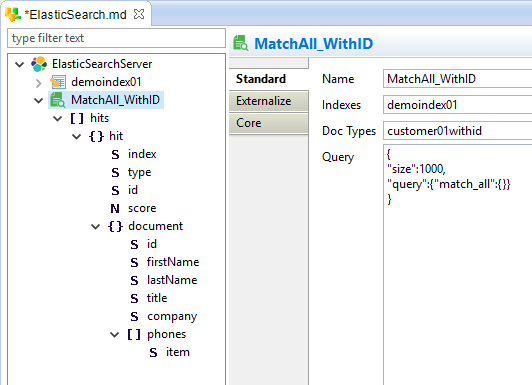
Available Properties:
| Property | Description |
| Name | Label for the search query. |
| Indexes | Comma separated list of Indexes on which the query will be executed |
| Doc types | Comma separated list of document types on which the query will be executed |
| Query |
Elasticsearch query to execute, with the JSON format. Refer to the Elasticsearch documentation for further information on how to design it. |
Parametrized queries
The values of Search queries can be parametrized with the use of parameters, which allows to dynamically change the query at execution.
When you want to do that, simply:
- Create a 'Value' on the search query with
right click > new > Value - Fill-in its properties
- Use it in the query to replace a manually set value
Example:
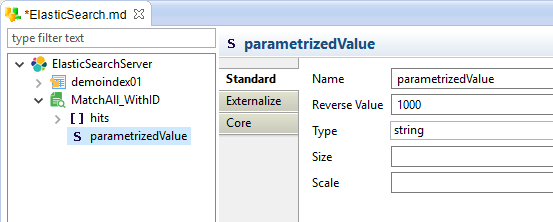
Available Properties:
| Property | Description |
| Name | Label for the parametrized value, which will next be used in the query |
| Reverse Value | Default value that should be used when reversing the query |
| Type | JSON Type (string, boolean, number) |
| Size | Size used for the target staging column when using this value as source in a mapping. |
| Scale | Number of decimals for the target staging column when using this value as source in a mapping. |
Example of usage in a search query:
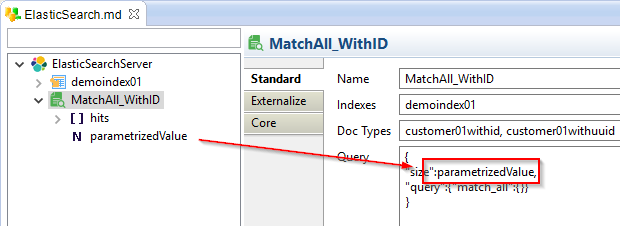
Important: The parametrized values only work to replace values, not keys.
Data Integration in Mappings
The Metadata is now configured, reversed, and ready to be used in Mappings.
We advise to follow the examples presented below to understand all the concepts and make your first Mappings.
You can moreover optionally download the demonstration project from this page, in which you can find the samples we are showing here.
Operations on Indexes and Documents
Document types defined in indexes can be used as targets in mappings to create, read, update or delete documents with the Elasticsearch templates.
Here is quick overview of a usual Elasticsearch Mapping:
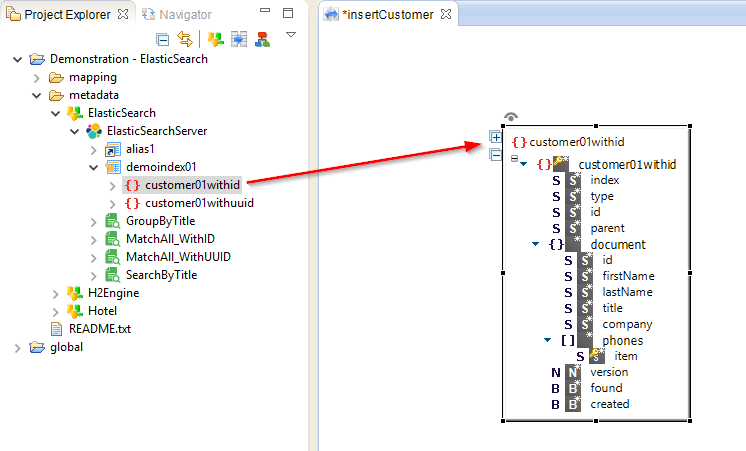
To perform an operation on a document type in a mapping, simply drag and drop it from the metadata, like a usual datastore or JSON Object.
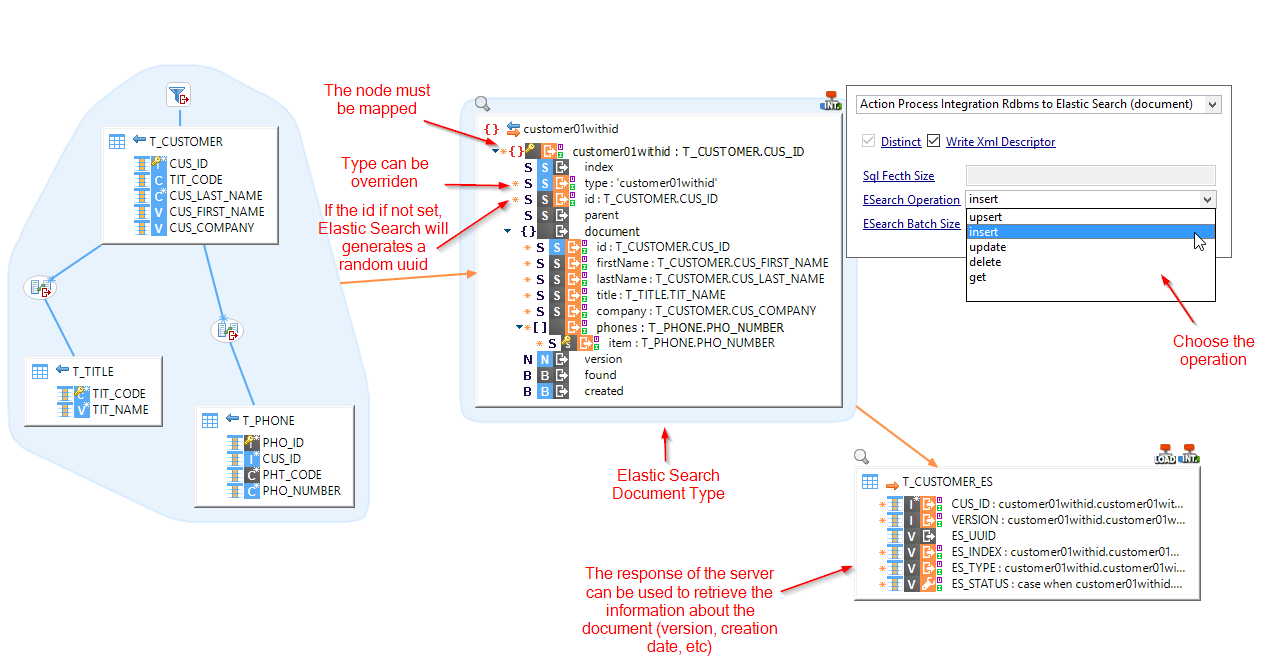
Then, map the root node (repetition key) from a source database, and select the operation to perform on the template:
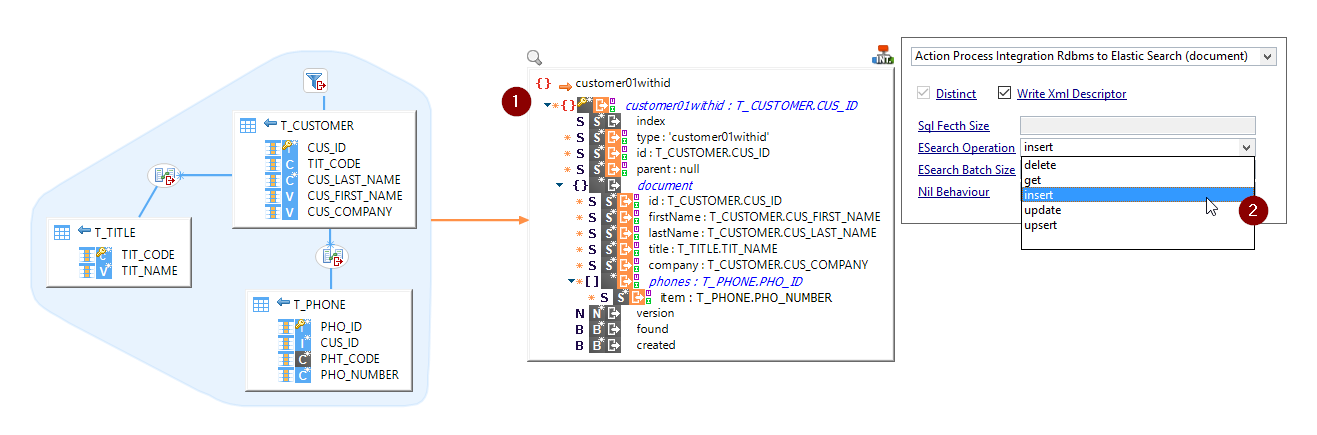
The document fields are mapped from source data as usual
Specifying the repetition key is mandatory as it will impact on the number of times Elasticsearch will be invoked.
To specify the repetition key, map the root node of the document type (customer01withid in the previous screenshot) from a source RDBMS. Then, for each row returned by the source on this key, Elastic Search will be called.
If you want to call it once, you can use a temporary one line/one column table for instance, or filter the source.
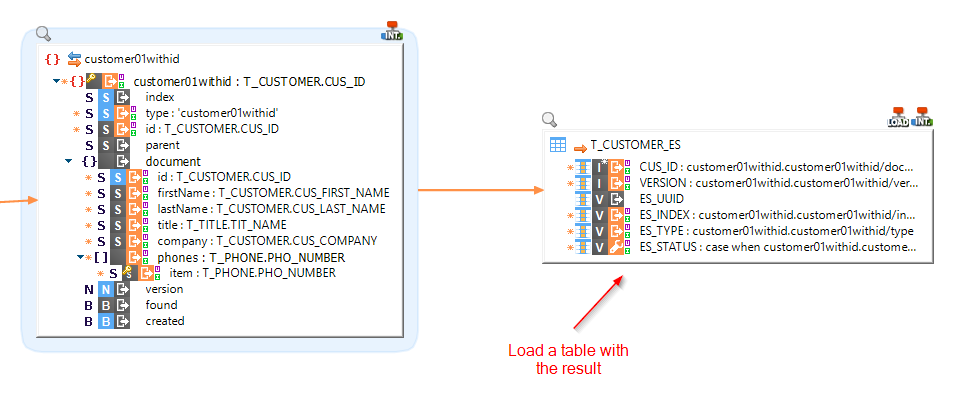
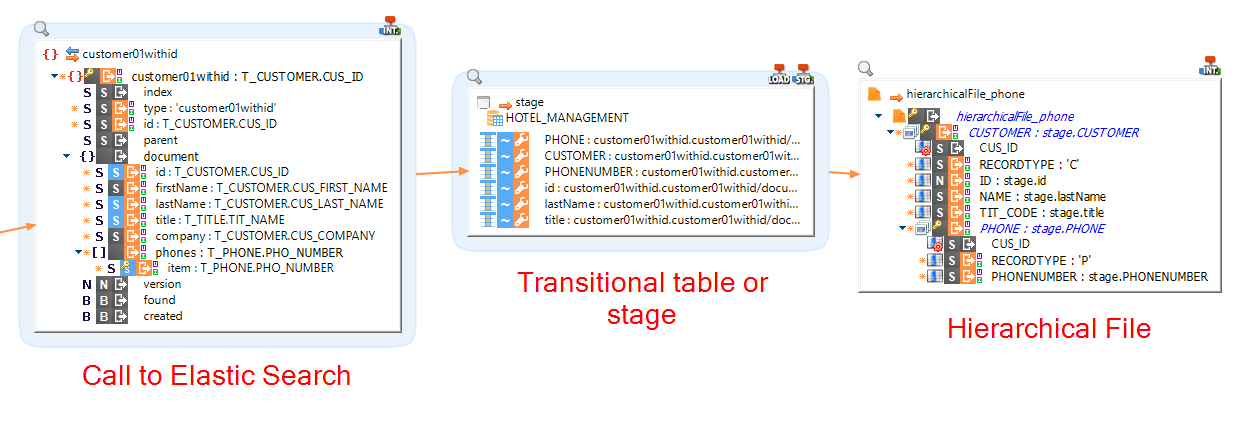
Using the result of the invocation
You can easily retrieve and use the result of the Elasticsearch operation by mapping the fields into a target table:
Note that actually, to load the result into a file, you'll have to go through a table before (with a stage or a temporary table for instance).
You cannot directly map the fields into a target file, as shown in the example below.
Miscellaneous / Specificities
There are some specificities/ tips to have in mind while making operations on Elasticsearch, which are listed below:
- The root Document Type node must be mapped on the mapping (as explained earlier).
- Except for insert operations, where Elasticsearch will fill it automatically with a uuid if not set, the 'id' node which is on the first level must be mapped. It will be used by Elasticsearch as key for update and delete operations.
- The index or type can be overridden on the mapping with the dedicated fields which are on the first level. It offers the possibility to set dynamically which index or type to use during the execution of the mapping
Utilization of queries
The procedure to Elasticsearch queries and retrieve the results in a Mapping is the same as for Document types.
As for them, simply drag and drop the query from the Metadata into the Mapping, and map the root node from a source RDBMS:
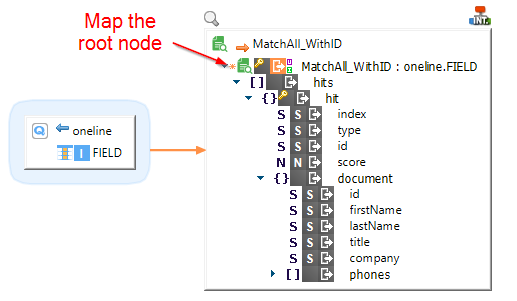
Mapping the root node is mandatory in this case too: the query will be executed for each value in the source data.
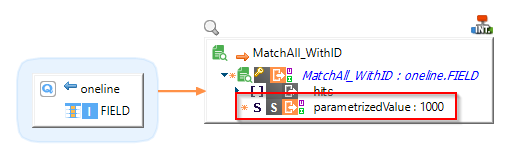
If you created parametrized values for your query, you can also map it from source or set a value in the Mapping:
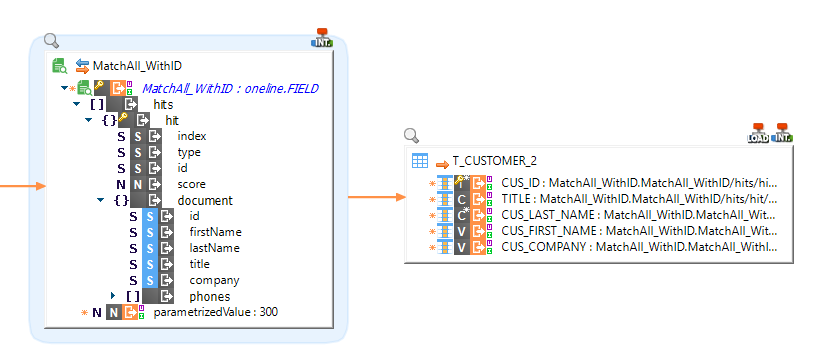
Using the result of the invocation
To use the result of the invocation, map the fields into a target table:
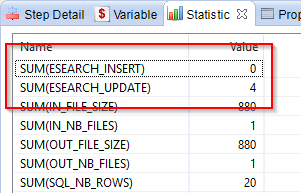
Monitoring executions
Stambia's Elasticsearch connector features several statistics that are published after the execution of the Mappings.
The following ones are available, and published depending on the operation performed on Elasticsearch:
- ESEARCH_INSERT
- ESEARCH_GET
- ESEARCH_UPDATE
- ESEARCH_DELETE
- ESEARCH_HIT
Example:
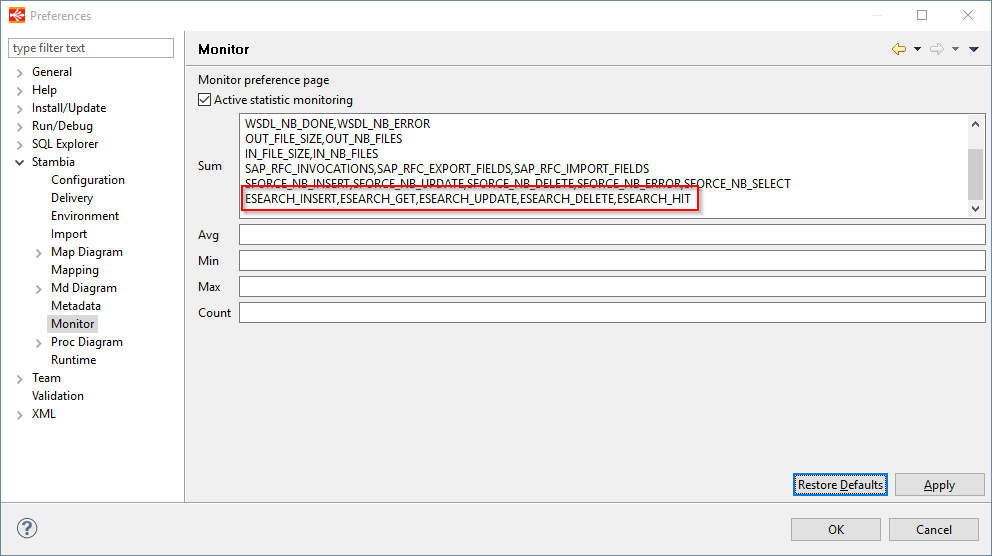
If they do not appear at execution, make sure they are present in the preferences:
Window Preferences > Stambia > Monitor