

Hive is a data warehouse software used to manage, query and structure data stored across different storage systems such as HDFS.
This article explains the basics to start working with Hive in Stambia.
Prerequisites:You must install the Hadoop connector to be able to work with Hive.
Please refer to the following article that will guide you to accomplish this.
Metadata
The first step, when you want to work with Hive in Stambia DI, consists of creating and configuring the Hive Metadata.
Here is a summary of the main steps to follow:
- Creation of the Hive Metadata
- (Optional) Configuration of the Kerberos security
- Configuration of the server JDBC properties
- Reverse of the schemas and tables
- Configuration of HDFS
Here is an example of a common Metadata Configuration:
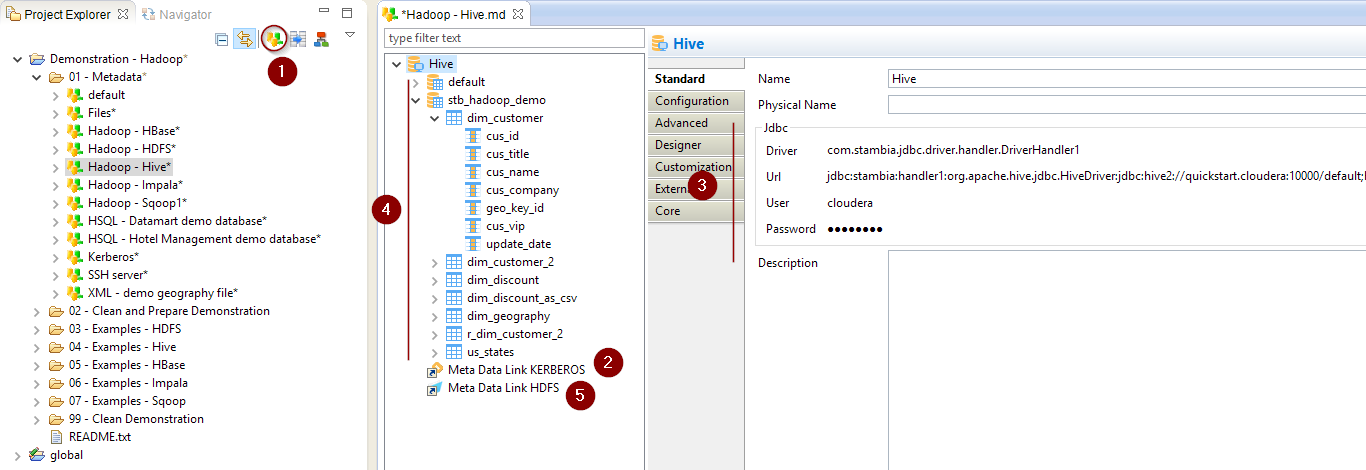
Metadata creation
Create first the Hive Metadata, as usual, by selecting the technology in the Metadata Creation Wizard:
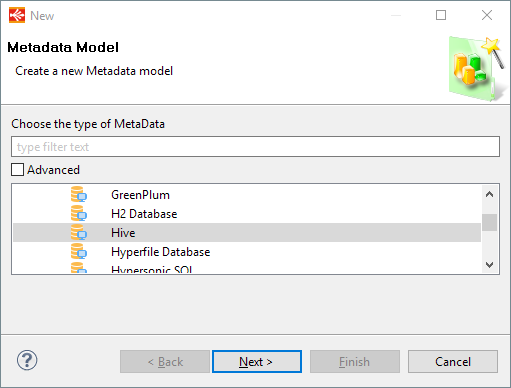
Click next, choose a name and click on finish.
Configuration of the Kerberos security
When working with Kerberos secured Hadoop clusters, connections will be protected, and you'll therefore need to specify in Stambia the credentials and necessary information to perform the Kerberos connection.
If your cluster is secured with Kerberos, close the server Wizard popup (if it is displayed), and follow the steps below before trying to connect and reverse Hive objects.
Otherwise you can go to the next section.
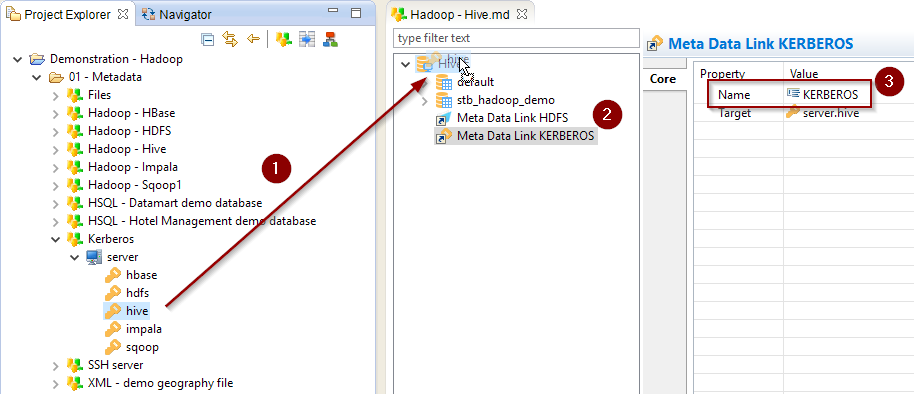
- Create a new Kerberos Metadata (or use an existing one)
- Define inside the Kerberos Principal to use for Hive
- Drag and drop it in the Hive Metadata
- Rename the Metadata Link to 'KERBEROS'
Refer to this dedicated article for further information about the Kerberos Metadata configuration
Configuration of the server properties
You are now ready to configure the JDBC properties that will be used to connect to Hive.
We're going to use the Server Wizard to configure everything.
If the Server Wizard popup is not displayed (if you closed it for configuring Kerberos, or any other reason), you can open it again with a right click > Actions > Launch Server Wizard on the server node.
Define the JDBC properties to connect to Hive and click then on Connect when it is done.
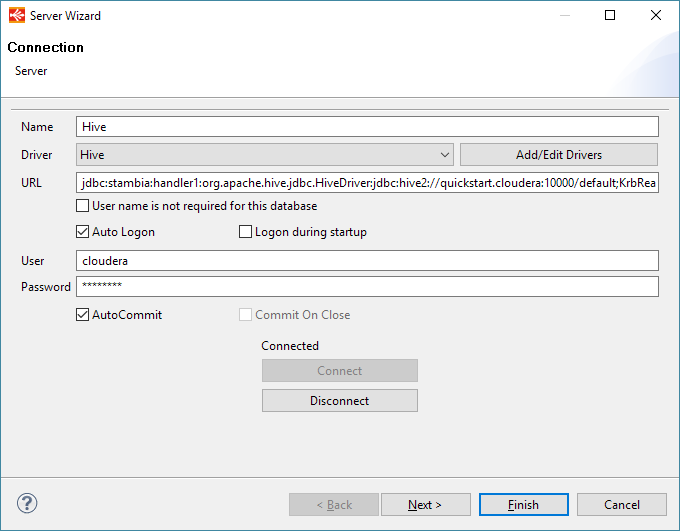
Specifying a User / Password is not required when using Kerberos
About the JDBC URL
Defining the correct JDBC URL and parameters might be delicate as it depends a lot on the Hive server and network configuration, if Kerberos is used, what Hadoop distribution is used, etc.
We'll so take a little time here to give advice and examples of URLs with explanations about its structure.
First, the Hive JDBC URL must follow the given syntax:
jdbc:stambia:handler1:<Hive JDBC Class>:<JDBC URL>
The first part is a little particular and is present because we're using a custom Stambia handler which helps us to handle the Kerberos security seamlessly. It is mandatory.
The 'Hive JDBC Class' will be the following in most cases, if you are using the standard Hive JDBC driver:
jdbc:stambia:handler1:org.apache.hive.jdbc.HiveDriver:<JDBC_URL>
You should have so to configure only the <JDBC_URL> part.
Example of URL to connect to Hive server
jdbc:stambia:handler1:org.apache.hive.jdbc.HiveDriver:jdbc:hive2://quickstart.cloudera:10000/default
Example of URL to connect to hive server secured with Kerberos
jdbc:stambia:handler1:org.apache.hive.jdbc.HiveDriver:jdbc:hive2://quickstart.cloudera:10000/default;principal=hive/quickstart.cloudera@CLOUDERA
Below are some JDBC URL properties that are usually required when using Kerberos:
| Property | Mandatory | Description | Example |
| principal | Yes |
Kerberos principal to connect with. |
principal=hive/quickstart.cloudera@CLOUDERA |
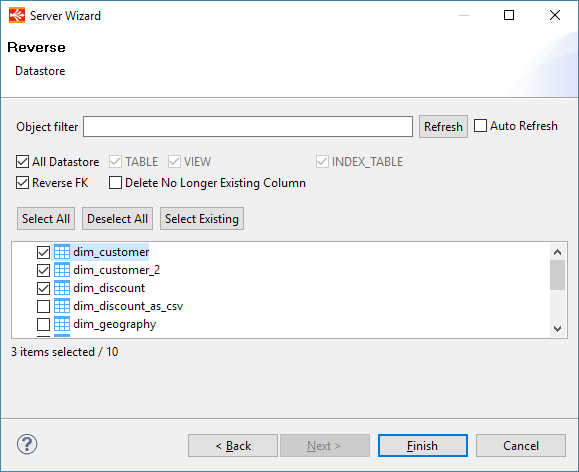
Reversing schemas and tables
Once the connection properties are set, Kerberos optionally configured, you can click on connect and reverse your schemas and tables, as usual.
Simply follow the wizard as for any other traditional database:
About HDFS
Most of the Hive Templates are using HDFS operations to optimize the treatments and use the native loaders.
The Hive Metadata therefore requires an HDFS connection to create temporary files while processing.
- Create an HDFS Metadata or use an existing one
- Define in this Metadata the temporary HDFS folder where those operations should be performed (Hive must be able to access it).
- Drag and drop the HDFS Folder Metadata in the Hive Metadata
- Rename the Metadata Link to HDFS

Creating your first Mappings
Your Metadata being ready and your tables reversed, you can now start creating your first Mappings.
The Hive technology in Stambia is not different than any other database you could usually use.
Drag and drop your sources and targets, map the columns as usual, and configure the templates accordingly to your requirements.
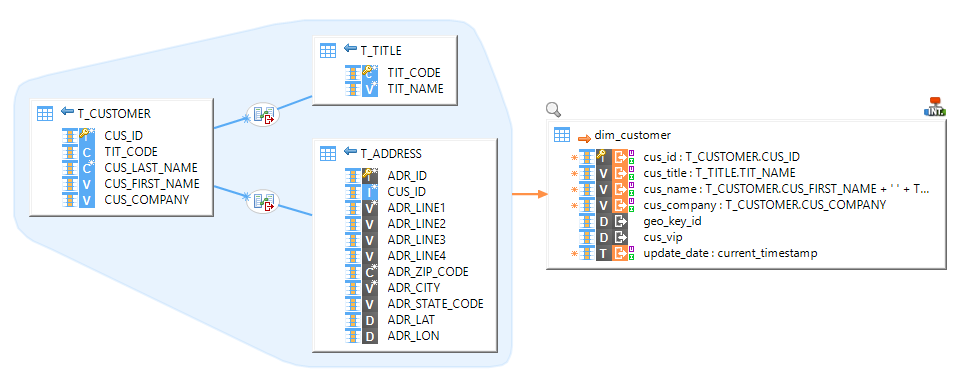
Example of Mapping loading data from HSQL into Hive:
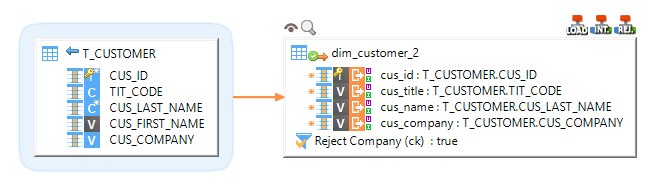
Example of Mapping loading data from HSQL to Hive with rejects enabled:
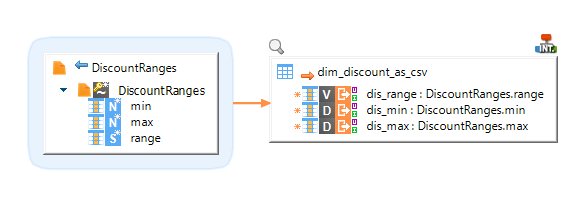
Example of Mapping loading a delimited file into Hive:
Example of Mapping loading data from Hive to HSQL, using a filter and performing joins:

Note: For further information, please consult the template's Process and parameters description.
Demonstration Project
The Hadoop demonstration project that you can find on the download page contains Hive examples.
Do not hesitate to have a look at this project to find samples and examples.