Objectives of the tutorial
The objective of this tutorial is to get to know the functionalities of Stambia regarding handling, reading and writing XML files.
We will study the following points:
- Creating and reversing XML metadata
- Creating Mappings with XML files as a source
- Creating Mappings that write XML files
The following technologies will be used:
- Databases
- XSD and XML files
Prerequisites
This tutorial has been designed to be done after the Tutorial: fundamentals of Stambia. The notions learned in this first tutorial are supposed to be known and the environment we will use is the same. Please pay attention to the following points:
- The three Metadata files of the Tutorial: fundamentals of Stambia must have been properly reversed and be grouped in the project Tutorial – Common Metadata
- The templates must have been imported into the global project
Environment initialization
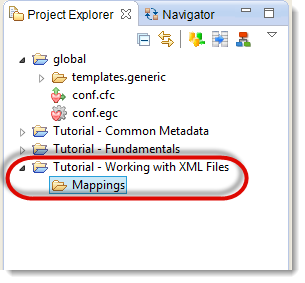
Create the Tutorial - Working with XML Files Project, which will serve to store all the elements of this tutorial.
Inside this project, create a Mappings folder which will serve to store the various Mappings that you will be creating.
Finally, start the demonstration environment:
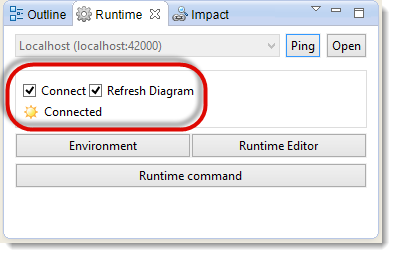
- Go to the Runtime view
- Click on Environment
- Click on Start local Runtime and Start demo Database
- Click on OK to close this window
- In the Runtime view, check the box Connect and verify that Refresh Diagram is also checked
Tip:
If you stop the demo environment or if you stop your machine, do not forget to restart the demo environment before you resume work on the tutorial at the place where you stopped.
Important:
Be careful to stop properly the demo databases when closing the environment, with the use of the Stop demo Databases button.
Closing them violently may lead to the instability of the demo databases.
If you are facing instabilities with it, if the connection is running indefinitely, or if you dropped or remove by mistake tables or data, you can at any time re-initialize the demo environment.
For this close the Designer and Runtime, and then delete the <Designer Installation>/stambiaRuntime/samples folder.
At the next Designer restart, it will be re-created with default settings and data.
Loading a table from an XML file
Reversing the geography file
In Stambia, the same principles guide the handling of objects, whether XML files, flat files or databases. Metadata are used to declare their structure, then the details of their structure are fetched by a Reverse engineering.
Start by creating the Metadata file. This creation will be based on an XSD file (XML Schema Definition) which contains the definition of the XML file’s structure:
- Right-click on the Tutorial – Common Metadata Project
- Select New then
 Metadata
 - In the list of technologies, select Xml Schema then click on Next
- Enter the name of the Metadata file: Geography
- Click on Finish
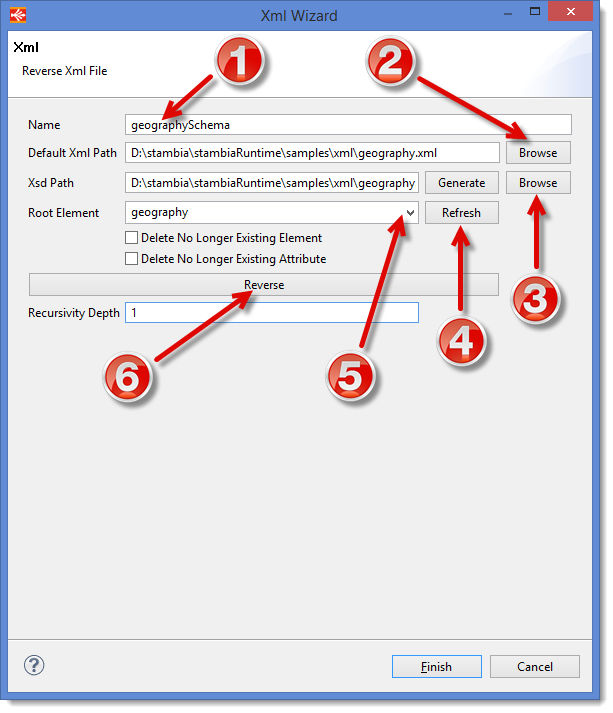
The XML files Reverse engineering assistant automatically opens:
- In the Name field, enter the value: geographySchema
- Click on the Browse button which can be found next to Default Xml Path, then browse till the directory where Stambia was installed. Continue to navigate until the directory
stambiaRuntime/samples/xml - Select the file
geography.xml - Then click on the Browse button which can be found next to Xsd Path, and browse till the directory where Stambia was installed. Continue to navigate until the directory
stambiaRuntime/samples/xml - Select the file
geography.xsd - Click on Refresh
- Select the Root Element
geography - You can now click on Reverse then on Finish
Warning: The Generate button allows you to generate an XSD file from an XML file. This functionality is useful if your XML file has no pertaining XSD file, but, if you click on this button when your XSD file is already defined, it will be overwritten. So be careful not to click on this Generate button during this tutorial.
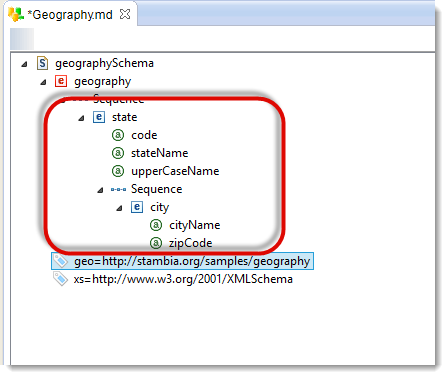
Stambia then does the Reverse engineering based on the structure defined in the geography.xsd file. This structure will be represented as a tree in the Metadata file.
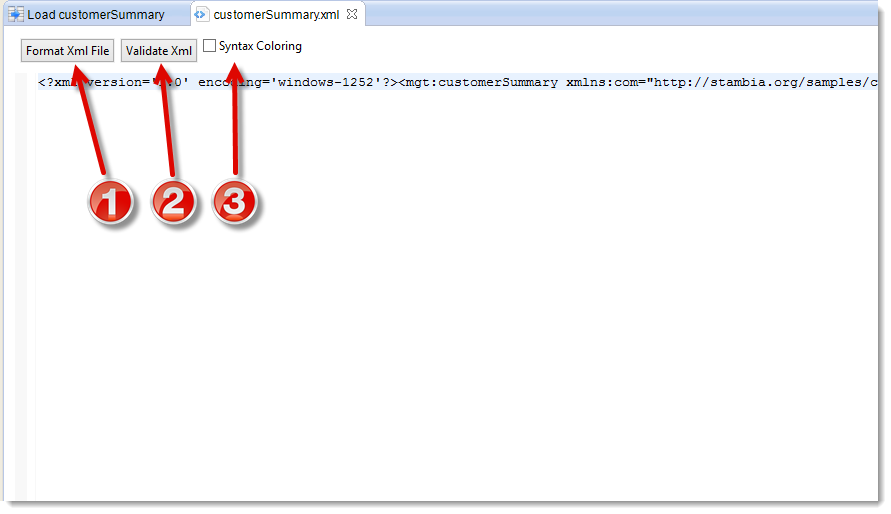
Save this Metadata file, then consult the content of the XML file:
- Right-click on the geography element
- Select Actions then Open Xml Editor
- Click on Format Xml File in order to automatically format the content
- Finally, check the Syntax Coloring option to use the syntax coloring specific to XML files
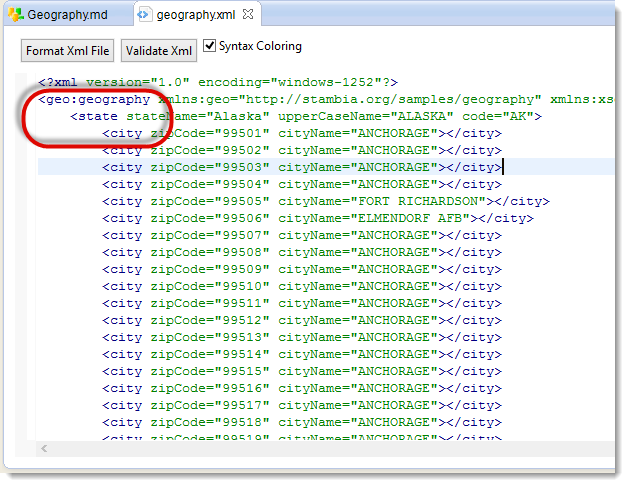
You can now see that the content of the XML file is similar to the hierarchy reversed by Stambia. The geography element contains the list of all the states (state elements), which contain the list of each of their cities (city elements).
Loading the DIM_GEOGRAPHY table
Creating the Mapping
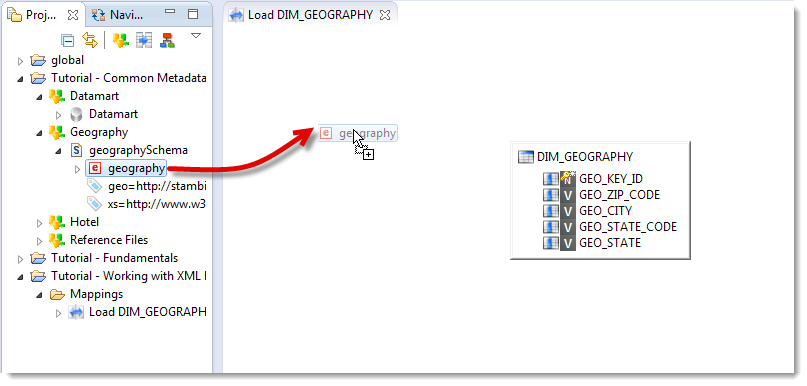
Create a new Mapping: Load DIM_GEOGRAPHY in the Mappings folder you created earlier. Add the target datastore DIM_GEOGRAPHY.
Reminder: The DIM_GEOGRAPHY datastore was reversed in the Tutorial: fundamentals of Stambia. It can be found in the Tutorial – Common Metadata Project and in the Datamart Metadata file.
Now you can add the root element of the XML file to be used as a source for the Mapping:
- Drag and Drop the geography element on the Mapping background
You can notice that by default the nodes of the source datastore are collapsed. You can expand the state node in order to see the other elements.
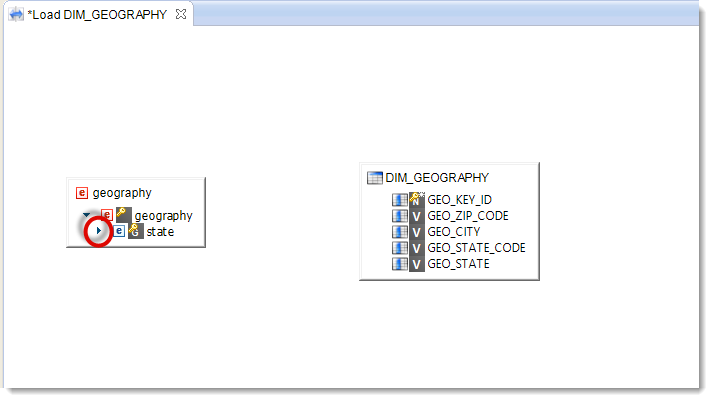
You can also expand or collapse all the nodes:
- Select the Datastore
- Click on the
 or
or  icons that appear to the left of the Datastore.
![]()
Create the following transformation rules:
| Target column | Business Rule | Characteristics | ||
|---|---|---|---|---|
| GEO_KEY_ID | next value for HOTEL_DATAMART.SEQ_GEO_KEY_ID |
Target | I | |
| GEO_ZIP_CODE | geography.geography/state/city/@zipCode |
Source | I/U | Functional key |
| GEO_CITY | geography.geography/state/city/@cityName |
Source | I/U | |
| GEO_STATE_CODE | geography.geography/state/@code |
Source | I/U | |
| GEO_STATE | geography.geography/state/@stateName |
Source | I/U | |
You can notice that you don’t need to create a join because Stambia uses the parent-child relationship of the XML structure to naturally link the elements.
Warning: The business rule that loads the GEO_KEY_ID column must only be executed for insertions. Be careful to deactivate it for Updates.
You can now save and execute the Mapping.
Analyzing the result of the execution
Go to the Statistic view to check the statistics of the execution:
| Name | Value |
|---|---|
SUM(SQL_NB_ROWS) |
166 823 |
SUM(SQL_STAT_INSERT) |
0 |
SUM(SQL_STAT_UPDATE) |
41 693 |
SUM(XML_NB_ATTRIBUTES) |
83 536 |
SUM(XML_NB_ELEMENTS) |
41 744 |
Information: You can notice that new statistics have appeared: XML_NB_ATTRIBUTES indicates the number of XML attributes that were read, XML_NB_ELEMENTS indicates the number of XML elements that were read during the Session execution.
Warning: if the Tutorial: fundamentals of Stambia was not executed previously, the 41 693 Updates will be replaced by 41 693 Inserts.
Loading several tables from an XML file
Reversing the marketing campaigns file
Create a Metadata file with the following properties:
| Property | Value |
|---|---|
| Location | Tutorial – Common Metadata |
| Technology | Xml Schema |
| Name | Hotel XML Files |
| Schema | Hotel Management |
| Xsd Path | <Installation Folder>/stambiaRuntime/samples/xml/hotelManagement.xsd |
| Root Element | marketingCampaign |

Information: You can notice that the XSD file contains three root elements. Stambia is able to manage XSD files that contain several root elements. Also, the root node Hotel Management will be used later on in this tutorial.
Since the hotelManagement.xsd file will be used for several root elements, we will declare the XML file at the root node level instead of in the schema itself:
- Click on the marketingCampaign node
- Open the Properties view
- In the Xml Path field, enter the path to the XML file called
<Setup folder>/stambiaRuntime/samples/xml/marketingCampaign.xml.
Loading several tables from the marketing campaigns file
First load of the T_CUSTOMER table
Create a Mapping with the following properties:
| Property | Value |
|---|---|
| Parent folder | Tutorial – Working with XML Files/Mappings |
| Mapping name | Load marketingCampaigns |
| Target Datastores | T_TITLE, T_CUSTOMER, T_PHONE_TYPE, T_PHONE, T_EMAIL |
| Source Datastore | marketingCampaigns |
Start by creating the transformation business rules for T_CUSTOMER using the customer element found in phoningCampaign:
| Target column | Business rule | Characteristics | ||
|---|---|---|---|---|
| CUS_ID | marketingCampaign.marketingCampaign/phoningCampaign/customer/@customerId |
Source | I/U | Functional key |
| TIT_CODE | marketingCampaign.marketingCampaign/phoningCampaign/customer/@titleCode |
Source | I/U | |
| CUS_LAST_NAME | marketingCampaign.marketingCampaign/phoningCampaign/customer/@lastName |
Source | I/U | |
| CUS_FIRST_NAME | marketingCampaign.marketingCampaign/phoningCampaign/customer/@firstName |
Source | I/U | |
| CUS_COMPANY | marketingCampaign.marketingCampaign/phoningCampaign/customer/@company |
Source | I/U | |
| CUS_BIRTH_DATE | marketingCampaign.marketingCampaign/phoningCampaign/customer/@birthDate |
Source | I/U | |
Adding a Stage to reuse the loading business rules
In order to make a union between the customer data from the phoning campaigns and the customer data from the mailing campaigns, create a Stage between marketingCampaign and T_CUSTOMER by dragging-and-dropping the HOTEL_MANAGEMENT schema onto the link between these two Datastores.
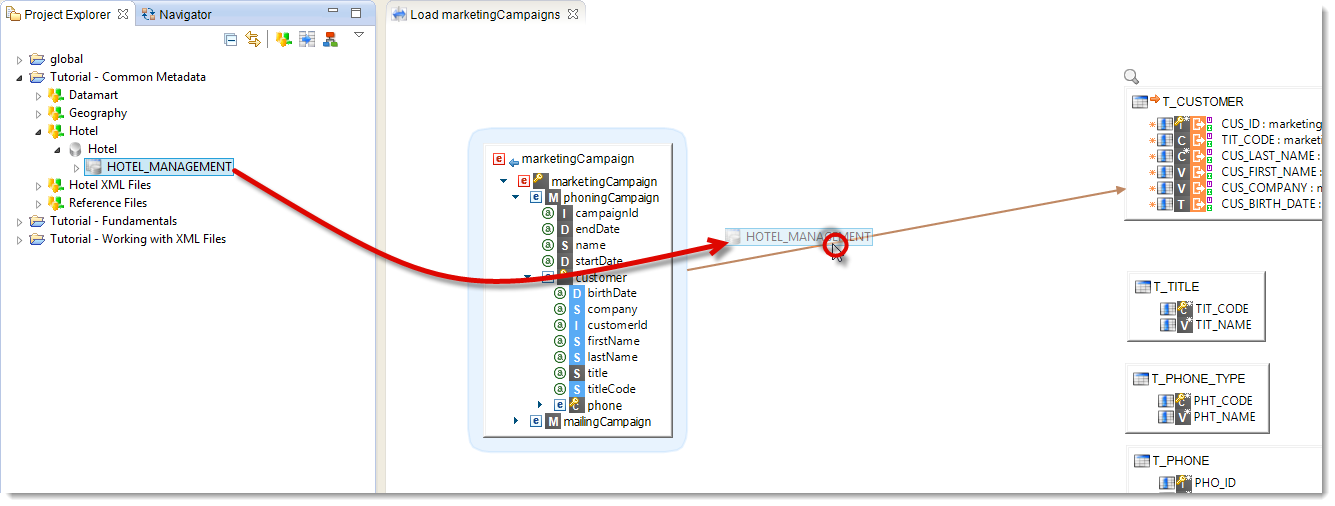
A wizard opens automatically. Verify that Initialize from Target is selected, then click Ok.
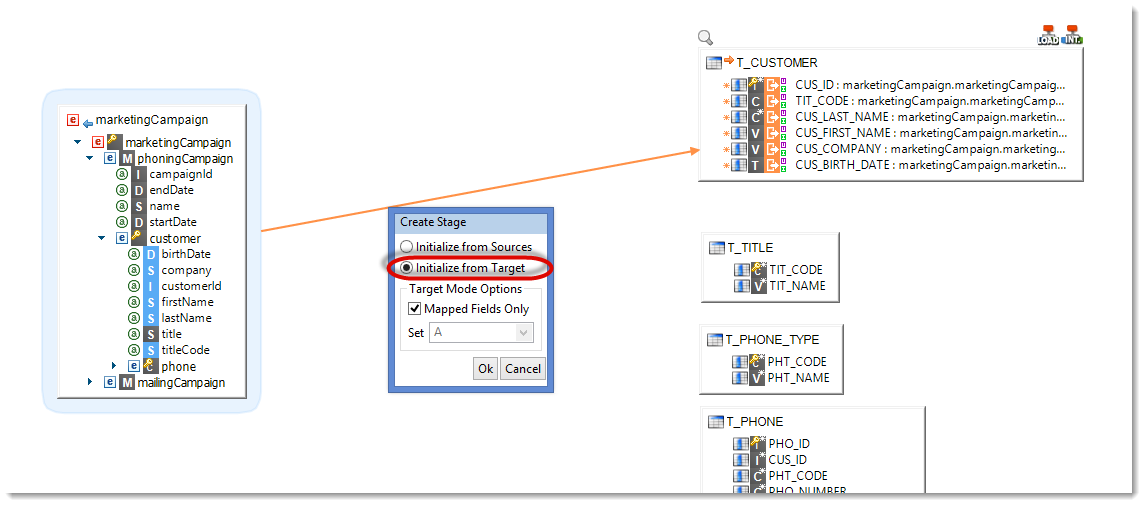
This creates a new Stage between the two Datastores that reuses the target’s columns and transfers the target’s business rules to the Stage. This is an easy way to initialize a Stage in an existing Mapping.
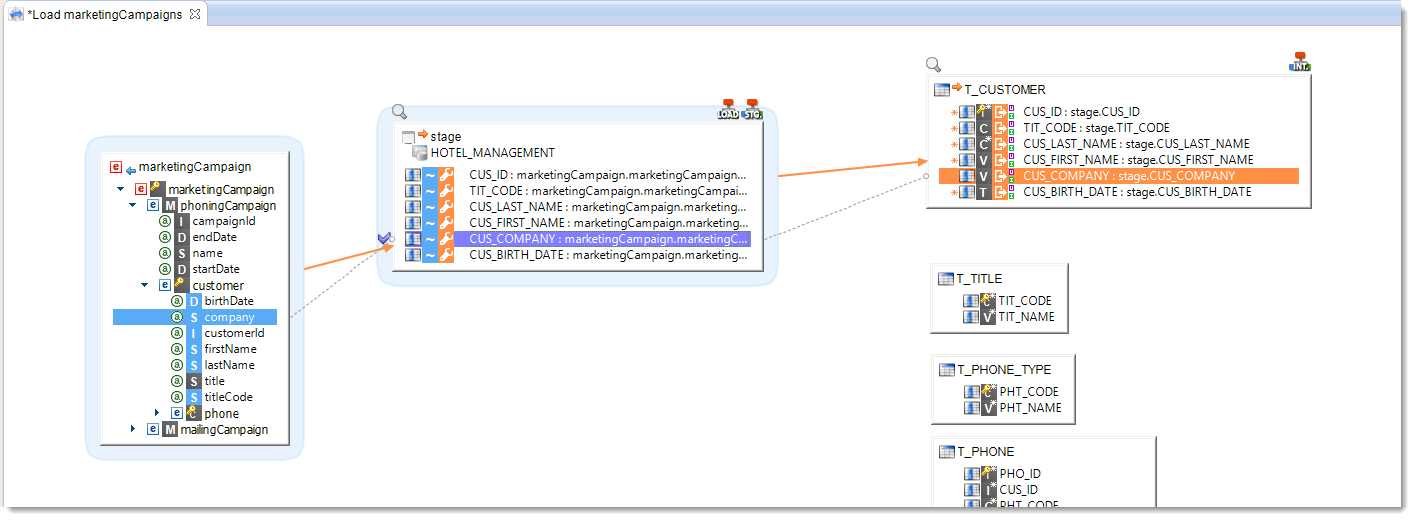
Give a name to this Stage:
- Click on the newly created Stage
- In the Properties view, enter customers in the Alias field
Add a new set to this Stage. Rename the former set phoneCampaign and the new set mailCampaign.
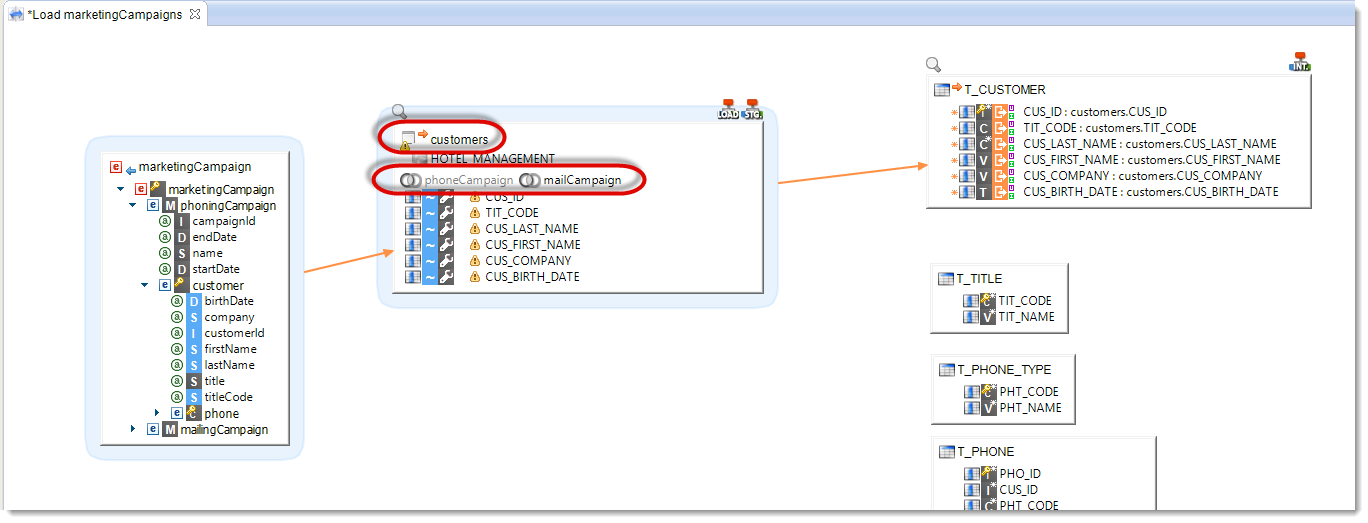
Here is the business rule to unite the data:
[phoneCampaign] union [mailCampaign]
Tip: If you have difficulties creating a new set, you can refer to the chapter Mutualizing transformations in Tutorial: Stambia Fundamentals.
Fill in the transformation business rules for the mailCampaign set using the customer element found in mailingCampaign:
| Target column | Business rules |
|---|---|
| CUS_ID | marketingCampaign.marketingCampaign/mailingCampaign/customer/@customerId |
| TIT_CODE | marketingCampaign.marketingCampaign/mailingCampaign/customer/@titleCode |
| CUS_LAST_NAME | marketingCampaign.marketingCampaign/mailingCampaign/customer/@lastName |
| CUS_FIRST_NAME | marketingCampaign.marketingCampaign/mailingCampaign/customer/@firstName |
| CUS_COMPANY | marketingCampaign.marketingCampaign/mailingCampaign/customer/@company |
| CUS_BIRTH_DATE | marketingCampaign.marketingCampaign/mailingCampaign/customer/@birthDate |
Loading the T_TITLE table and defining the integration sequence
In order to reuse the same Stage to load T_TITLE you need to add a new field to it:
- Select the customers Stage
- Click on the
 button that appears to the left of the Stage
 - Select this new field
- Enter TIT_NAME in the Alias field in the Properties view
Load this field TIT_NAME with the following business rules:
| Set | Business rule |
|---|---|
| phoneCampaign | marketingCampaign.marketingCampaign/phoningCampaign/customer/@title |
| mailCampaign | marketingCampaign.marketingCampaign/mailingCampaign/customer/@title |
Create the T_TITLE transformation business rules:
| Target column | Business rule | Characteristics | ||
|---|---|---|---|---|
| TIT_CODE | customers.TIT_CODE |
Source | I/U | Functional key |
| TIT_NAME | customers.TIT_NAME |
Source | I/U | |
In order to avoid duplicated data during the integration of T_TITLE check the Use Distinct option on the Integration Template of the T_TITLE Datastore.
T_CUSTOMERT_TITLETIT_CODET_CUSTOMERT_TITLET_TITLET_CUSTOMER- Select the T_TITLE Datastore
- In the Properties view select the Advanced tab
- Enter 1 in the Integration Sequence field
- Select the T_CUSTOMER Datastore
- In the Properties view, select the Advanced tab
- Enter 2 in the Integration Sequence tab
By doing this, in addition to the natural dependence between the source and target Datastores materialized by the Mapping’s arrows, you have defined a functional dependence between T_TITLE and T_CUSTOMER materialized by this Integration Sequence: T_TITLE will indeed be loaded before T_CUSTOMER.
Loading the T_PHONE_TYPE table
Create the transformation business rules for T_PHONE_TYPE:
| Target column | Business rule | Characteristics | ||
|---|---|---|---|---|
| PHT_CODE | marketingCampaign.marketingCampaign/phoningCampaign/customer/phone/@phoneTypeCode |
Source | I/U | Functional key |
| PHT_NAME | marketingCampaign.marketingCampaign/phoningCampaign/customer/phone/@phoneType |
Source | I/U | |
Here again, the same phoneType may be used for several phone numbers. So the data must be deduplicated: check the Use Distinct parameter in the Integration Template of T_PHONE_TYPE.
Loading the T_PHONE table
Create the transformation business rules for T_PHONE:
| Target column | Business rule | Characteristics | ||
|---|---|---|---|---|
| PHO_ID | marketingCampaign.marketingCampaign/phoningCampaign/customer/phone/@phoneId |
Source | I/U | Functional key |
| CUS_ID | marketingCampaign.marketingCampaign/phoningCampaign/customer/@customerId |
Source | I/U | |
| PHT_CODE | marketingCampaign.marketingCampaign/phoningCampaign/customer/phone/@phoneTypeCode |
Source | I/U | |
| PHO_NUMBER | marketingCampaign.marketingCampaign/phoningCampaign/customer/phone/@phoneNumber |
Source | I/U | |
| PHO_PHONING_ALLOWED | marketingCampaign.marketingCampaign/phoningCampaign/customer/phone/@phoningAllowed |
Source | I/U | |
Loading the T_EMAIL table
Create the transformation business rules for T_EMAIL:
| Target column | Business rule | Characteristics | ||
|---|---|---|---|---|
| EML_ID | marketingCampaign.marketingCampaign/mailingCampaign/customer/email/@emailId |
Source | I/U | Functional key |
| CUS_ID | marketingCampaign.marketingCampaign/mailingCampaign/customer/@customerId |
Source | I/U | |
| EML_ADDRESS | marketingCampaign.marketingCampaign/mailingCampaign/customer/email/@emailAddress |
Source | I/U | |
| EML_TYPE | marketingCampaign.marketingCampaign/mailingCampaign/customer/email/@emailType |
Source | I/U | |
| EML_MAILING_ALLOWED | marketingCampaign.marketingCampaign/mailingCampaign/customer/email/@mailingAllowed |
Source | I/U | |
Setting a sequence for all integrations
In order to respect the foreign keys between the various tables, specify the following Integration Sequence:
| Target Datastore | Integration sequence |
|---|---|
| T_TITLE | 1 |
| T_CUSTOMER | 2 |
| T_PHONE_TYPE | 1 |
| T_PHONE | 3 |
| T_EMAIL | 3 |
You may save and execute this Mapping.
Analyzing the result of the execution
Go to the Statistic view to check the statistics of the execution:
| Name | Value |
|---|---|
SUM(SQL_NB_ROWS) |
1 189 |
SUM(SQL_STAT_INSERT) |
0 |
SUM(SQL_STAT_UPDATE) |
283 |
SUM(XML_NB_ATTRIBUTES) |
1 837 |
SUM(XML_NB_ELEMENTS) |
328 |
Loading a simple XML structure
Reversing the simplified customer file
The hotel’s XSD file contains several root elements. You have already reversed the marketingCampaign element that contained a description of the marketing campaigns files. You shall now reverse the customerSummary element which is a simplified description structure of the hotel’s customers:
- Open the Metadata file Hotel XML Files
- Right-click on the Hotel Management schema
- Select Actions then Launch Schema wizard
- Click on Refresh
- In the Root Element dropdown list, select the customerSummary element
- Click on Reverse
Your Metadata file has now been enriched with a new root element and its hierarchy. Define the path to the associated XML file:
- Click on the customerSummary element
- Open the Properties view
- In the Xml Path field, enter the path to the XML file called
customerSummary.xml.
Information: You can store this file in the temporary folder of your computer, or in a folder of your desktop. For example, under Linux, you could give the following path:
/tmp/customerSummary.xml
Loading the customerSummary.xml file
Creating the Mapping
Create a Mapping with the following properties:
| Property | Value |
|---|---|
| Parent folder | Tutorial – Working with XML Files/Mappings |
| Mapping name | Load customerSummary |
| Target Datastore | customerSummary |
| Source Datastore | T_CUSTOMER, T_TITLE |
The transformation business rules are:
| Target column | Business rule | Characteristics | ||
|---|---|---|---|---|
| customerSummary | Functional key | |||
| customerSummary/customer | T_CUSTOMER.CUS_ID |
Source | I/U | Functional key |
| customerSummary/customer/@birthDate | T_CUSTOMER.CUS_BIRTH_DATE |
Source | I/U | |
| customerSummary/customer/@company | T_CUSTOMER.CUS_COMPANY |
Source | I/U | |
| customerSummary/customer/@customerId | T_CUSTOMER.CUS_ID |
Source | I/U | |
| customerSummary/customer/@firstName | T_CUSTOMER.CUS_FIRST_NAME |
Source | I/U | |
| customerSummary/customer/@lastName | T_CUSTOMER.CUS_LAST_NAME |
Source | I/U | |
| customerSummary/customer/@title | T_TITLE.TIT_NAME |
Source | I/U | |
| customerSummary/customer/@titleCode | T_CUSTOMER.TIT_CODE |
Source | I/U | |
Important: when loading XML files, functional keys indicate an expression enabling iteration on an element. For example in this Mapping, the functional key on the customer element is CUS_ID. This indicates that there will be one customer element created for each different value of CUS_ID.
The join business rules are:
| First Datastore | Second Datastore | Business rule | Characteristics | |
|---|---|---|---|---|
| T_CUSTOMER | T_TITLE | T_CUSTOMER.TIT_CODE=T_TITLE.TIT_CODE |
Source | Inner |
You can now save and execute this Mapping.
Analyzing the result of the execution
Go to the Statistic view to check the statistics of the execution:
| Name | Value |
|---|---|
SUM(OUT_NB_FILES) |
1 |
SUM(SQL_NB_ROWS) |
100 |
SUM(XML_NB_ATTRIBUTES) |
691 |
SUM(XML_NB_ELEMENTS) |
101 |
Information: The size of the output file is in bytes.
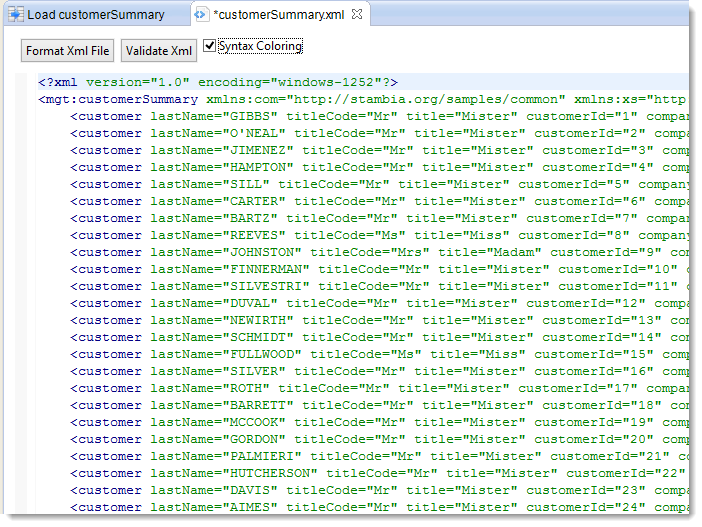
You can also see the content of the generated file:
- Come back to the Load customerSummary Mapping
- Right-click on the customerSummary Datastore
- Select Actions then Open Xml Editor
An XML editor will then open and allow you to see the content of the file:
- Click on Format Xml File in order to automatically format the content
- Click on Validate Xml to check if the XML content agrees with the structure declared in the XSD file
- Check the Syntax Coloring option to use the syntax coloring specific to XML files
Loading an XML hierarchy
Reversing the hotel’s data exchange file
The hotel’s XSD file has got a last root element still to be reversed: hotelManagement. Reverse this element in to the Hotel XML Files file.
Now define the path to the associated XML file:
- Click on the hotelManagement element
- In the Properties view, enter a path to a file:
hotelManagement.xml(for example:/tmp/hotelManagement.xml)
Loading a complete customer file
Creating the Mapping
Create a Mapping with the following properties:
| Property | Value |
|---|---|
| Parent folder | Tutorial – Working with XML Files/Mappings |
| Mapping name | Load customerDetails |
| Target Datastore | hotelManagement |
| Source Datastore | T_CUSTOMER, T_TITLE, T_PHONE, T_PHONE_TYPE, T_ADDRESS, T_EMAIL |
The transformation business rules are:
| Target column | Business rule | Characteristics | ||
|---|---|---|---|---|
| hotelManagement | Functional key | |||
| hotelManagement/customer | T_CUSTOMER.CUS_ID |
Source | I/U | Functional key |
| hotelManagement/customer/@birthDate | T_CUSTOMER.CUS_BIRTH_DATE |
Source | I/U | |
| hotelManagement/customer/@company | T_CUSTOMER.CUS_COMPANY |
Source | I/U | |
| hotelManagement/customer/@customerId | T_CUSTOMER.CUS_ID |
Source | I/U | |
| hotelManagement/customer/@firstName | T_CUSTOMER.CUS_FIRST_NAME |
Source | I/U | |
| hotelManagement/customer/@lastName | T_CUSTOMER.CUS_LAST_NAME |
Source | I/U | |
| hotelManagement/customer/@title | T_TITLE.TIT_NAME |
Source | I/U | |
| hotelManagement/customer/@titleCode | T_TITLE.TIT_CODE |
Source | I/U | |
| hotelManagement/customer/address | T_ADDRESS.ADR_ID |
Source | I/U | Functional key |
| hotelManagement/customer/address/@addressId | T_ADDRESS.ADR_ID |
Source | I/U | |
| hotelManagement/customer/address/@city | T_ADDRESS.ADR_CITY |
Source | I/U | |
| hotelManagement/customer/address/@line1 | T_ADDRESS.ADR_LINE1 |
Source | I/U | |
| hotelManagement/customer/address/@line2 | T_ADDRESS.ADR_LINE2 |
Source | I/U | |
| hotelManagement/customer/address/@line3 | T_ADDRESS.ADR_LINE3 |
Source | I/U | |
| hotelManagement/customer/address/@line4 | T_ADDRESS.ADR_LINE4 |
Source | I/U | |
| hotelManagement/customer/address/@stateCode | T_ADDRESS.ADR_STATE_CODE |
Source | I/U | |
| hotelManagement/customer/address/@zipCode | T_ADDRESS.ADR_ZIP_CODE |
Source | I/U | |
| hotelManagement/customer/phone | T_PHONE.PHO_ID |
Source | I/U | Functional key |
| hotelManagement/customer/phone/@phoneId | T_PHONE.PHO_ID |
Source | I/U | |
| hotelManagement/customer/phone/@phoneNumber | T_PHONE.PHO_NUMBER |
Source | I/U | |
| hotelManagement/customer/phone/@phoneType | T_PHONE_TYPE.PHT_NAME |
Source | I/U | |
| hotelManagement/customer/phone/@phoneTypeCode | T_PHONE_TYPE.PHT_CODE |
Source | I/U | |
| hotelManagement/customer/phone/@phoningAllowed | T_PHONE.PHO_PHONING_ALLOWED |
Source | I/U | |
| hotelManagement/customer/email | T_EMAIL.EML_ID |
Source | I/U | Functional key |
| hotelManagement/customer/email/@emailAddress | T_EMAIL.EML_ADDRESS |
Source | I/U | |
| hotelManagement/customer/email/@emailId | T_EMAIL.EML_ID |
Source | I/U | |
| hotelManagement/customer/email/@emailType | T_EMAIL.EML_TYPE |
Source | I/U | |
| hotelManagement/customer/email/@mailingAllowed | T_EMAIL.EML_MAILING_ALLOWED |
Source | I/U | |
Tip: To save time you can reuse the Mapping Load customerSummary created during the previous exercise.
* Right click on the Mapping Load customerSummary and select Copy
* Right click on the Folder Mappings and select Paste
* Enter the name of the new file: Load customerDetails.map
* Open this new Mapping
* Drag and drophotelManagementfrom the Project Explorer on the datastorecustomerSummarylocated in the Mapping. Stambia replaces the target datastore and preserves the existing business rules.
* Rename the root node: right click on the fieldcustomerSummaryand select Rename field
* You can now complete the definition of the Mapping with the new sources and business rules.
Information: loading of the bill element will be the subject of an optional exercise further on. For the moment, this element can be left empty.
The join business rules are:
| First Datastore | Second Datastore | Business rule | Characteristics | |
|---|---|---|---|---|
| T_CUSTOMER | T_TITLE | T_CUSTOMER.TIT_CODE=T_TITLE.TIT_CODE |
Source | Master table: T_CUSTOMER |
| T_CUSTOMER | T_EMAIL | T_CUSTOMER.CUS_ID=T_EMAIL.CUS_ID |
Source | Master table: T_CUSTOMER |
| T_CUSTOMER | T_ADDRESS | T_CUSTOMER.CUS_ID=T_ADDRESS.CUS_ID |
Source | Master table: T_CUSTOMER |
| T_CUSTOMER | T_PHONE | T_CUSTOMER.CUS_ID=T_PHONE.CUS_ID |
Source | Master table: T_CUSTOMER |
| T_PHONE | T_PHONE_TYPE | T_PHONE.PHT_CODE=T_PHONE_TYPE.PHT_CODE |
Source | Master table: T_PHONE |
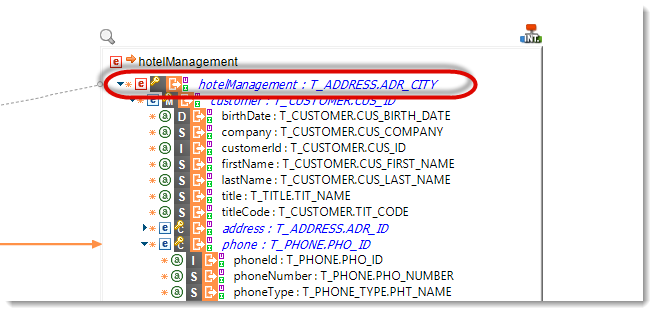
Important: Notice that each loaded element has a functional key which indicates to Stambia on which expression it must rely to determine the different occurrences of the element. For example, each different value of
T_CUSTOMER.CUS_IDwill result in a new customer element. In the same way, inside each occurrence of customer, there will be:
* one occurrence of address for eachT_ADDRESS.ADR_ID
* one occurrence of phone for eachT_PHONE.PHO_ID
* one occurrence of email for eachT_EMAIL.EML_ID.
Information: The hotelManagement element has a default functional key, but the field is not mapped here. So Stambia will not iterate for this element. We will see further on that it is possible to map this element and use it as a functional key.
You can now save and execute this Mapping.
Analyzing the result of the execution
Go to the Statistic view to check the statistics of the execution:
| Name | Value |
|---|---|
SUM(OUT_NB_FILES) |
1 |
SUM(SQL_NB_ROWS) |
359 |
SUM(XML_NB_ATTRIBUTES) |
2 317 |
SUM(XML_NB_ELEMENTS) |
383 |
Now open the hotelManagement.xml file from the location you specified earlier and check that the content is correct:
<?xml version="1.0" encoding="UTF-8"?><mgt:hotelManagement xmlns:com="http://stambia.org/samples/common" xmlns:xs="http://www.w3.org/2001/XMLSchema" xmlns:mgt="http://stambia.org/samples/management">
<customer lastName="GIBBS" titleCode="Mr" title="Mister" customerId="1" company="" birthDate="1975-02-15T00:00:00+01:00" firstName="Jason">
<address line4="" zipCode="02115" stateCode="MA" line1="610 Beacon St" line3="" addressId="1" line2="" city="BOSTON"></address>
<phone phoneNumber="(413)454-5663" phoneType="Home" phoningAllowed="true" phoneId="1" phoneTypeCode="HOM"></phone>
<phone phoneNumber="(413)442-5252" phoneType="VoIP" phoningAllowed="true" phoneId="2" phoneTypeCode="SIP"></phone>
<phone phoneNumber="(413)442-5250" phoneType="Office" phoningAllowed="true" phoneId="3" phoneTypeCode="OFF"></phone>
<email mailingAllowed="true" emailType="home" emailId="1" emailAddress="jgibbs@hotmail.com"></email>
</customer>
<customer lastName="O'NEAL" titleCode="Mr" title="Mister" customerId="2" company="Springfield Ltd" birthDate="1967-03-03T00:00:00+01:00" firstName="Michael">
<address line4="" zipCode="02114" stateCode="MA" line1="225 Friend St" line3="" addressId="7" line2="" city="BOSTON"></address>
...
Writing in a specific file
The Mapping as it is written for the moment uses the default options of the Template. Particularly the generated XML file takes the name defined in the Metadata file. However, it is sometimes necessary to take control on the file name to generate a specific name.
Change the Out File Name option in the integration Template:
- Click on the Integration step of the hotelManagement element
- In the Properties view, click on the Out File Name link to activate the option
- Enter the path to a file named
customerDetails.xml(for example, under Linux:/tmp/customerDetails.xml)
Execute the Mapping once again and check that the generated file is indeed customerDetails.xml.
Optional exercise: Adding the billing information
Creating the Mapping
In order to save time on this exercise, copy (CTRL+C or right-click Copy) the Load customerDetails Mapping then paste it (CTRL+V or right-click Paste) in the Mappings folder. Give it its new name: Load customerDetailsWithBillings.
Load the bill element of this new Mapping in the following way:
New source Datastores:
- T_BILLING
- T_BILLING_LINES
- T_PAYMENT_TYPE
| Target column | Business rule | Characteristics | ||
|---|---|---|---|---|
| hotelManagement/customer/bill | T_BILLING.BIL_ID |
Source | I/U | Functional key |
| hotelManagement/customer/bill/@billDate | T_BILLING.BIL_DATE |
Source | I/U | |
| hotelManagement/customer/bill/@billId | T_BILLING.BIL_ID |
Source | I/U | |
| hotelManagement/customer/bill/@paymentDate | T_BILLING.BIL_PMT_DATE |
Source | I/U | |
| hotelManagement/customer/bill/@paymentType | T_PAYMENT_TYPE.PMT_NAME |
Source | I/U | |
| hotelManagement/customer/bill/@paymentTypeCode | T_PAYMENT_TYPE.PMT_CODE |
Source | I/U | |
| hotelManagement/customer/bill/@totalAmount | sum(T_BILLING_LINES.BLL_QTY * T_BILLING_LINES.BLL_AMOUNT) |
Source | I/U/A | |
The new join business rules are:
| First Datastore | Second Datastore | Business rule | Characteristics | |
|---|---|---|---|---|
| T_CUSTOMER | T_BILLING | T_BILLING.CUS_ID=T_CUSTOMER.CUS_ID |
Source | Master table: T_CUSTOMER |
| T_BILLING | T_BILLING_LINES | T_BILLING_LINES.BIL_ID=T_BILLING.BIL_ID |
Source | Master table: T_BILLING |
| T_BILLING | T_PAYMENT_TYPE | T_BILLING.PMT_CODE=T_PAYMENT_TYPE.PMT_CODE |
Source | Master table: T_BILLING |
Finally, change the Out File Name option in order to load a file called customerDetailsWithBillings.xml.
Analyzing the result of the execution
Go to the Statistic view to check the statistics of the execution:
| Name | Value |
|---|---|
SUM(OUT_NB_FILES) |
1 |
SUM(SQL_NB_ROWS) |
9 858 |
SUM(XML_NB_ATTRIBUTES) |
59 311 |
SUM(XML_NB_ELEMENTS) |
9 882 |
Tip: If there is an error, make sure you did the aggregation when loading the totalAmount attribute.
Loading several XML files
Creating the Mapping
In this exercise, you will generate a complete customer file for each city. The Out File Mask option of the XML integration Template works just like the Out File Name option, but, instead of a fixed name, you will specify a mask. This mask will be used to generate a dynamic file name that will be different for each target file created by the Mapping. This mask is defined thanks to predefined elements or source data.
Create a new Mapping by copying (CTRL+C or right-click Copy) the Load customerDetails Mapping and by pasting it (CTRL+V or right-click Paste) in the Mappings folder. Give it its new name: Load customerDetailsByCity.
The first thing to do is to tell Stambia on what expression it must rely to iterate on the root elements since the XML norm dictates that there must be only one root element per XML file:
- Check that the hotelManagement element is activated as functional key
- Enter the following transformation business rule:
T_ADDRESS.ADR_CITY
The Template allows the value of Out File Mask to be parameterized with various predefined values:
- [FILE_NAME]: Complete name of the file as specified in the Metadata
- [FILE_SHORT_NAME]: Path and name of the file without the extension as specified in the Metadata
- [FILE_EXTENSION]: File extension extracted from the file name specified in the Metadata
- [POSITION]: Number that increments with each newly generated file
- [TIMESTAMP]: Number of milliseconds since January 1st, 1970
However, the Template also allows the user to define the values. These values are defined with Tags in the Mapping. Tags allow you to tag an expression or a column which will then be used by the Template(s). In the INTEGRATION Rdbms to Xml Template, Tags are used to parameter the name of the target file:
- Click on the city target attribute
- In the Properties view, enter the value CITY_NAME in the Tags field
- Click on +
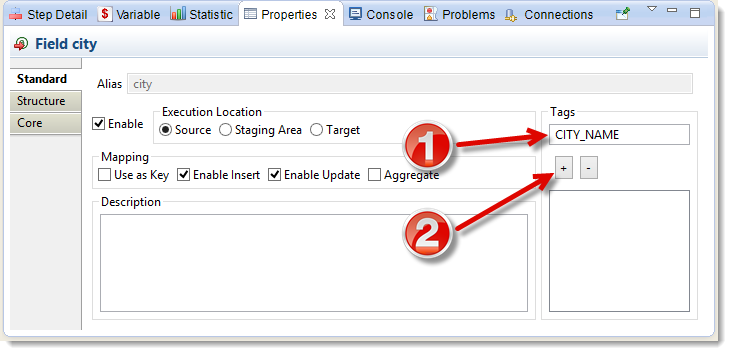
Notice that an icon with the letter T appears to say that a Tag was added to this target column.
![]()
You can then use this tag to generate a file name that takes the city name into account:
- Click on the Integration step of the hotelManagement element
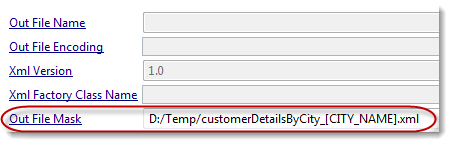
- In the Properties view, select and cut the path specified in the Out File Name option
- Click on the Out File Name link to deactivate this option
- Click on the Out File Mask link to activate this option
- Paste in Out File Mask the path that was previously in the Out File Name option
- Finally, change the file name
customerDetails.xmlintocustomerDetailsForCity_[CITY_NAME].xml
You can now execute the Mapping.
Analyzing the result of the execution
Go to the Statistic view to check the statistics of the execution:
| Name | Value |
|---|---|
SUM(OUT_NB_FILES) |
27 |
SUM(SQL_NB_ROWS) |
359 |
SUM(XML_NB_ATTRIBUTES) |
2 228 |
SUM(XML_NB_ELEMENTS) |
393 |
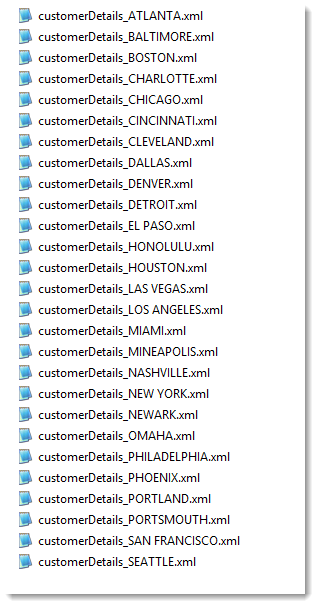
Go into the folder where you generate the files and look at the created files:
Optional exercise: grouping the files by state
Creating the Mapping
Make a copy of the Load customerDetailsByCity Mapping and call it: Load customerDetailsByStateAndCity
Change this Mapping so that it generates an XML file for each city, but so that these files get stored into one folder per state (i.e. for each value of T_ADDRESS.STATE_CODE).
Analyzing the result of the execution
Go to the Statistic view to check the statistics of the execution:
| Name | Value |
|---|---|
SUM(OUT_NB_FILES) |
27 |
SUM(SQL_NB_ROWS) |
359 |
SUM(XML_NB_ATTRIBUTES) |
2 228 |
SUM(XML_NB_ELEMENTS) |
393 |
Moreover, you must have 27 XML files allocated to 23 folders. For example, the TX folder contains 3 files.
Loading independent hierarchies
Until now, the loading of XML files concerned files where the root element contained a hierarchy that could be loaded from a same set of joined tables. However, some XML files have hierarchies that have no direct link with one another. This is what we will see in this chapter.
Creating the Mapping
Create a new Mapping by copying (CTRL+C or right-click Copy) the Load customerDetails Mapping then by pasting it (CTRL+V or right-click Paste) in the Mappings folder. Give it its new name: Load hotelManagement.
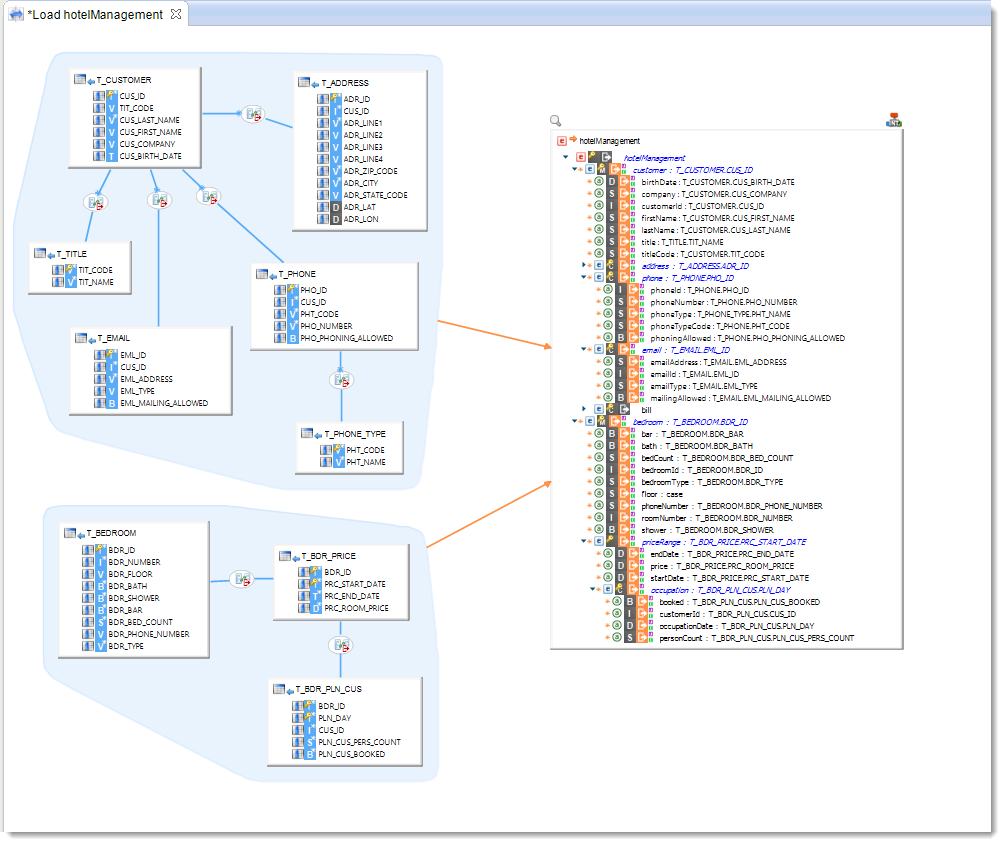
Load the bedroom element in this new Mapping in the following way:
New source Datastores:
- T_BEDROOM
- T_BDR_PRICE
- T_BDR_PLN_CUS
| Target column | Business rule | Characteristics | ||
|---|---|---|---|---|
| hotelManagement/bedroom | T_BEDROOM.BDR_ID |
Source | I/U | Functional key |
| hotelManagement/bedroom/@bar | T_BEDROOM.BDR_BAR |
Source | I/U | |
| hotelManagement/bedroom/@bath | T_BEDROOM.BDR_BATH |
Source | I/U | |
| hotelManagement/bedroom/@bedCount | T_BEDROOM.BDR_BED_COUNT |
Source | I/U | |
| hotelManagement/bedroom/@bedroomId | T_BEDROOM.BDR_ID |
Source | I/U | |
| hotelManagement/bedroom/@bedroomType | T_BEDROOM.BDR_TYPE |
Source | I/U | |
| hotelManagement/bedroom/@floor | casewhen lower(T_BEDROOM.BDR_FLOOR) = 'gf' then 0when lower(T_BEDROOM.BDR_FLOOR) = '1st' then 1when lower(T_BEDROOM.BDR_FLOOR) = '2nd' then 2end |
Source | I/U | |
| hotelManagement/bedroom/@phoneNumber | T_BEDROOM.BDR_PHONE_NUMBER |
Source | I/U | |
| hotelManagement/bedroom/@roomNumber | T_BEDROOM.BDR_NUMBER |
Source | I/U | |
| hotelManagement/bedroom/@shower | T_BEDROOM.BDR_SHOWER |
Source | I/U | |
| hotelManagement/bedroom/priceRange | T_BDR_PRICE.PRC_START_DATE |
Source | I/U | Functional key |
| hotelManagement/bedroom/priceRange/@endDate | T_BDR_PRICE.PRC_END_DATE |
Source | I/U | |
| hotelManagement/bedroom/priceRange/@price | T_BDR_PRICE.PRC_ROOM_PRICE |
Source | I/U | |
| hotelManagement/bedroom/priceRange/@startDate | T_BDR_PRICE.PRC_START_DATE |
Source | I/U | |
| hotelManagement/bedroom/priceRange/occupation | T_BDR_PLN_CUS.PLN_DAY |
Source | I/U | Functional key |
| hotelManagement/bedroom/priceRange/occupation/@booked | T_BDR_PLN_CUS.PLN_CUS_BOOKED |
Source | I/U | |
| hotelManagement/bedroom/priceRange/occupation/@customerId | T_BDR_PLN_CUS.CUS_ID |
Source | I/U | |
| hotelManagement/bedroom/priceRange/occupation/@occupationDate | T_BDR_PLN_CUS.PLN_DAY |
Source | I/U | |
| hotelManagement/bedroom/priceRange/occupation/@personCount | T_BDR_PLN_CUS.PLN_CUS_PERS_COUNT |
Source | I/U | |
The new join business rules are:
| First Datastore | Second Datastore | Business rule | Characteristics | |
|---|---|---|---|---|
| T_BEDROOM | T_BDR_PRICE | T_BDR_PRICE.BDR_ID=T_BEDROOM.BDR_ID |
Source | Inner |
| T_BDR_PRICE | T_BDR_PLN_CUS | T_BDR_PLN_CUS.BDR_ID=T_BDR_PRICE.BDR_IDand T_BDR_PLN_CUS.PLN_DAY between T_BDR_PRICE.PRC_START_DATE and T_BDR_PRICE.PRC_END_DATE |
Source | Inner |
Finally, deactivate the Out File Name option in order to load the file defined in the Metadata.
You will notice there are two distinct groups of Datastores. The first one loads the hierarchy of the customer element and the second one loads the hierarchy of the bedroom element.
You can now execute the Mapping.
Analyzing the result of the execution
Go to the Statistic view to check the statistics of the execution:
| Name | Value |
|---|---|
SUM(OUT_NB_FILES) |
1 |
SUM(SQL_NB_ROWS) |
13 293 |
SUM(XML_NB_ATTRIBUTES) |
54 533 |
SUM(XML_NB_ELEMENTS) |
13 437 |