Preface
Welcome to Stambia Analytics!
This guide contains information about how to administer and monitor Stambia using Stambia Analytics
Below is a summary of the main features which are explained in this document:
- Creation and usage of Session Reports to visualize and follow sessions' execution in time.
- Creation and deployments of Deliveries to Runtimes
- Creation and configuration of different working environments, such as development, testing, production, ...
- Management of all attributes' values such as server URLs, passwords, ... for each defined environment.
- Usage of REST APIs to perform operations on Stambia Analytics
Audience
This document is intended for users interested in using Stambia Analytics to parameterize Packages and go into production, schedule executions, follow up the session’s executions, view sessions' details, ... .
Document Conventions
This guide uses the following formatting conventions:
| Convention | Meaning |
|---|---|
| boldface | Boldface type indicates a graphical user interface associated with an action, or a product specific term or concept. |
| italic | Italic type indicates a special emphasis or placeholder variable that you need to provide. |
monospace |
Monospace type indicates code example, text or commands that you have to enter. |
Other Stambia Resources
In addition to the product manuals, Stambia provides other resources available on its company website: www.stambia.com and community website www.stambia.org.
Obtaining Help
To get help you can:
- contact our global Technical Support Center: www.stambia.org/di/support.
- consult the articles on our community website www.stambia.org.
- consult or post topics on our forum on www.stambia.org.
Feedback
We welcome your comments and suggestions on the quality and usefulness of this documentation.
If you find any error or have any suggestion for improvement, please contact us at www.stambia.org/di/support and indicate the title of the documentation along with the chapter, section, and page number, if available. Please let us know if you want a reply.
Introduction to Stambia Analytics
Product Overview
Stambia Analytics is a web application which is used to manage all production process, from definition and configuration of environments, deployment of deliveries on those environments, to consultation of execution logs.
With Stambia Analytics you’ll be able to define as many environments as needed, such as development, test, or production environments.
Each environment will have its own set of Runtimes and Configurations.
You’ll then be able to manage all the production process on those environments, through dedicated features allowing to
configure, follow, and publish deliveries on each of them, with a notion of version to be able to historize what is deployed on Runtimes and come back to previous versions easily in case of issues.
Stambia Analytics moreover offers the possibility to consult execution logs with statistics, graphs, and ability to navigate inside executed sessions to find exactly what has been executed: which SQL Queries, which steps, which actions, ...
Graphical interface Overview
Here is an overview of Stambia Analytics graphical interface:
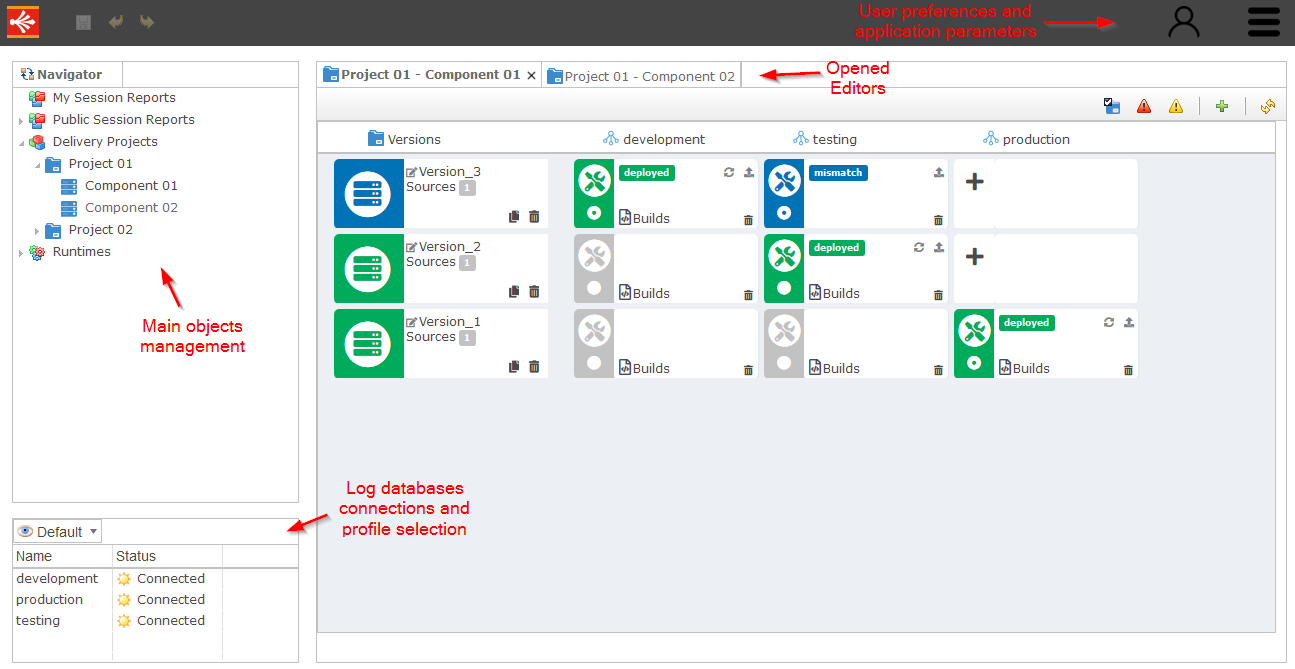
Additional views with more information may be displayed depending on the context and opened editor.
HTTP REST APIs Overview
A complete HTTP REST API is available to perform operations on Stambia Analytics through other tools easily.
Those APIs offer the possibility to manage and operate Delivery Projects, which are used to import sources, build and deploy deliveries on the different defined environments.
Stambia Analytics generates automatically a Swagger descriptor describing all available operations, and is shipped with Swagger-UI which can be used to play with the APIs easily.
For further information refer to the «Appendix 1 - REST API Reference» dedicated section in this document.
Managing Sessions
Defining Session Reports
Session Reports are used to gather, filter and visualize a list of sessions based on the criteria defined by the user.
Changing Profiles
Sessions which are retrieved in Session Reports are retrieved from the Log Databases of Runtimes.
The Log databases from which sessions are retrieved are defined through Profiles, Log Databases, and Runtimes, which can be selected from drop down list which can be found at the bottom of Stambia Analytics.
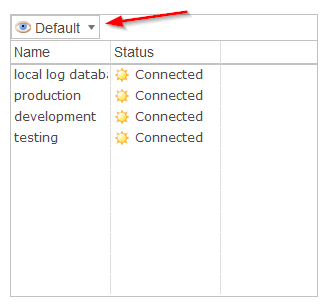
Sessions Reports will retrieve sessions only from the selected Profile, Runtime, or Log Database.
Refer to Stambia Analytics Installation and Configuration Guide to learn how to add items in this list.
Creating Session Reports
There are two types of Sessions Reports, public Sessions Reports which are visible by all users and stored under the Public Session Reports topic, and private Session Reports which are only visible by the current user and stored under the My Session Reports topic.
To create a new Session Report:
- Right click in the Public Session Reports or My Session Report topic in the Navigator View.
- Choose "New Session Report"
- Give a name to the report
- Modify the criteria to match your needs
- Save and refresh sessions list
The sessions that meet your criteria will appear in the table.
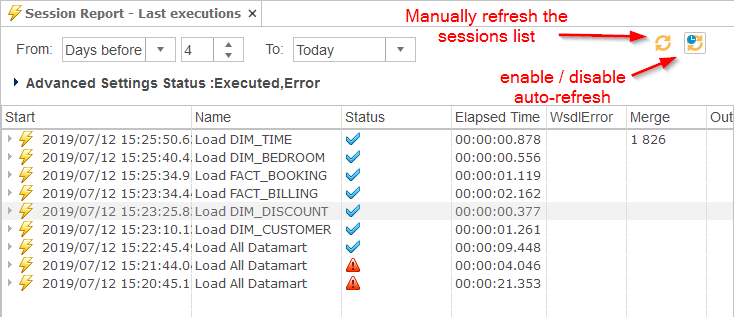
Refreshing sessions list
You can manually refresh the session list through the refresh button or enable auto-refresh mode on the session report.
When auto-refresh is enabled, the sessions list will be refreshed periodically using the delay specified in Preferences.
You can enable or disable auto-refresh at any time on each session reports by clicking on the auto-refresh button.
| Icon | Description |
|---|---|
 |
Button to manually refresh the sessions list. |
 |
Auto refresh is started |
 |
Auto refresh is paused |
Example:
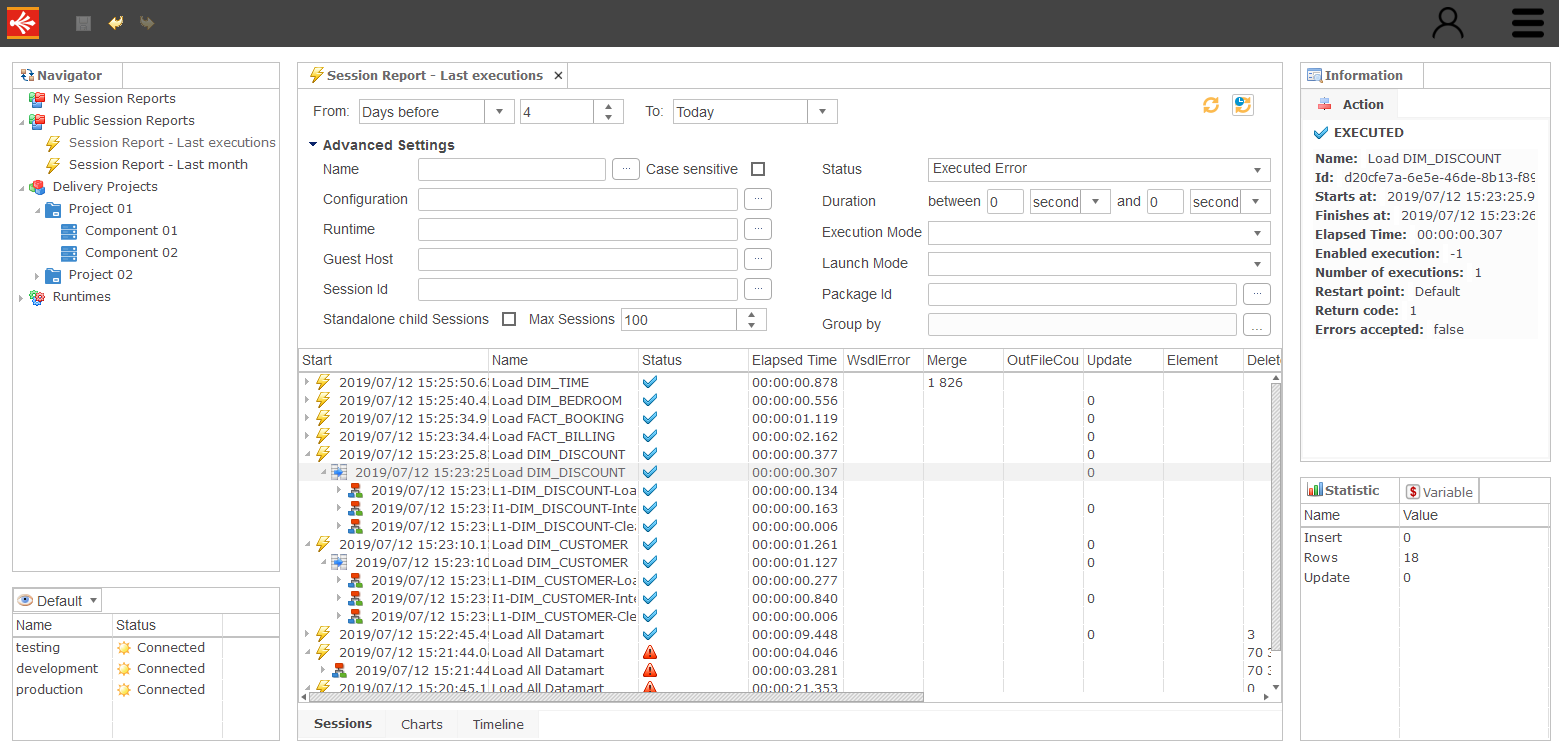
Modifying criteria
Here are the criteria that you can choose to filter your sessions:
Standard settings
The From and the To parts allow you to set the time scope of your report:
- Today will only display the sessions executed since or until today (depending on which of the two fields From, or To you are using)
- Yesterday will only display the sessions executed from or until yesterday
- Absolute allows you to define a specific day
- Days before allows you to specify a number of days in the past.
Advanced settings
| Criteria | Description |
|---|---|
| Name | Session’s name or name pattern. You can use the ‹*› sign to give a name pattern. |
| Configuration | Sessions with the specified Configuration(s) will be displayed. |
| Runtime | Sessions executed with the specified Runtime(s) will be displayed. |
| Guest Host | Sessions with the specified guest host(s) will be displayed. The guest host is the hostname of the machine on which the session has been executed. |
| Session Id | Sessions with the specified Id will be displayed. |
| Group By | Group the sessions according to certain fields: Status, Name, Runtime, Guest Host, Execution Mode, Launch Mode, Configuration. This will open a window in which you can add the group fields. Note that fields can be ordered. That means that you can group the sessions by name and then by status, or other arrangements. |
| Standalone Child Sessions | If true, the child sessions will be displayed in the list of sessions as if they were standalone sessions. |
| Status | List of statuses you want to display in the session list. |
| Duration | Only the session fulfilling the specified duration will be displayed. |
| Execution Mode | Sessions with the specified Execution Mode(s) will be displayed. |
| Launch Mode | Sessions with the specified Launch Mode(s) will be displayed. |
| Package Id | Sessions with the specified package Id(s) will be displayed. |
| Max Sessions | Maximum number of sessions displayed. |
Available statuses
| Status | Description |
|---|---|
| Prepared | Prepared but not executed sessions. |
| Running | Running sessions. |
| Executed | Executed sessions. |
| Error | Sessions in error. |
| Killed | Sessions killed by the user |
| Dead | Dead sessions, that is sessions that never finished and are considered as dead by Stambia Analytics |
Available Launch Modes
| Launch Mode | Description |
|---|---|
| Designer | The session has been executed from the Stambia Designer. |
| Schedule | The session has been executed automatically by a schedule. |
| Web Interactive | The session has been executed from Stambia Analytics. |
| Engine Command | The session has been executed from the Runtime Command utility (E.g. Using the ‹execute delivery› command). |
| Command Line | The session has been executed from command line (E.g. with startdelivery.bat). |
| Web Service | The session has been executed from the Runtime’s REST or SOAP web services. |
| Action | The session has been executed from the ‹Execute Delivery› Process Action. |
| Restart | The session has been restarted. |
Available Execution Modes
| Execution Mode | Description |
|---|---|
| Memory | The session has been executed in memory in the Runtime. |
| Autonomous | The session has been executed outside of the Runtime. |
Modifying displayed information columns
By Right-clicking on the sessions list table header, you can choose the columns you want to display.
This allows to add columns displaying information such as the Runtime which executed the session, ...
Columns' display modifications are saved for each user through cookies. If cookies are not allowed in the browser, modifications will be discarded when the user exits his web session.
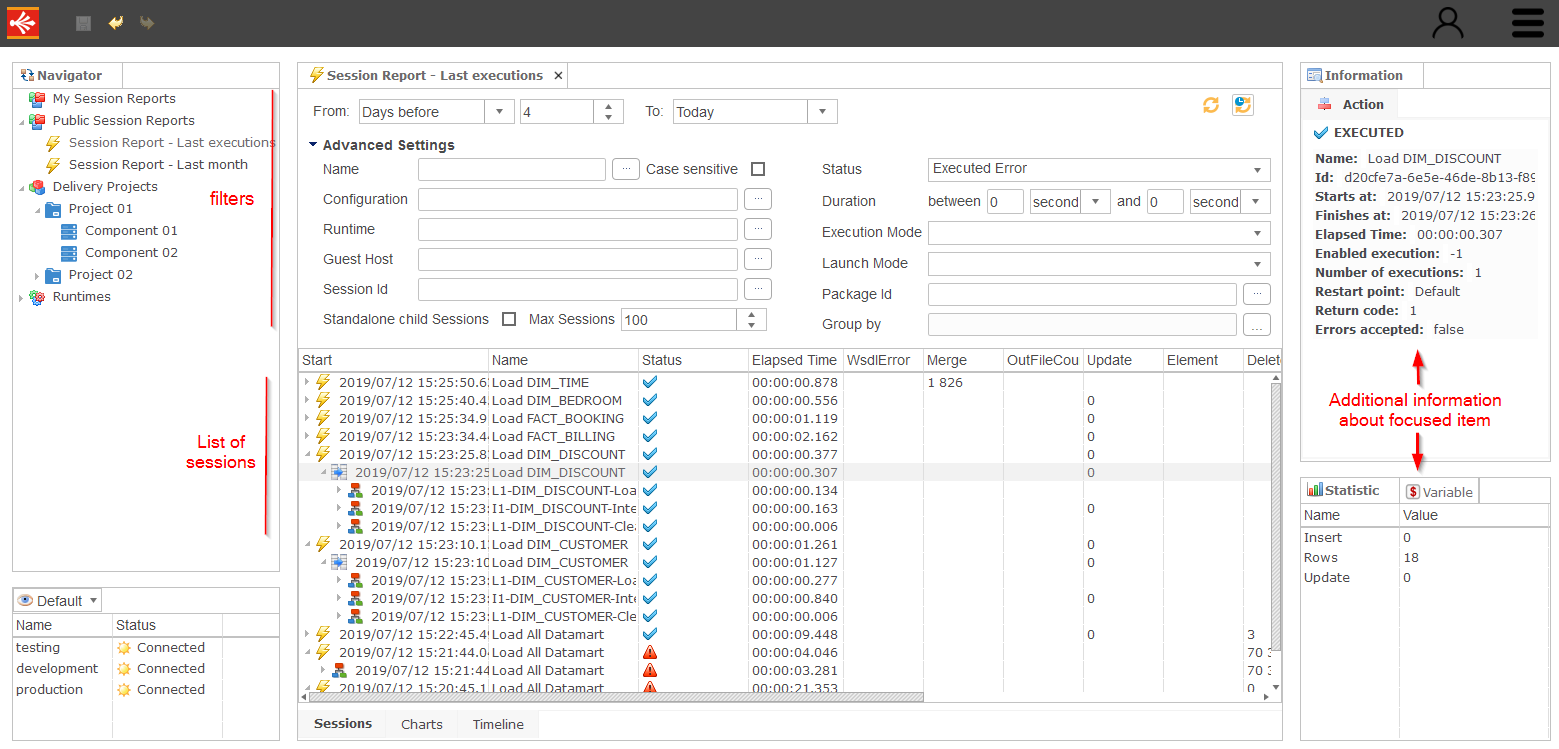
The views
Around the sessions table, some views are useful to retrieve knowledge about the session when you click on it in the sessions table.
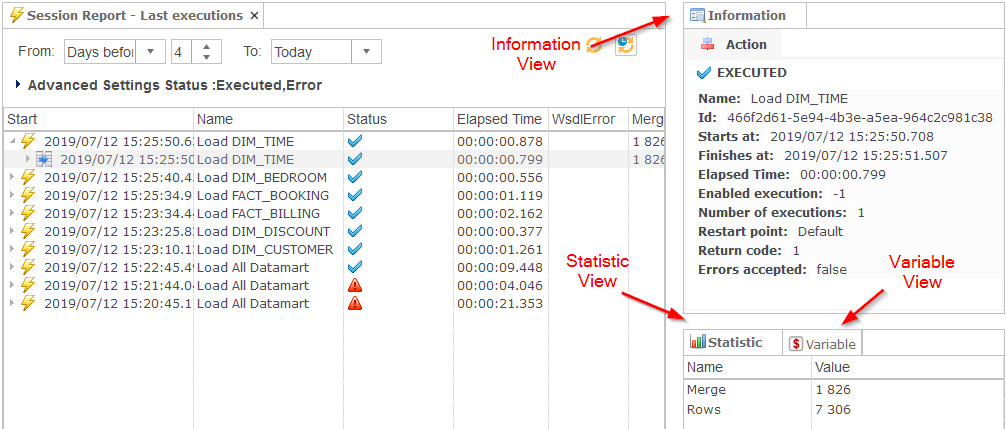
- The Statistic view gives the aggregated statistics on the session.
- The Variable view gives the main variables of the session
- The Information view gives an overview of important information (this information is the same as information you will find in the variable view or the sessions table)
Session detail
Entering session details
You can enter into session’s details by double-clicking on the session’s row in the sessions table.
This will open a new window, in which the session execution tree will appear.
The tree can be opened.
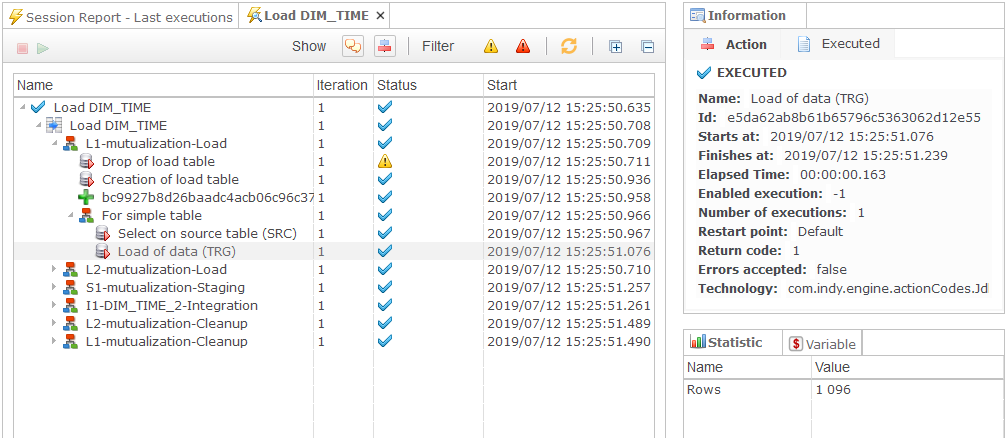
The views
You can find in this editor the same Views as in a Session Report.
Clicking on each node of the tree will synchronize the information displayed in the different views.
- The Statistic view gives the aggregated statistics for the selected step
- The Variable view gives the variables for the selected steps
- The Information view gives an overview of some important information for the selected steps. If the steps contain an executed text (for example a SQL order), an executed code tab appears in this view.
- If clicking on a step that has a text code, the Executed view gives the final executed code.
Modifying the displayed information and the session status
In the upper-right side of the session detail window, buttons can be pressed in order to select the information displayed in the tree.
| Button | Description |
|---|---|
 |
Message button allows to display the user messages. These messages should have been planned by the Process Designer. |
 |
Details button allows to display the detail of a session (by default, this button is pressed) |
 |
Warnings button allows to display only the details having warning messages. |
 |
Errors button allows to display only the details having error messages. |
 |
Stop button stops the current sessions if it is running. |
 |
Restart button restarts the current session when it is in an error status. |
| |
Refresh button refreshes the session tree. This is useful when the session is running. |
Visualization of sessions
In a Session Report, you can visualize sessions from three different ways, represented through the three different tabs which can be accessed at the bottom of a Session Report Editor.
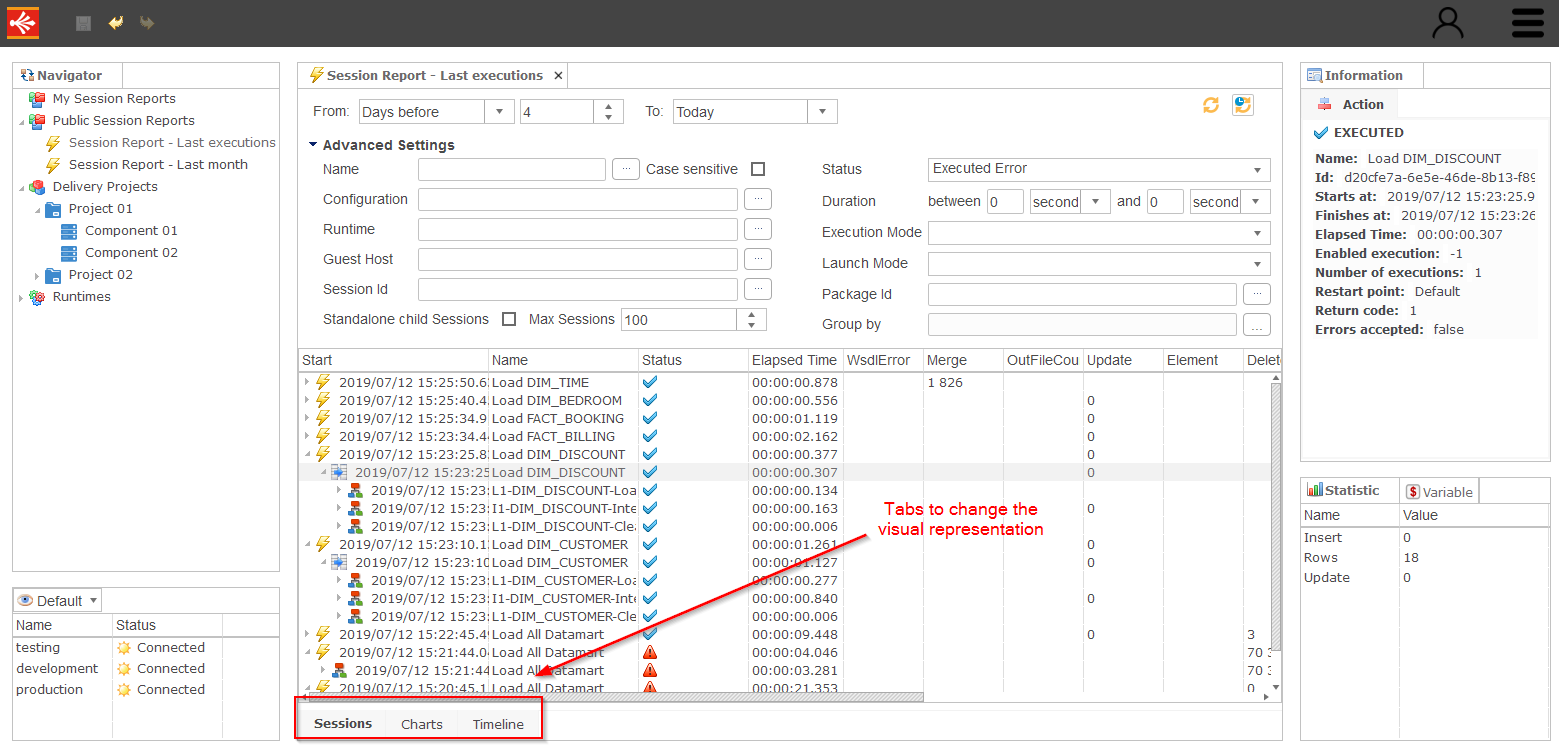
The Sessions tab
The Sessions tabs is the list of sessions returned by the defined criteria.
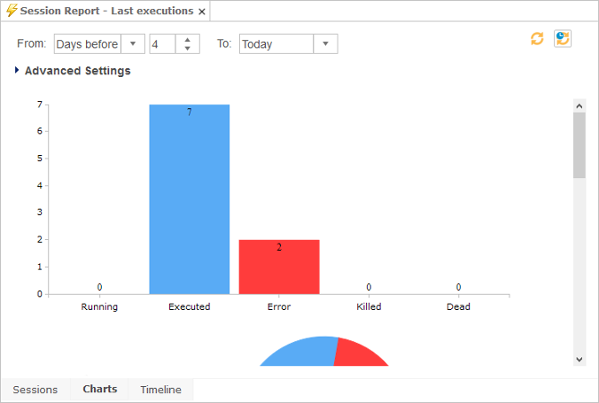
The Charts tab
The Charts tab gives some graphs that summarize the statistics of the sessions.
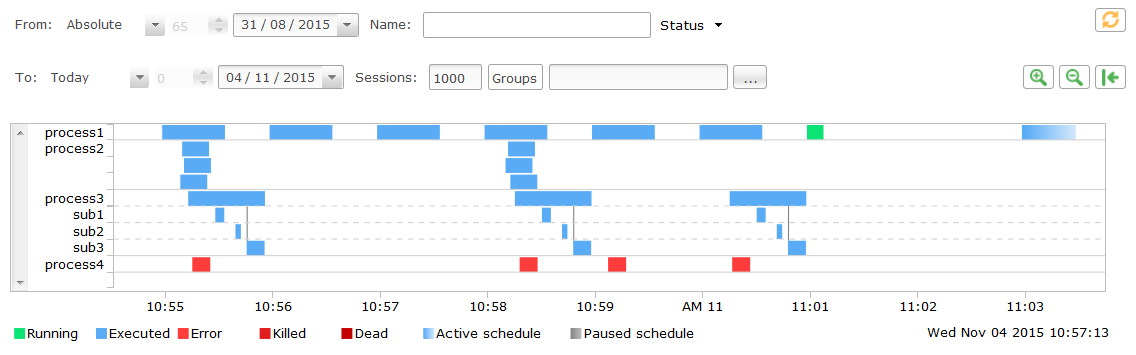
The Timeline tab
The Timeline tab shows sessions' executions over time.
To navigate in the timeline:
- Maintain left click and move left and right to go through time
To zoom in and out:
- Use the mouse wheel
- Double click on an empty place
- Maintain right Click and select the zone on which you want to zoom in
- Use the zoom buttons
To view the information of a session:
- Left click on the session. Information appears on the dedicated views
- Double click on a session to open the Session detail
Timeline Legend:
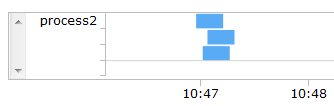
Full line: Normal execution
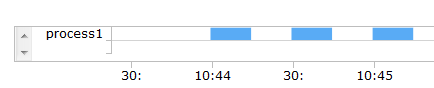
Multiple blank separated lines: Same session executed in parallel.
Dotted lines: child sessions
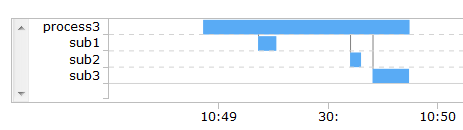
Gradation: Sessions scheduled.
Stambia Analytics analyze the already executed sessions and estimate the time for future scheduled one’s.
The Fifty next schedules are shown.

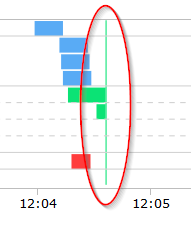
Current time:
Restarting or stopping a session
To restart or stop a session there are two ways:
- In the session report editor, a right-click on a session allows to restart or stop the session.
- In the session details editor, the button bar has two buttons to restart or stop the session.
Getting the documentation of a Process
If the Deliveries have been built through a package including the documentation, all the sessions running with theses will be linked to the documentation.
In this case, the documentation is accessible at different locations:
- On the sessions list, by a right-click on the session. In this case, it will open the Process documentation.
- In the detail of a session, by a right-click on a session’s tree node. In this case, it will open the documentation of the specific node (step of the Process).
- Inside a Package Manager, open the content of a Version by clicking on the Version Name, then right-click on a source package which includes documentation to be able to open the documentation from context menu.
Managing Runtimes
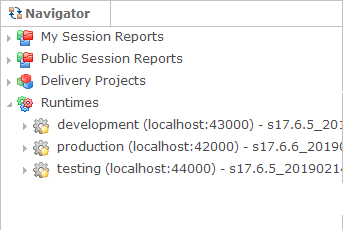
In the Navigator View, under the Runtimes topic, will be listed all the Runtimes of the currently selected Profile.
If the list is empty, check if a profile is selected in the bottom combo box.
Changing Profiles
Listed Runtimes are retrieved from the currently selected Profile or Runtime.
Runtimes to display can be selected from drop down list which can be found at the bottom of Stambia Analytics.
Refer to Stambia Analytics Installation and Configuration Guide to learn how to add items in this list.
Runtime detail
By a double-click on a specific Runtime, a new window will appear.
This window has several tabs:
- The monitoring tab gives information on the clients connected to the Runtime and on the session’s thread running on the Runtime.
- The Virtual Machine tab gives real-time information on the Java Virtual Machine on which the Runtime is running.
- The Test tab is useful to make some tests directly on the Runtime. You can test an IP route (to know if an IP port is available from the Runtime towards another host), or you can test the existence of a Folder (directory) on the Runtime server.
- The Purge tab is used to schedule a purge for the Runtime log database. You can add, edit or remove purges with the corresponding buttons. You can configure on a scheduled purge how many sessions, days, etc are kept, when it is executed, ...
- The Command tab allows to execute Runtime commands.
Runtime Deliveries
A Delivery can be opened by a double-click on it. The opened view allows to execute, restart or delete a session for this Delivery.
A session list is automatically displayed, filtering on this Delivery.
The criteria can be modified in order to refine the session list.
A right-click on the Delivery in the navigator view allows to execute or define a new schedule.
When executing Multi-Configuration Deliveries, a selection window will open to choose the Configuration to use.
Scheduling a Delivery
In order to schedule a Delivery:
- Right-click on the Delivery in the Navigator View
- Choose New Schedule
- A new window appears, allowing you to define the schedule.
- In this new window, each tab Second, Minute, Hour, Day, Month, Year should be filled according to the schedule you want to create.
- This will generate a sort of cron expression that will be sent to the Runtime when the schedule information will be saved.
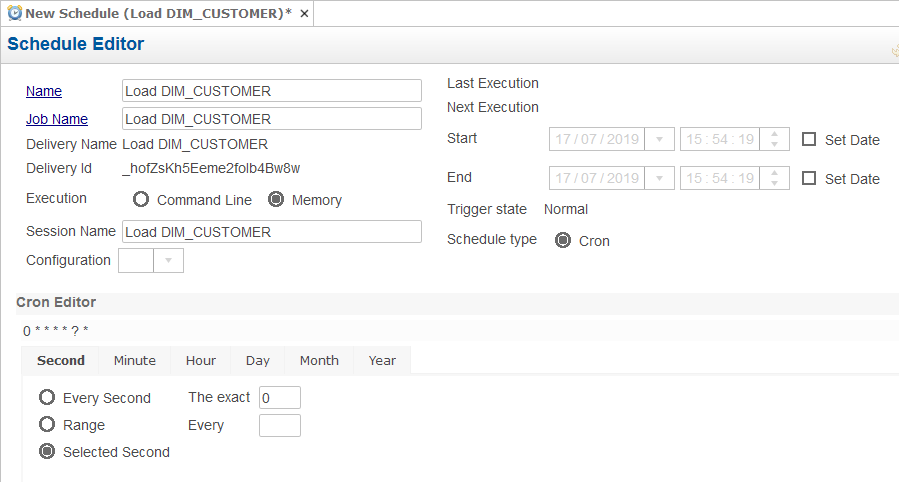
Note: For Multi-Configuration Deliveries, a Configuration must be selected in the corresponding combo box.
Managing Delivery Projects
Concepts
A Delivery Project is used to follow, configure, manage and deploy deliveries on multiple environments.
A Delivery Project contains a number of Package Managers which are defined in administration, and which are logical and versioned placeholders containing a set of sources.
Each Package Manager has its own life cycle which can be managed through Stambia Analytics UI or through the available REST APIs.
You have the possibility to create, for each Package Manager, different versions and deploy the one you want on a given environment, offering the possibility to deploy a given version on development environment for instance, while the last stable version is deployed on the production one.
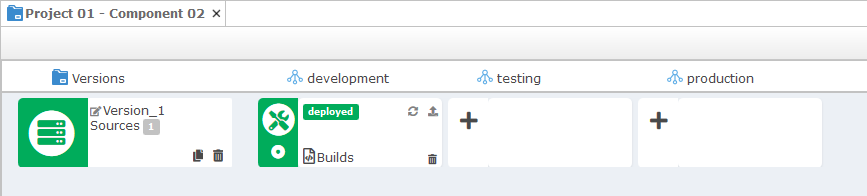
Overview of graphical UI
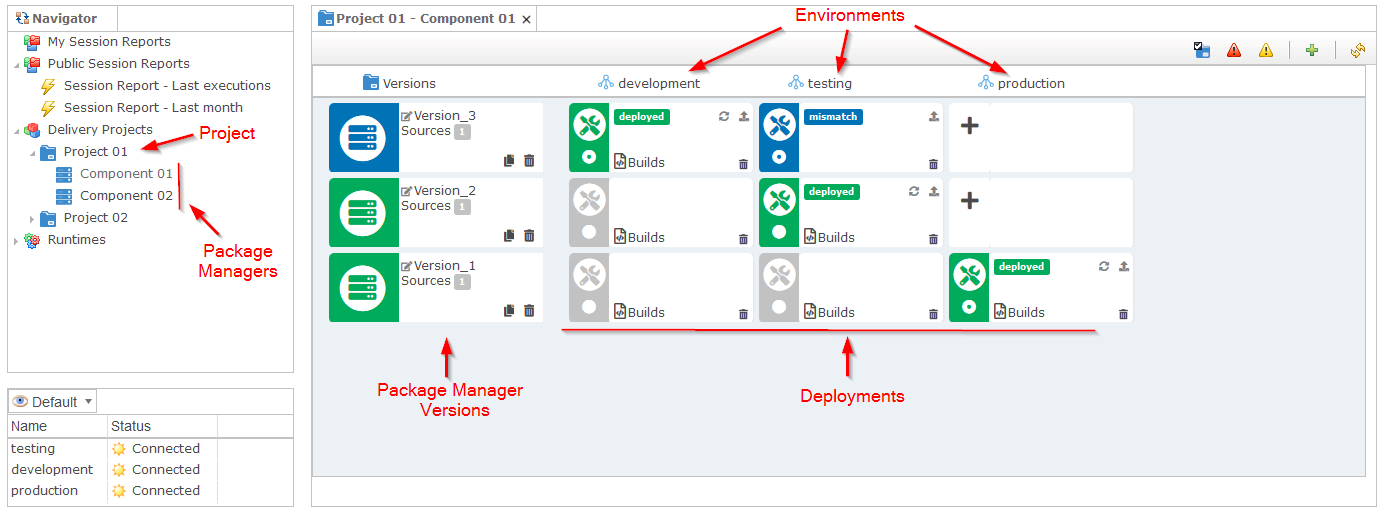
Description of each item
| Name | Description |
|---|---|
| Delivery Project | Logical group of Package Managers to deploy to the same group of Environments. |
| Package Manager | Logical and versioned placeholder which will be used to import sources, create versions, generate and deploy final deliveries. |
| Package Manager Version | Logical placeholder representing a version of a Package Manager, in which sources will be imported. |
| Environment | An environment is a set of Configurations and Runtimes which will be applied to the sources when building and deploying a version. |
| Deployment | Association between a Package Manager Version and the Environment for which this version should be configured and deployed to. |
| Configuration | Named placeholder in which the externalized Metadata attributes values of each sources are stored, such as server URLs, passwords, ... For instance a «Test» Configuration will store all Metadata attribute values related to the «testing» environment. |
| Runtime | Runtime engine in which generated deliveries can be deployed and executed. |
| Source | A Source corresponds to a Process which has been developed on the Designer software, and is imported into Analytics from its corresponding package archive generated from the Designer software. |
| Delivery | A delivery is what will be executed or scheduled in the final stage by the Runtimes. It is a file which contains the complete roadmap of tasks to be done, with ready to use connections (server, ports, passwords, etc.). Everything in it is already configured, is completely autonomous, and will only need a Runtime to become executable. The goal of a Delivery Project is to manage the life cycle of the Sources and Environments, to generate and deploy final Deliveries on Runtimes. |
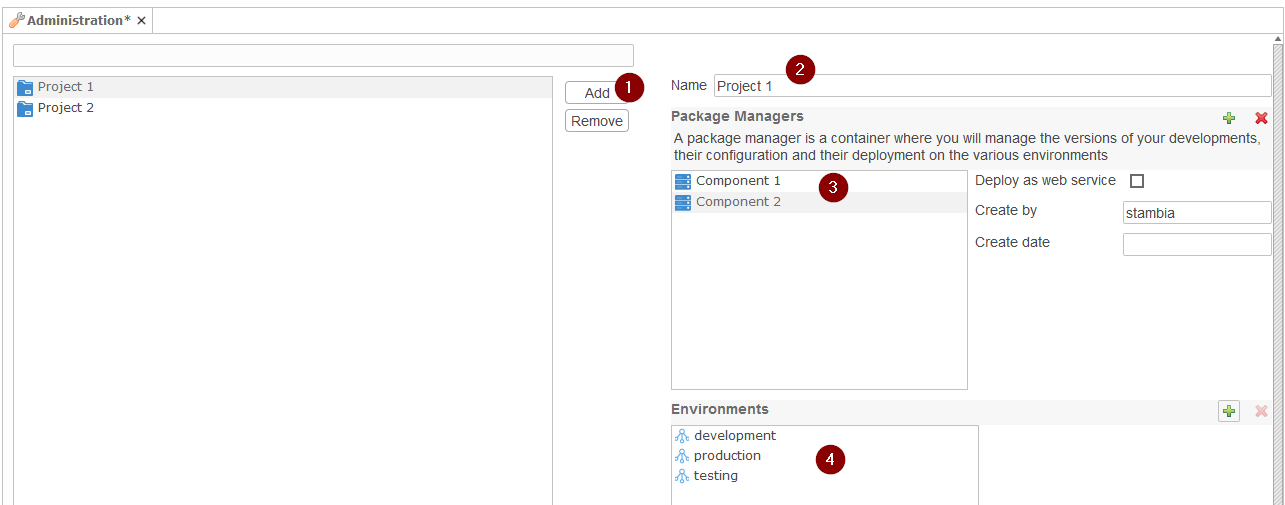
Defining Delivery Projects
Definition and configuration of Delivery Project is performed in administration.
If you want to create a new Delivery Project, defines its Environments, Package Managers, Configurations, ... open administration and go to Delivery Projects.
You can define and configure here Delivery Projects which will allow to build and deploy Deliveries on one or more Environments.
- Click the add Button
- Set a name for the Delivery Project
- Create one or more Package Managers.
- Add one or more Environments.
If multiple environments are defined in the same Delivery Project, it will be possible to manage the lifecycle of each Package Manager across the various environments. For instance, if a Delivery Project uses the «Tests» and «Production» environments, it will be possible to deploy Version 1.0 of a Package Manager in «Production» and deploy Version 2.0 of the same Package Manager in «Tests» without impacting the «Production» environment.
Warning: Environments display order in Package Manager Editor is computed from the order in which they have been added in the Delivery Project when configuring it. If you want to change the order in which the Environment columns appear in Package Manager Editor, such as having «Development», «Testing», «Production» in the correct order from left to right, you have to make sure they are in the wanted order in the list of Environment of the Delivery Project, and if not, delete them, save, and them again in the correct order.
Note: For further information about Configurations, Runtimes, and Environments definition please refer to Analytics Installation and Configuration Guide.
Managing Versions
Each Package Manager defined in a Delivery Project is managed through its own cycle of life, having its own versions which can evolve in time.
A Package Manager Version corresponds to a consistent set of sources that should be deployed altogether on the different environments.
Each Version of a Package Manager can contain a different set of sources, which will then be deployed on the target environment when performing deployment operations.
Example:
| Package Manager Version | Sources contained in the version |
|---|---|
| Version 1.0 | ProcessA |
| Version 1.1 | ProcessA,ProcessB |
| Version 1.2 | ProcessA,ProcessB_updated |
| Version 2.0 | ProcessC |
To manage the Versions of a Package Manager, double click on the corresponding Package Manager in the Navigator View. This will open the Package Manager Editor where each Version corresponds to a row in the table and each column corresponds to an Environment into which the Version can be deployed.
Creating a new Package Manager Version
New versions are created using the add button. Analytics open directly the popup to import the packages. The default name is computed automatically. It is selected, if you wish to change it.
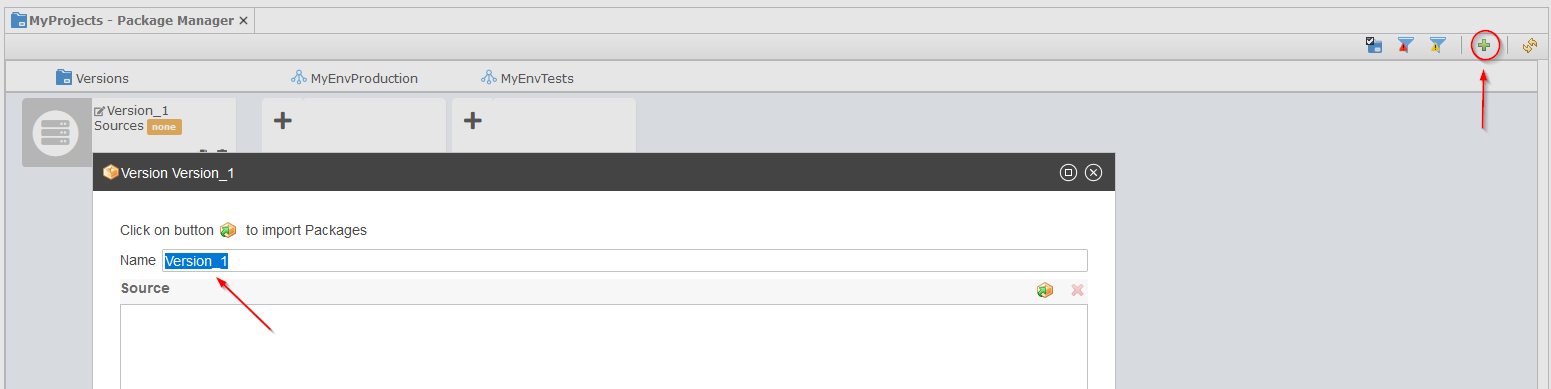
Automatic opening is a parameter define in the Administration / Preferences Menu.
Importing sources
To import new sources or to update existing ones in a version:
- Edit the version through the edit button or by clicking on the version name
- Click on the import button
- Then click on the Browse button
- Select the archive containing the sources to import
- Click on the Open Button
- Click on the OK Button
- Click on the Save Button
Note: When importing sources Stambia Analytics automatically checks the consistency of the version which may lead to warning or error messages. For more information on this topic, refer to the chapter Understanding Warning and Error messages.
Note: An archive containing sources correspond most of the time to a package file generated from the Designer software.
Duplicating an existing version
A new version can also be created by duplicating an existing one. This can be done by clicking on the duplicate button.
This creates a new version with a default name computed automatically and that contains exactly the same sources as the duplicated version.
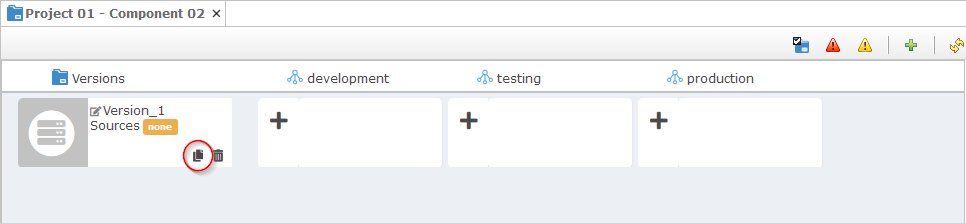
It is possible to rename the version by clicking on the <VersionName> link.
Managing Deployments
Creating a Deployment
By default, when creating a new version or when duplicating an existing one, no Deployment is created. After having imported sources into the version, the next step consists of creating a Deployment by clicking on the add button for the desired environment.
A Deployment is the association between a Package Manager Version and the Environment for which this version should be configured and deployed to.
This is used to configure the required Metadata for the given Version and Environment, and to build and deploy corresponding deliveries.
Creating a Deployment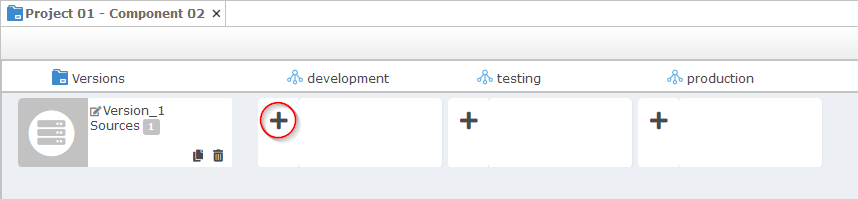
This sets this new Deployment as the working deployment in this environment.
Configuring Metadata
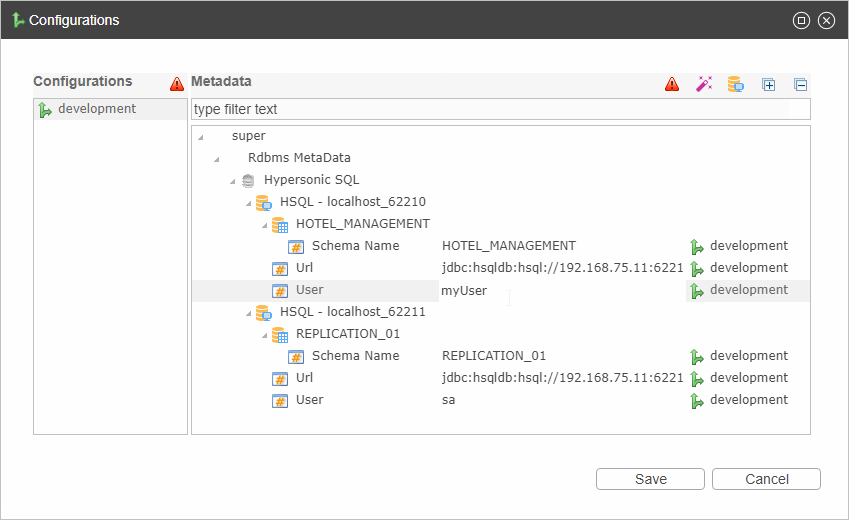
By clicking on configure button, it is possible to edit the Metadata values required by the sources for the given environment. This opens the Metadata editor filtered to focus only on required Metadata attributes.
Clicking on the configure button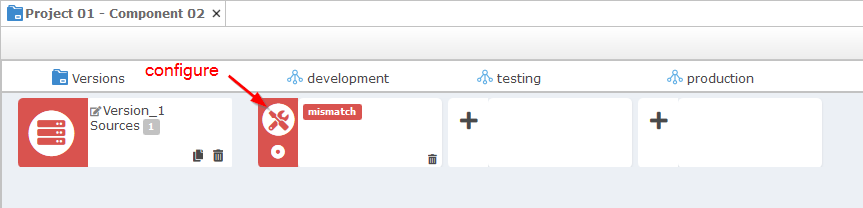
Defining Metadata Attributes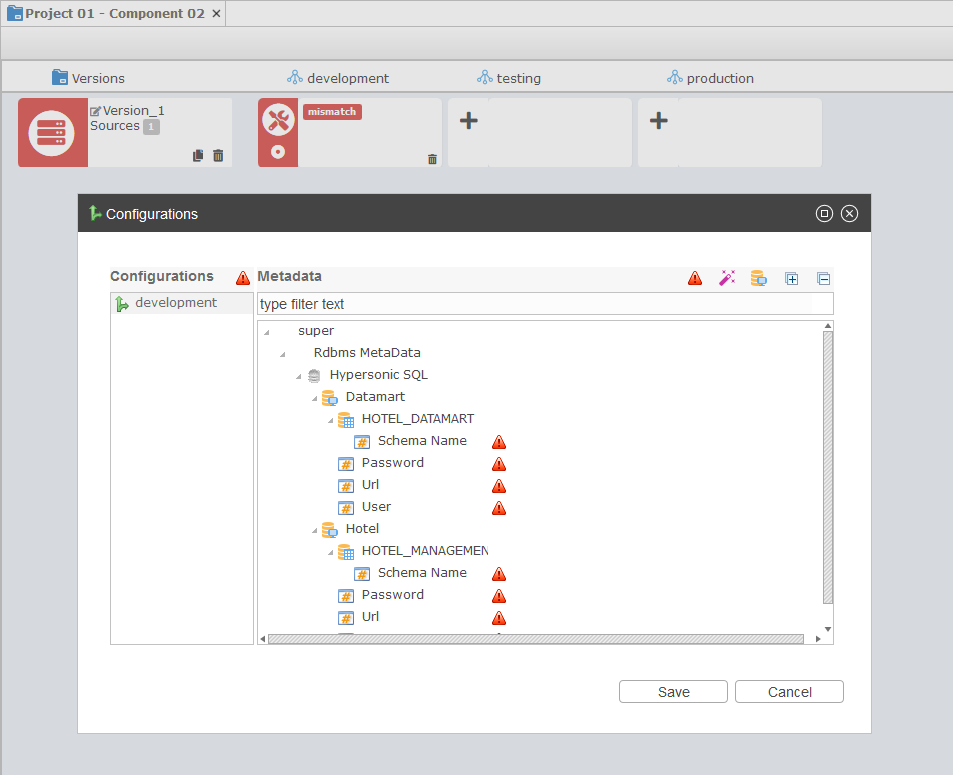
The following filters and helpers are available on this window:
| Button | Description |
|---|---|
| |
Button allowing to filter the list with Configurations / attributes having unset values which need to be specified. |
 |
Button allowing to initialize all missing values with the default attributes' values. Note that default values are extracted from the sources when extracting Metadata attributes while importing sources. |
 |
Button allowing to test databases connection with current settings. Note that this requires the JDBC driver of the database to be installed in Stambia Analytics |
Important: Configuration attributes values are global to all the application. If you modify the value of an attribute on a «development» Configuration for instance, all the Projects, Package Managers, and Packages Managers Versions using the same «Development» Configuration will be impacted.
Note: When creating Deployments or editing Configurations Stambia Analytics automatically checks the consistency of the Version which may lead to warning or error messages. For more information on this topic, refer to the chapter «Understanding Warning and Error messages».
Building and deploying a Version
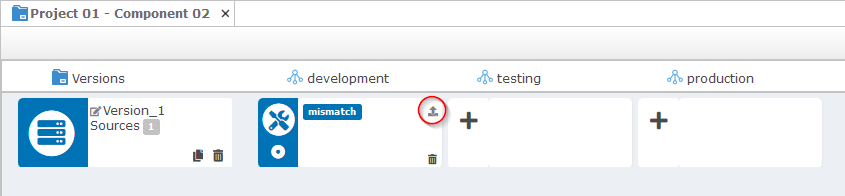
Once a Deployment has been specified and configured, it is possible to deploy it to the Runtimes configured in the corresponding environment.
When clicking on the deploy button, Stambia Analytics will generate and deploy deliveries on the Runtimes of the given environment, based on the Metadata attributes configured for this environment and the version’s sources.
Click on the deploy button
Version is deployed on development environment
Note The deploy button is available in an environment only for the currently deployed version as well as for the working Version. To restore a previous build for the given Deployment, refer to the chapter Restoring a previous Build.
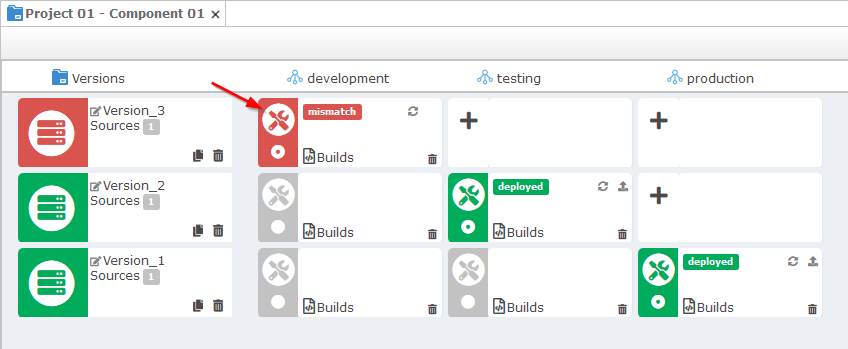
Understanding Warning and Error messages
Under certain circumstances, a Deployment may require some attention. For instance if a Deployment has been made with an older version of the sources, or if the Metadata values set in the used Configuration has changed since the last deployment, warning or error messages are displayed.
| Text Message | Cause of the Message | Resolution |
|---|---|---|
| missing | One or more Deliveries of the deployed version is missing on at least one Runtime | Re-deploy the version in the given environment |
| mismatch | One or more Metadata used by the sources of this version have no value set in the Configurations of the environment | Set a value to the missing Metadata |
| mismatch | One or more Metadata used by the sources have a different value than the value which was set in the Configurations of the environment at the moment of the last deployment | Re-deploy the version in the environment |
| mismatch | One or more sources of the Version has changed since the version was deployed | Re-deploy the version in the environment |
| mismatch | Stambia Analytics cannot find the build corresponding to a deployed version in an environment. This is typically the case when a build has been manually deleted after being deployed in an environment | Re-deploy the version in the environment |
| mismatch | One or more Deliveries deployed on the Runtimes does not match the expected build | Re-deploy the version in the environment |
| unknown | The analysis of the Deliveries has not been performed yet | Manually analyze the Deployment |
| unknown | When checking the Deliveries deployed on Runtimes Stambia Analytics has been unable to contact one or more Runtimes | Manually analyze the Deployment |
| mismatch | The working Deployment has not been deployed yet | This informational message will automatically disappear when the working Deployment will be deployed in the given environment |
| deployed | The delivery is up to date on the Runtime | No action required |
More information on the root cause of the message can be found by performing an analyze on the version
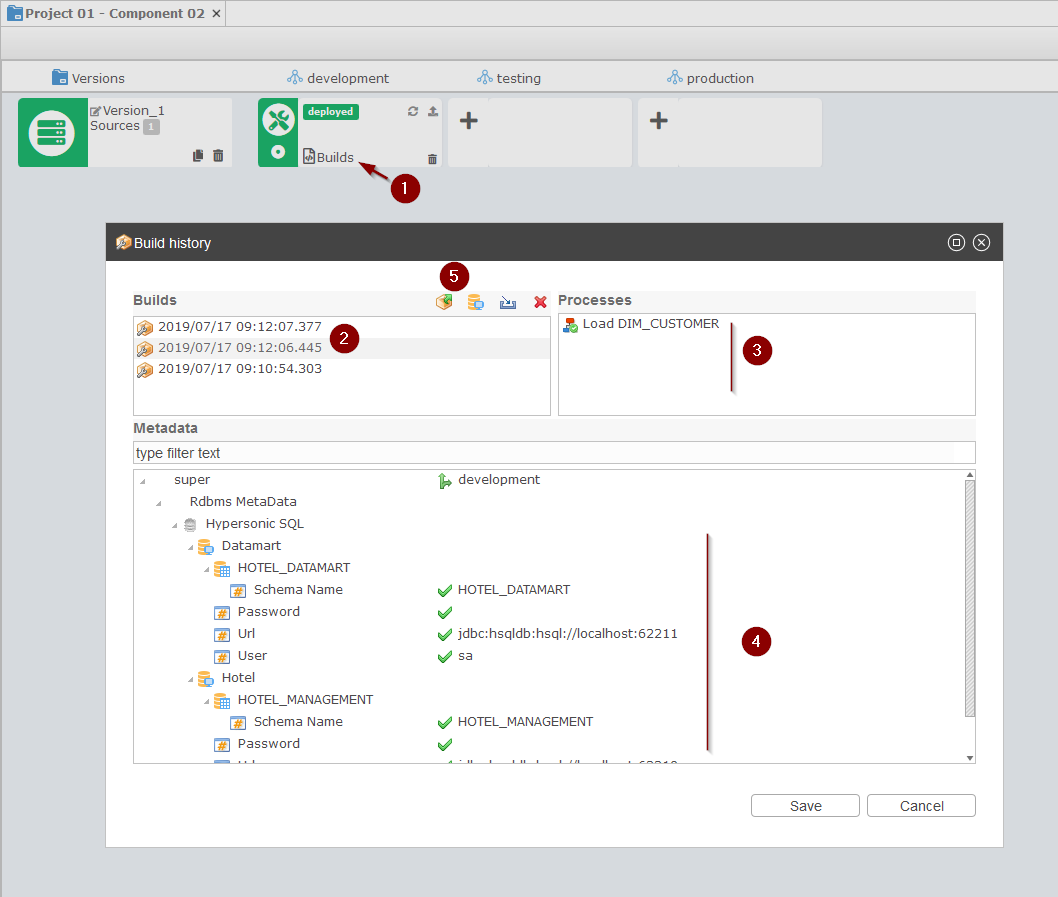
Restoring a previous Build
Each time a Deployment is made Stambia Analytics stores a copy of the built deliveries. There are three different possibilities when restoring previous Builds:
- Restore the build exactly as it was deployed, including the same Configuration values
- Re-build and deploy the corresponding version with the current Configuration values
- Download the built Deliveries to manually deploy them on specific Runtimes
Restoring a Build with the initially configured values
- Click on the Build link
- Among the Builds historized by Stambia Analytics select the one to restore
- Review the differences between the built sources and the current sources in the version: If a version has been deployed multiple times with changes in the sources (this is typically the case when a Deployment remains in working status for a long time) the sources that differ will be displayed with a warning icon and with an OK icon otherwise
- Review the Metadata to check any difference with the current Configuration values
- It is possible to Filter displayed Metadata by selecting one or more sources holding the CTRL or SHIFT keys and selecting the Processes
- If values used to perform the build correspond to existing values in Configuration, they will be displayed with a green check icon and with a warning icon otherwise
- To restore the selected Build with these Metadata values, click on the deploy button
Re-building and deploying with current configured values
- Set the Deployment as the current working Deployment for this Environment
- Click on the deploy button
Stambia Analytics will apply the current Configurations values on the sources of the version and will publish the Deliveries to the Runtimes of the given environment.
Example

Version deployed on development environment
Downloading the deliveries of a previous build
- Click on the build link
- Among the builds historized by Stambia Analytics select the one to download
- Click on the download button

This will download the deliveries locally allowing for instance manual installation on another Runtime.
Validating existing Deployments
Analyzing a specific Deployment
When a version has been deployed to an Environment Stambia Analytics can analyze the Deployment and provide feedback on the status of each source Process regarding build and deployment status on each Runtime. To trigger the analysis, click on the button.
This will open a page with a detailed report for each source Process:
- The first column contains the source Process name along with an icon indicating if the source Process is valid or if warnings were detected
- The second column indicates the status of the Build of this source Process
- The other columns indicate the status of the corresponding delivery on each Runtime
Build statuses
| Status | Description | Resolution |
|---|---|---|
| missing metadata | The source Process imported in this version uses some Metadata that have not been configured yet. This usually occurs when new sources have been imported into the version after a deployment has been previously made | Fix the missing Metadata values and re-deploy the version |
| build not found | The build corresponding to the source Process cannot be found. This usually occurs if the build has been deleted manually after the deployment or if the sources have been imported in the version after the deployment has been initially made | Re-deploy the version |
| version mismatch | Build’s source Process does not correspond to the current source Process. This usually occurs if new sources have been imported in the version after the deployment has been initially made | Re-deploy the version |
| metadata mismatch | Build’s Metadata values does not correspond anymore to the current Metadata values. This usually occurs if the configuration has been updated since the deployment | Re-deploy the version |
| valid | The build is up to date | No action required |
Runtime statuses
| Status | Description | Resolution |
|---|---|---|
| delivery not found | Required delivery could not be found on the Runtime. This can occur when a Runtime has been added to the environment after the deployment was made or if the Delivery has been manually deleted | Re-deploy the version |
| runtime not found | Stambia Analytics could not contact the Runtime for the analysis | Check the connectivity to the Runtime and if it is correctly started and execute the analysis again |
| delivery mismatch | The Delivery currently deployed on this Runtime does not correspond to the current version and Metadata | Re-deploy the version |
| deployed | The deployed Delivery is up to date | No action required |
Manually validating multiple Deployments
Stambia Analytics can analyze multiple Deployments at once and provide feedback on Package Managers requiring attention.
In the Navigator, right click on one of the following nodes and select Validate:
- Delivery Projects root node
- Delivery Project node
- Package Manager node
Stambia Analytics will analyze all the Deployments under this node and will display an icon in the Navigator corresponding to the level of attention required if any, according to the checks described in chapter Analyzing a specific Deployment
Managing Configured Metadata
Importing Metadata only
Stambia Analytics allows to import the Metadata attributes globally outside of a any Delivery Project context. This is useful in order to prepare the configuration values before importing the source packages into the Package Manager Versions:
- In the Navigator, right click on Delivery Projects
- Select Import Package Metadata
- Click on the Browse button
- Select a package archive from which Metadata attributes should be extracted.
- Click on the Open Button
- Click on the OK Button
- Click on the OK Button
Stambia Analytics will extract the Metadata attributes of the provided archive.
It is then possible to review the Configurations and set the new Metadata values.
Managing Metadata
Metadata attributes values can be defined either from the global Metadata Editor or directly from a Package Manager Editor in order to focus on a specific set of attributes values. In both cases the attributes values are updated for the corresponding Configuration which will potentially impact multiple Delivery Projects and Package Managers.
For instance, if you change the value of a server URL Metadata attribute on the «Development» Configuration, all the Delivery Projects and Package Managers using the «Development» Configuration will be impacted by the change.
Managing Metadata values from Metadata Editor.
It is possible to edit Metadata values for all the Configurations through the main Metadata Editor.
- In the Navigator, right click on Delivery Projects root node
- Select Open Metadata Editor
- Update or set the values for the Metadata
- Click OK to save the new values in the Configuration
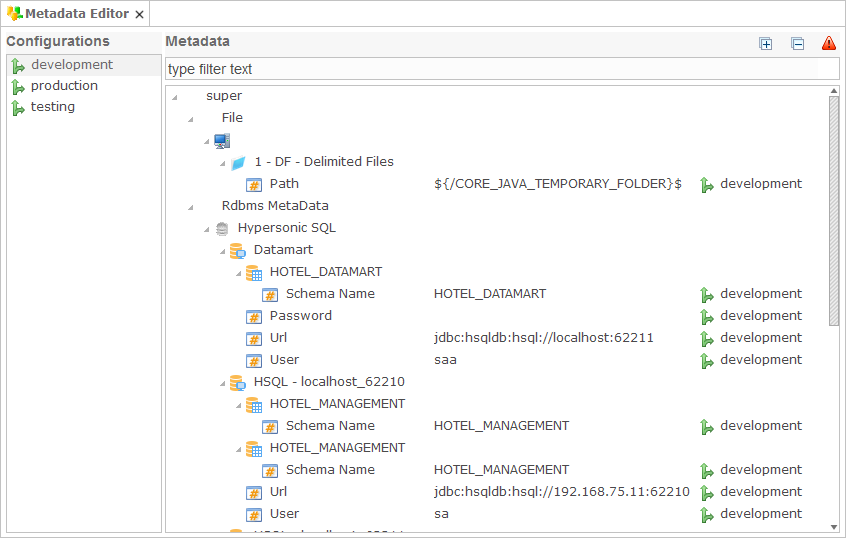
Note: It is possible to filter this editor on Metadata without any value, through the red filter button.
Managing Metadata of a specific environment from Package Manager Editor
When you are working on a specific Delivery Project and Package Manager, you can also manage Metadata values directly from the Package Manager Editor.
- Click on the configure button of a Deployment.
- Update or set the values for the Metadata
- Click OK to save the new values in the Configuration
Clicking on the configure button
Changing Metadata values
As for the Metadata Editor, changing the value of a Configuration will impact the Configuration itself, so all the Delivery Projects and Package Managers which are using it.
Note: It is possible to filter this editor on Metadata without any value, through the filter button, and also to test connections if the corresponding JDBC driver is installed in Stambia Analytics.
Appendix 1 – REST API Reference
Overview
Stambia Analytics is exposing REST APIs to perform operations on the application programmatically.
The complete list of available operations and parameters is exposed through a Swagger descriptor file, and an embedded Swagger-UI component allowing to visualize and play with the APIs.
| Name | Description | URL | URL Example |
|---|---|---|---|
| Base URL | REST APIs' base URL for operations | <application_base_url>/analytics/services/api/2 | http://localhost:8080/analytics/services/api/2 |
| Swagger2 Descriptor | REST APIs' Swagger2 descriptor file | <application_base_url>/analytics/services/swagger.yaml | http://localhost:8080/analytics/services/swagger.yaml |
| Swagger-UI | Swagger-UI tool to play with the API using the Swagger2 descriptor | <application_base_url>/analytics/swagger-ui/api/2 | http://localhost:8080/analytics/swagger-ui/api/2 |
Authentication required to use the APIs is an HTTP Basic Authentication, and the user connecting must have ‹analyticsRepositoryAdmin› role to be able to perform operations. Refer to Analytics Installation and Configuration documentation for further information about users and roles
Technical Return Codes Reference
When invoking the REST API, if there is an issue while processing the request Stambia Analytics will return with a corresponding error code and message through a JSON message which will be returned, and the HTTP status code.
Those functional error may appear for instance when trying to perform operations on objects which do not exist, when trying to deploy deliveries on unavailable Runtimes, etc.
You can find below the complete list of codes and messages which may be returned.
| Error Code | HTTP Status Code | Message | Description | How to fix |
|---|---|---|---|---|
| STA-REPO-001 | 404 | No Repository found | This error indicates that the main repository of the application cannot be found. This should not happen except if a user manually deleted Stambia Analytics repository in Stambia Analytics database. | Stambia Analytics database may have been unexpectedly modified, check in the database if the default repository exists (STA_REP table). |
| STA-REPO-003 | 404 | No Version found | This error indicates that the target Version does not exist. | Check if the Version named is correct in the URL and that this Version exists. |
| STA-REPO-004 | 404 | No Environment found | This error indicates that the target Environment does not exist. | Check if the Environment name is correct in the URL, check that this Environment exists, and this it is well associated with the target Delivery Project. |
| STA-REPO-006 | 404 | No Build found | This error happens when trying to deploy deliveries through a Deployment which does not contain any build. | Use the build operation on the same Environment and Version, and then try again to deploy. |
| STA-REPO-007 | 200 | An error occurred while deploying | This generic error appears when some issue did occur while trying to deploy on the given Environment. | A more precise message about the issue is added to the error, which should help to investigate and fix the issue. |
| STA-REPO-008 | 200 | Error deploying delivery | This error appears when some issue did occur while trying to deploy deliveries on the given Environment. | A more precise message about the issue is added to the error, which should help to investigate and fix the issue. |
| STA-REPO-009 | 424 | Missing Metadata | This error happens when trying to perform a build on an Environment in which some of the required Metadata attributes values are not set. | Connect to Stambia Analytics graphical UI in your browser, check which values are missing on the corresponding Delivery Project / Package Manager / Environment and Version, define them and try again. Definition of Metadata attributes values can only be done through the graphical UI and not through web services. |
| STA-REPO-010 | 404 | No Package Manager found | This error indicates that the target Package Manager does not exist. | Check that the Package Manager name is correct in the URL and that this Package Manager exists. |
| STA-REPO-011 | 409 | A Package Manager already exists with the same name | This error happens when trying to create a Package Manager which already exists. | |
| STA-REPO-012 | 404 | No Delivery Project found | This error indicates that the target Delivery Project does not exist. | Check if the Delivery Project name is correct in the URL and that this project exists. |
| STA-REPO-016 | 409 | A Version already exist with the same name | This error happens when trying to create a Version which already exists. | |
| STA-REPO-017 | 422 | Invalid Version Name: name can only contain characters, numbers, points and underscores | This error happens when trying to create a Version with an invalid name. | Change the name to match authorized characters. |
| STA-REPO-018 | 422 | Invalid Package Manager Name: name can only contain characters, numbers, underscores and spaces | This error happens when trying to create a Package Manager with an invalid name. | Change the name to match authorized characters. |
| STA-AUTH-ERROR | 403 | Unauthorized | User does not have the permission to use APIs. | Required permission to use the API is «analyticsRepositoryAdmin». Refer to installation and configuration guide for further information about available permissions. |
Appendix 2 – Using Deployment Managers (Stambia Analytics V2.x)
Warning: Deployment Managers have been removed in 3.x and replaced by Delivery Projects.
Introduction
Deployment managers allow you to customize, configure and manage the deployment of the integration processes developed on the Stambia Designer tool.
A Deployment Manager will contain Packages, Deployment Specifications and topology information (connections, metadata configuration).
Creating a Deployment Manager
In the Navigator View  , under the Deployments topic
  , will be listed all the Deployment Managers that have been created.
To create a new Deployment Manager:
- Right-click on the Deployments node in the Navigator View
- Choose New Deployment Manager

- Give a name and click on Finish
Deployment Manager View:
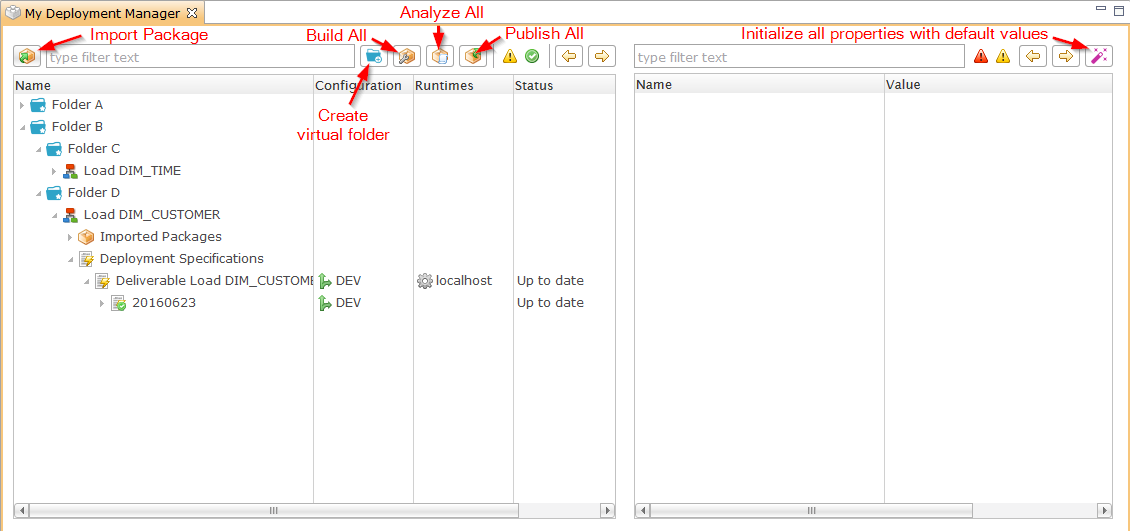
The arrows ![]()
![]() are used to navigate through the items with missing settings.
are used to navigate through the items with missing settings.
The Deployment process
In a Deployment Manager, you will be able to
- Import the Packages generated through the Stambia Designer tool by the people who have designed the integration processes.
- Define new Configurations. For instance you can define production or preproduction Configurations.
- Define Deployment Specifications on Packages, which allow to customize the Package deployment and metadata properties through the specified Configurations.
- Build a Delivery
- Deploy this Delivery on the Runtimes
- Manage the versions and check differences
Importing a Package
To import a Package:
- Open the Deployment Manager
- Click on the Import button

- Browse and choose a Package file, the extension of which is .pck
The package  will be imported and attached to the Process
  node.
node.
Different packages files can be attached to a same Process node, according to their unique identifier.
The default name used for the imported Package is the import date.
To import multiple packages at the once, simply make a zip archive containing all your packages and import it with the Import button
The packages must be at the root of the archive and only .zip files are allowed.
Organizing Packages
You can structure your Deployment Manager using virtual folders  .
.
This allows to organize and arrange your packages under a folder tree.
To create a folder, click on the New Virtual Folder button.
You can create as many folder/sub-folders as you need.
Then, simply drag and drop your packages between folders to organize them.
Defining Configurations
You have to define the Configurations  that will be used to configure the Delivery’s metadata.
To define a new Configuration:
- Click on the Configuration tab in the Deployment Manager
- Click on the Add button
- On the right side fill the Name field that will be the unique identifier of the Configuration.
- Don’t forget to save.
Note: The Configurations could be, for instance, PROD, PREPROD, or TEST.
Composed Configurations:
The Configuration can be configured to inherit from other existing Configurations with the Parents field.
To define a new Composed Configuration:
- Click on the button
 near Parents field.
 - This will open a new Window in which you will select the desired Configurations.
Note: The order is important as it will define the inheritance order: the values of the lowest Configuration will be taken, if a value is not found, the value of the upper configuration will be taken, and so on...
Creating a Deployment Specification
Once you have imported a Package, and you have defined at least one Configuration, you will be able to create Deployment Specifications  and configure the metadata.
To create a Deployment Specification:
- Right-click on the Process node
- Choose New Deployment Specification
- On the specification , specify one or multiple Configurations by clicking on the button near Configurations property.
- This will open a new Window in which you will choose the Configurations you want to associate to your Specification.
Note: # You can have multiple Configurations associated to a Deployment Specification. It offers the possibility to execute a delivery with different Configurations, useful for testing with different values, for example.
# Do not confuse this with a Composed Configuration, which is a single Configuration that inherits from other ones.
Configuring the metadata properties
Once the Deployment Specification is created and associated to one or more Configurations, you will need to configure the metadata properties on these specified Configurations.
- Click on the Deployment Specification.
- On the right part will appear the list of the metadata that you need to configure.
If the Error icon appears on property, you have to configure the metadata, because it has not been configured before.
If the Configuration icon appears, then the metadata is correctly configured.
Several Packages can share the same metadata. In this case, some metadata could already be configured due to a previous deployment work.
You can filter all properties which need to be configured by clicking on the error icon on the top of Configuration table, next to the text filter.
To define the metadata:
- Click on the property that you want to configure
- On the bottom part, the property will appear with its imported value. This is the value that has been exported from the design moment when the Package was created.
- You can keep the same value by clicking on the Configuration link
- Or you can define your own value by filling the text area
- Do this for each property that has the Error icon
Note: For composed Configurations, you can see that all the parents appear in this window. If a value is not set, the value from the parent will be taken.
Tip: Use the Initialize
Remotely available deliveries
You can set a delivery as Remotely Available.
A Runtime configured to access to the Deployment Manager will fetch the latest version of the delivery before executing it.
- Click on a Deployment Specification.
- Check Remotely Available.
- Optionally, change the remote name, which by default is the process name.
Building a Delivery
Once all the metadata are configured, a Delivery can be built from the Deployment Specification.
- Right click on the Deployment Specification node , and choose Build Deliveries.
- This will create a new version of Delivery and place it under the Deployment Specification node.
Note that you can build Deliveries from any nodes (Specification, Process, Folder, ...) with right click and Build Deliveries.
This will create a Delivery for each child of the node.
Note The metadata configured on a built Delivery cannot be modified. If a modification needs to be done, update the Deployment Specification, and build a new version.
Tip: Click on the top Build All button
to build Deliveries for the entire Deployment Manager.
Deploying Deliveries on the Runtimes
A version of a Delivery can be deployed on Runtimes.
To proceed, you’ll first have to associate one or more Runtimes to the Deployment Specification.
- Click on the Deployment Specification
- Click on the button near Runtime property.
- This will open a new Window in which you will choose the Runtimes you want to associate to your specification.
After associating one or more Runtimes, you can deploy Deliveries to them.
There are three ways to do it:
- On the Delivery
- Right click on the Delivery and choose Publish Delivery
- On any node of the tree (Specification, Process, Folder, ...)
- Right click and choose Publish Deliveries
- This will open a new Window in which you will select the Delivery to publish and on which Runtime.
- Alternatively, you can also decide to download the Delivery file and deploy it manually on the Runtimes.
- Right-click on the Delivery
- Choose Download Delivery
Note: You can only deploy the Delivery on a Runtime by a Publish operation if the Runtime is started (on-line) and accessible.
Tip: Click on the top Publish All button
to publish all Deliveries of the Deployment Manager.
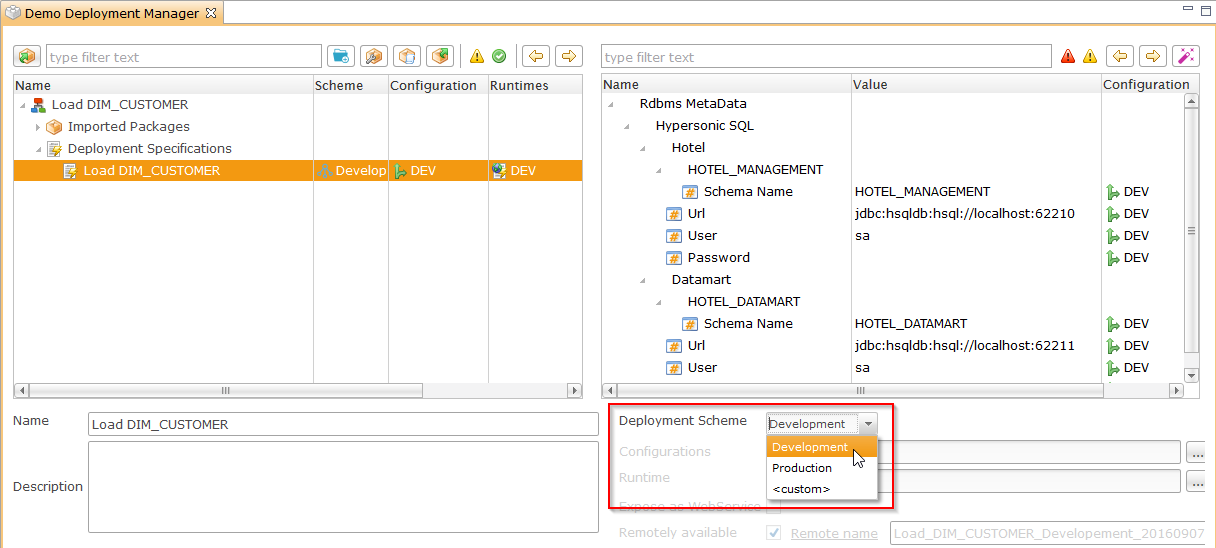
Defining Deployment Schemes
Deployment Schemes can be used to automate the configuration of Deployment Specifications.
A Scheme is simply a pre-configured Specification where you can define the Configurations, Runtimes, and options that must be used.
After defining a Scheme, you can choose to use it on the desired Deployment Specifications using the Deployment Scheme box.
Warning: When updating a Scheme, all the Deployment Specifications using it will be impacted.
To define a Deployment Scheme:
- Click on the Deployment Scheme tab in the Deployment Manager
- Click on the Add button
- On the right side fill the Name field that will be the unique identifier of the Deployment Scheme.
- Define the properties accordingly to your requirement: Runtime, Configuration, ...
- Don’t forget to save.
The ‹Use as default Scheme› property allows to specify that the Scheme must be used automatically on newly created Deployment Specifications.
The ‹Remote name mask› property can be used to define dynamically the remote name of the Specifications using the Scheme.
This allows to use the same Scheme on multiple Specifications by using the following masks:
| Mask | Description |
|---|---|
| [Scheme] | Name of the Scheme. |
| [Package] | Name of the Package. |
| [DeploymentSpec] | Name of the Deployment Specification. |
The masks will be replaced automatically with their values on the Specifications using the Scheme.
You can moreover use the Generate Schemes button to automatically create all the Schemes corresponding to the existing Deployment Specifications.
After clicking on this button, Stambia Analytics will generate the Schemes and let you choose if you want to use the newly created Schemes on the Deployment Specifications.
Managing Delivery versions and checking the differences
The current and default versions
Packages
If you import new versions of a Package you have imported before, the last imported Package will become the current used version of the Package  .
.
A new icon  will be added to specify that this Package is the one used to generate the Deliveries.
Delivery versions
If you create a new version of a Delivery, the last Delivery version you created will become the current version of the Delivery  .
.
A new icon will be added to specify that this Delivery version is the last version.
Checking the differences
- Differences between metadata and the built version of the Delivery
If there are differences between the Delivery metadata and the version of the Delivery, a warning icon  will appear on the objects (tree nodes and metadata properties).
This is probably because a metadata has been changed before the Delivery was built.
- Differences between the built version and the deployed version on the Runtimes
You can check the differences between the built version of the delivery and the version deployed on the Runtimes. This is available if you defined Runtimes for this Delivery.
Under the current version node you will see the Runtimes  on which different statuses can appear.
A warning icon will appear if a difference is found.
A question icon  will appear if the difference is unknown.
A green checked icon will appear if the built Delivery and the deployed Delivery are correctly synchronized.
To check the differences:
- Right click on the Runtime under the current version node and choose Analyze.
- Right click on any node of the tree and choose Analyze Runtimes.
Tip: Click on the top Analyze All button
to analyze all the runtimes.
Restoring a previous version
It is possible to restore a previous version of a Package or a Delivery.
- To change the current Package, click on the Current Package check box.
- To change the current version, click on the Current Build check box.
The default green icon will appear on the element you have selected.