Introduction to Stambia Analytics
Product Overview
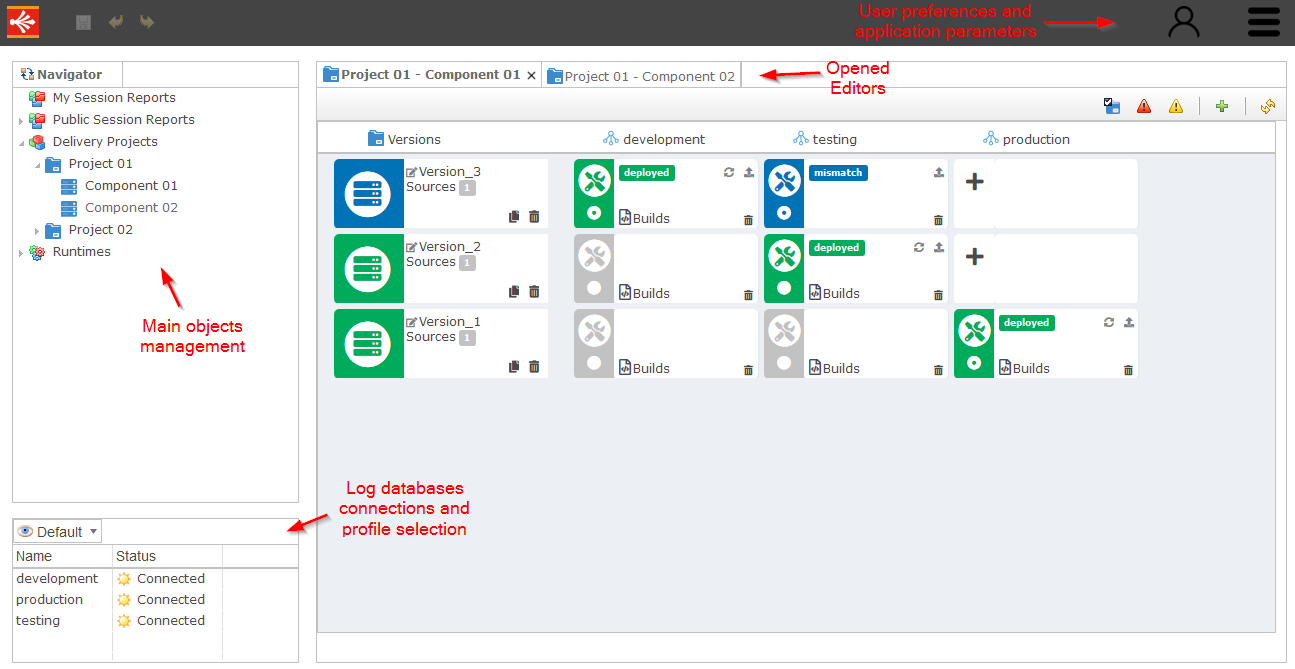
Stambia Analytics is a web application which is used to manage all the production process, from definition and configuration of environments, deployment of deliveries on those environments, to consultation of execution logs.
With Stambia Analytics you’ll be able to define as many environments as needed, such as development, test, or production environments.
Each environment will have its own set of Runtimes and Configurations.
You’ll then be able to manage all the production process on those environments, through dedicated features allowing to
configure, follow, and publish deliveries on each of them, with a notion of version to be able to historize what is deployed on Runtimes and come back to previous versions easily in case of issues.
Stambia Analytics moreover offers the possibility to consult execution logs with statistics, graphs, and ability to navigate inside executed sessions to find exactly what has been executed: which SQL Queries, which steps, which actions, ...
Here is an overview of Stambia Analytics graphical interface:
Installation Procedure
Overview
This section explains how to install and configure Stambia Analytics version 3.x and higher.
If you are looking for the installation procedure of previous versions, please refer to _Appendix 3 -Installation of Stambia Analytics V2.x.x which is at the end of this documentation.
Requirements
Software download
You can find all the products for download on www.stambia.org, available from the “Download” menu. For Stambia Analytics there is one zip file to download from the “Stambia Analytics” section.
Hardware and software requirements
Stambia Analytics must be deployed on a Java Web Application Server and requires a database to store its data.
Prerequisites are the following:
- Operating System:
- Stambia Analytics can be installed on any system having a Java Virtual Machine (JVM)
- Java Virtual Machine (JVM)
- Java 1.8 ou 11.0
- J2EE Web Application Server
- Apache Tomcat 8 / Apache Tomcat 8.5 / Apache Tomcat 9
- Wildfly 10,11,12,13
- ...
- A relational database schema to store Stambia Analytics data, with at least 1Go free space, which may grow depending on the number of packages and versions created and historized. Following databases are supported:
- MySQL
- Microsoft SQL Server
- PostgreSQL
- Oracle
- Sybase ASE
- Available disk space
- 500Mo of available disk space
Accounts
You need an account with administrative rights on the web server to deploy a new application and edit web server configurations.
You also need a database user account to be used by Stambia Analytics with read/write access on the target database schema.
Limitations Stambia Analytics
You can find below the list of known limitations and issues.
We’re working on it to fix them in upcoming releases.
| Known Limitation / Issue | Description |
|---|---|
| Wildfly 14 and higher are not supported | Analytics 3.1.0 will not work for now with Wildfly 14 and higher versions. Please use previous versions such as Wildfly 13. We are working on this point to unlock higher versions in an upcoming release. |
| Graphical issues and glitch | There might be some minor graphical issues with the new user interface, we are working on it and do not hesitate to contact us if you have any feedback or issue on this part. |
| Environment order | Environments display order in Package Manager Editor is computed from the order in which they have been added in the Delivery Project when configuring it. If you want to change the order in which the Environment columns appear in Package Manager Editor, such as having “Development”, “Testing”, “Production” in the correct order from left to right, go to the Administration, then on Delivery Project tab remove the Environments from the Delivery Project, save, and then add them again in the order you want them to be displayed in Package Manager Editor. |
Installation Procedure
Installation overview
Depending on the Java Web Application Server you are using the steps to install Stambia Analytics will be slightly different.
The procedure presented below should however be similar in all applications, with only locations and details changing.
Main steps for installing Stambia Analytics are the following.
- Definition of «STAMBIA_WEBAPP_HOME» environment variable
- This environment variable defines a folder path where Stambia Analytics will store its temporary data such as logs, and additional drivers required to connect to Runtime Log Databases. Note that the application server must have read and write permission on the folder defined.
- Definition of a JNDI datasource in application server
- This datasource represents connection information to the database and schema in which Analytics will store user data such as session reports, configurations, delivery projects, preferences, ...
- Depending on application server the datasource configuration procedure may vary, please refer to your application server’s documentation.
- Datasource name must be “jdbc/sta_datasource” except for Apache Tomcat where it must be “jdbc/sta_datasource_tomcat”.
- Definition of a user in application
- Definition and configuration of a user having correct Stambia Analytics roles in the application server.
- Depending on application server, user configuration procedure may vary, please refer to your application server’s documentation.
- The complete list of available roles can be found at the end of this document, in the «Appendix 1» section.
- Installation in application server of the JDBC driver corresponding to the database used in the datasource
- You must install in the application server the JDBC driver corresponding to the database configured in the datasource
- Depending on application server, this may require some additional configuration for making this driver visible by the application server or the datasource.
- Installation and deployment of Stambia Analytics web application
- Finally, you can deploy Stambia Analytics web application in application server
When installation is finished and server running, you can access Stambia Analytics application through following URL (may vary depending on application server and application server configuration):
http://<server>:<port>/analytics/stambia
Notes: Installation procedures samples for various application servers can be found below. Please refer to the documentation of your application server for more details if an example is not yet provided with, or if you need more details about a specific step. Note also that depending on application servers' versions the provided samples might need to be adapted to reflect your environment.
Sample – Installation on Apache Tomcat
Definition of «STAMBIA_WEBAPP_HOME» environment variable
Define an environment variable named «STAMBIA_WEBAPP_HOME» which value will be a folder path where Stambia Analytics will store its temporary data such as logs and additional drivers required to connect to Runtime Log Databases.
We suggest defining a folder which is outside of Apache Tomcat installation, to make sure it will not be removed unexpectedly.
Note also that Apache Tomcat must have read and write permission on the folder defined.
Make sure to have defined this environment variable and that Apache Tomcat is well using it, otherwise this folder will be created inside a temporary work folder inside the Apache Tomcat installation, which might be cleaned at any time.
Definition of Apache Tomcat datasource
Configure the JNDI DataSource for your database in Tomcat by adding a declaration for your resource to your Apache Tomcat Context (context.xml). The resource name must be «jdbc/sta_datasource_tomcat».
As an example, for a MySQL database named analyticsdb on server localhost and port 3306:
<Context>
	<!-- maxTotal: Maximum number of database connections in pool. Make sure you
		configure your mysqld max_connections large enough to handle
		all of your db connections. Set to -1 for no limit.
		-->
	<!-- maxIdle: Maximum number of idle database connections to retain in pool.
		Set to -1 for no limit. See also the DBCP documentation on this
		and the minEvictableIdleTimeMillis configuration parameter.
		-->
	<!-- maxWaitMillis: Maximum time to wait for a database connection to become available
		in ms, in this example 10 seconds. An Exception is thrown if
		this timeout is exceeded. Set to -1 to wait indefinitely.
		-->
	<!-- username and password: MySQL username and password for database connections -->
	<!-- driverClassName: Class name for the old mm.mysql JDBC driver is
		org.gjt.mm.mysql.Driver - we recommend using Connector/J though.
		Class name for the official MySQL Connector/J driver is com.mysql.jdbc.Driver.
		-->
	<!-- url: The JDBC connection url for connecting to your MySQL database.
		-->
	<Resource name="jdbc/sta_datasource_tomcat" auth="Container" type="javax.sql.DataSource"
		maxTotal="100" maxIdle="30" maxWaitMillis="10000"
		username="javauser" password="javadude" driverClassName="com.mysql.jdbc.Driver"
		url="jdbc:mysql://localhost:3306/analyticsdb"/>
</Context>
More information can be found on Apache website: https://tomcat.apache.org/tomcat-8.0-doc/jndi-datasource-examples-howto.html
Definition of Stambia Analytics user
In order to add your users and roles, you have to edit the “tomcat-users.xml” file.
Adding a user can be done with the following block:
<tomcat-users>
<user name="youruser" password="yourpassword" roles="admin-gui, manager-gui, analyticsAdmin,
analyticsConnect" />
</tomcat-users>
In this example, the user has the two Stambia Analytics roles “analyticsAdmin” and “analyticsConnect”, but also the two
Tomcat roles “admin-gui” and “manager-gui”.
The complete list of available roles can be found at the end of this document, in the «Appendix 1» section.
Installation of the JDBC driver in Apache Tomcat
You need to add in the Apache Tomcat installation the JDBC driver matching the database defined in the datasource.
The folder where to install this driver is usually located under <Tomcat_installation_dir>/lib.
Make sure that the JDBC driver is matching the database provider and version.
E.g.
If your are using Microsoft SQL Server 2017 as datasource, install a Microsoft SQL Server JDBC driver supporting this database version.
Installation and deployment of Stambia Analytics web application in Apache Tomcat
To install Stambia Analytics you need to copy the Stambia Analytics .war file in the Apache Tomcat folder “webapps”.
Tomcat will auto-deploy the application.
Make sure you have performed all the previous steps (configuration of datasource, of user, and installation of JDBC driver) before deploying Stambia Analytics.
Installation verification
To check if the installation of Stambia Analytics was successful, open a web browser on <TOMCAT_BASE_URL>/analytics/stambia, where TOMCAT_BASE_URL is the url of your web server. Once authenticated with a user having required Analytics roles, it should open the Stambia Analytics main page.
In Apache Tomcat startup log file (or on the console), the following line is returned when Stambia Analytics database is properly initialized:
Analytics datasource successfully initialized
Troubleshooting
If you have any issue with installation and configuration, refer to the Troubleshooting Installation and Configuration part of this documentation.
Uninstall Procedure
Stambia Analytics uninstall consists of removing the web application from your web server.
You can use the Tomcat manager app, or stop Tomcat, remove the war file and then restart Tomcat.
You’ll also have to manually drop the database schema where Analytics has stored its data.
Sample – Installation on WildFly (formerly known as JBoss)
Definition of «STAMBIA_WEBAPP_HOME» environment variable
Define an environment variable named «STAMBIA_WEBAPP_HOME» which value will be a folder path where Stambia Analytics will store its temporary data such as logs and additional drivers required to connect to Runtime Log Databases.
We suggest defining a folder which is outside of WildFly installation, to make sure it will not be removed unexpectedly.
Note also that WildFly must have read and write permission on the folder defined.
Make sure to have defined this environment variable and that WildFly is well using it, otherwise this folder will be created inside a temporary work folder in application server, which which might clean it at any time.
Installation and configuration of the JDBC driver in Wildfly
You need to install and deploy in WildFly the JDBC driver matching the database which will be used by Analytics to store its data.
Depending on how you are using Wildfly the exact procedure will be different.
Please refer to your administrator and Wildfly’s documentation for further information as there are several options.
You can simply deploy the JDBC driver as any other application in Wildfly, or define it as a driver or a module, for instance.
The main goal is this driver to be used in the JNDI datasource which will be configured afterwards.
Make sure that the JDBC driver is matching the database provider and version.
E.g.
If your are using Microsoft SQL Server 2017 as datasource, install a Microsoft SQL Server JDBC driver supporting this database version.
Definition of WildFly datasource
Configure the JNDI DataSource for your database in WildFly by adding a declaration for your resource in your application configuration files. The resource name must be «jdbc/sta_datasource».
For example for a SQL Sever database:
<datasource jndi-name="java:/jdbc/sta_datasource" pool-name="sta_datasource">
		<connection-url>jdbc:sqlserver://sqlserverhostname</connection-url>
		<driver-class>com.microsoft.sqlserver.jdbc.SQLServerDriver</driver-class>
		<driver>sqljdbc4.jar</driver>
		<security>
			<user-name>myuser</user-name>
			<password>mypassword</password>
		</security>
		<validation>
			<valid-connection-checker class-name="org.jboss.jca.adapters.jdbc.extensions.mssql.MSSQLValidConnectionChecker"/>
			<background-validation>true</background-validation>
		</validation>
</datasource>
Depending on your WildFly usage, the configuration file where to place this datasource may be different. When using WildFly in standalone mode, this will be in standalone.xml file for instance. You can also use WildFly graphical user interface to create it more easily at the correct place.
Definition of Stambia Analytics user
In order to configure your users and roles, you will have to create a security domain in WildFly which will contain the user with correct permissions. The complete list of available roles can be found at the end of this document, in the «Appendix 1» section.
This security domain must be named “analyticsRealm”.
Example of security domain:
<security-domain name="analyticsRealm">
		<authentication>
		<login-module code="UsersRoles" flag="required">
			<module-option name="usersProperties" value="${jboss.server.config.dir}/analytics-users.properties"/>
			<module-option name="rolesProperties" value="${jboss.server.config.dir}/analytics-roles.properties"/>
		</login-module>
			</authentication>
</security-domain>
Example of analytics-users.properties file:
youruser=yourpassword
Example of analytics-roles.properties file:
youruser=analyticsConnect,analyticsAdmin
Installation and deployment of Stambia Analytics web application in WildFly
The last step is to deploy the Stambia Analytics web application in WildFly.
Depending on how you are using WildFly, the procedure for deploying the application may vary.
When using WildFly as standalone mode, you can simply copy the Stambia Analytics .war file into the “deployment” folder and it will be automatically deployed, or you can use WildFly graphical user interface to deploy it more easily at the correct place.
Make sure you have performed all the previous steps (configuration of datasource, of user, and installation of JDBC driver) before deploying Stambia Analytics.
Installation verification
To check if the installation of Stambia Analytics was successful, open a web browser on <WILDFLY_BASE_URL>/analytics/stambia, where WILDFLY_BASE_URL is the url of your web server. Once authenticated with a user having required Stambia Analytics roles, it should open the Stambia Analytics main page.
In Wildfly startup log file (or on the console), the following line is returned when Stambia Analytics database is properly initialized:
Analytics datasource successfully initialized
Troubleshooting
If you have any issue with installation and configuration, refer to the Troubleshooting Installation and Configuration part of this documentation.
Uninstall Procedure
Stambia Analytics uninstall consists of removing the web application from your web server.
You can use the WildFly administration tools to undeploy it.
You’ll also have to manually drop the database schema where Analytics has stored its data.
Troubleshooting Installation and Configuration
You can find in this section some advises for troubleshooting installation and configuration when encountering issues.
Make sure the correct java version is used
The first step is to make sure that your application server is well using Java 1.8, which is a prerequisite.
Make sure the STAMBIA_WEBAPP_HOME variable is visible by the application server
Adding the STAMBIA_WEBAPP_HOME environment variable to the operating system may not be sufficient for the application server to take it into account.
Depending on how the application server is installed (through a service, as a standalone application, ...) you may have to perform additional steps for the variable to be taken into account by the application server, such as reinstalling the service, adding the variable into a specific file which is taken into account by the server (setenv.bat for Apache Tomcat for instance), or any other server specific needed configuration.
The idea is to make sure that the variable is well taken into account, otherwise if the STAMBIA_WEBAPP_HOME folder variable is not defined, Stambia Analytics will use a folder inside the temporary work folder of the application server, which may be cleaned at anytime.
Finally, make sure that the application server have read and write permission on the folder defined.
Make sure the JDBC Driver is visible by the datasource
Stambia Analytics will use the sta_datasource (or sta_datasource_tomcat) datasource configured in the application server to connect to the database and schema where its data will be stored.
This therefore requires that the JDBC driver corresponding to this database is installed in the application server and visible by datasource and Stambia Analytics application.
If you have issues such as “java.lang.ClassNotFoundException: com.mysql.jdbc.Driver” like exceptions, this may implies that the driver is not installed, or not visible by the datasource or Stambia Analytics application.
Refer to your application server’s documentation to make sure that the driver is well configured and visible.
For example, installing Analytics with a MariaDB database might fail on Analytics V3 and MariaDB Version 2.4.0 (or higher).
This kind of message can be displayed:“cannot acquire data source”.
To resolve this problem, when you have a MariaDB database as an Analytics database, use the mysql jdbc driver instead of the mariadb jdbc driver.
Make sure the JNDI datasource is named properly
Stambia Analytics is waiting for a datasource with a pre-defined name.
Make sure therefore that the datasource configured for Stambia Analytics’s database is correctly named.
Datasource name must be “jdbc/sta_datasource” for all application servers except for Apache Tomcat where it must be “jdbc/sta_datasource_tomcat”.
Refer to the installation procedure and provided samples for examples with different application servers providers.
Make sure database is properly initialized at startup
When the application server (Apache Tomcat / Wildfly / ...) starts, the following line should be logged whenStambia Analytics application is initialized:
Analytics datasource successfully initialized
Configuration Procedure
The administration and configuration of Stambia Analytics can be set up in the Administration menu.
This menu will open the Administration window in which Runtimes, Configurations, Environments, Delivery Projects, Log Databases, Profiles and Preferences can be defined.
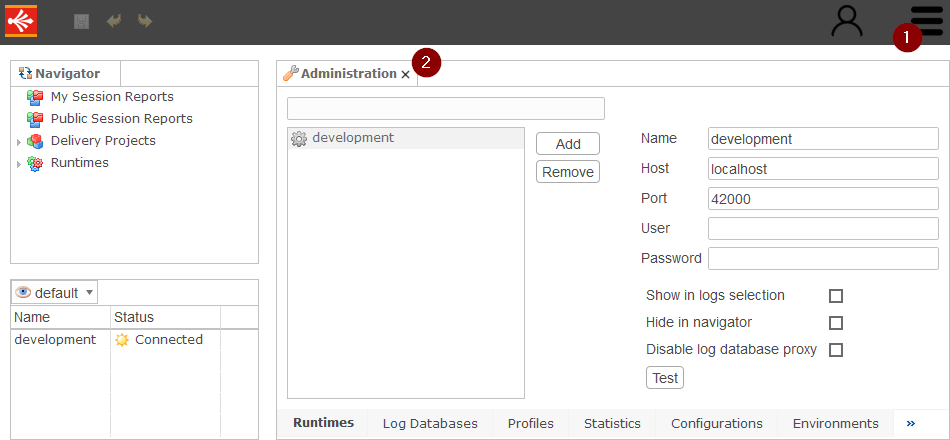
Defining Runtimes
In the Runtime tab you can define connections to one or more Runtimes.
- Click on the Add button
- Specify a Name, the Host and the Port on which to connect
- Optionally set a User and Password if the Runtime is secured
- Test the connection through the Test button
If you check the Show in logs selection box, the Runtime name will appear in the selection combo box under the main menu.
If you check the Hide in navigator box, the Runtime will not appear in the selection Navigator view.
If you check the Disable log database proxy box, Stambia Analytics will not retrieve the session information from the Runtime.
When all the Configurations are done and saved, don’t forget to select the Runtime in the combo box under the main menu if you want to use it.
Note: To access to a Runtime, don’t forget to open the needed IP ports. By default 42000.
Important:
# If you configure Stambia Analytics to connect to the log databases using Datasources you should check the Disable log database proxy box on each Runtime.
# If your Runtime is configured to use a different log database than the default one: Add the corresponding JDBC drivers in:
<STAMBIA_WEBAPP_HOME>/jdbc folder
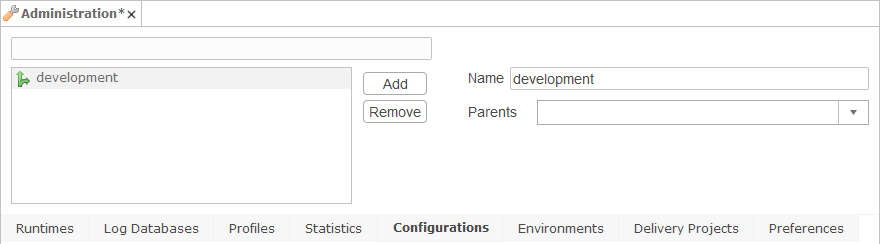
Defining Configurations
A Configuration is a named placeholder in which the values of each externalized Metadata of source packages imported in Stambia Analytics are stored. For example a “Test” configuration will store all the Metadata related to the “testing” environment.
In the Configurations tab you can define the configurations that will be used when building with Package Managers.
- Click the Add Button
- Set a Name for the Configuration
- Optionally, select a Parent Configuration which allows the current Configuration to inherit some values from a Parent Configuration
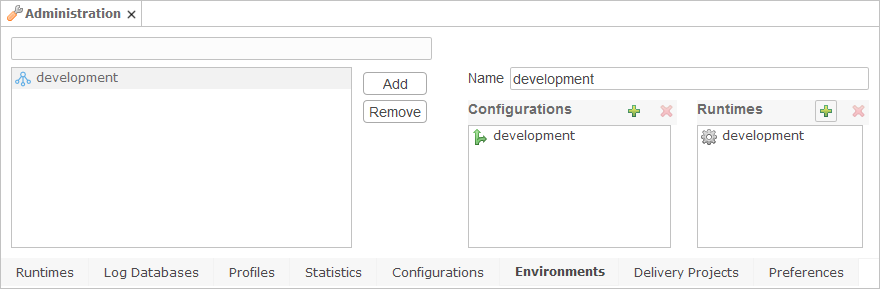
Defining Environments
An Environment is a reusable definition of Configurations to apply when building with Package Managers as well as the Runtimes to deploy to.
The Environments tab allows to define the Environments that will be used when building and deploying deliveries through Package Managers.
- Click the Add Button
- Set a Name for the Environment
- Add one or more Configurations. If multiple Configurations are selected, each delivery built and deployed for this Environment will require then be executed by specifying the Configuration on each execution
- Add one or more Runtimes. If multiple Runtimes are selected, each delivery built and deployed for this Environment will be deployed on each of the selected Runtimes, ensuring the consistency of all the Runtimes in a same environment.
Defining Delivery Projects
Deployments are managed through Delivery Projects indicating the target deployment environments of each Package Manager of the project.
In the Delivery Projects tab you can define the Delivery Projects that will allow to build and deploy deliveries on one or more Environments.
- Click the Add Button
- Set a Name for the Delivery Project
- Create one or more Package Managers. A Package Manager corresponds to a set of Processes that has been created in Stambia Designer and that has to be configured and deployed using Stambia Analytics. When you want the deliveries published to be published as Web Services on Runtimes, simply check the “Deploy as web service” box on the corresponding Package Manager.
- Add one or more Environments.
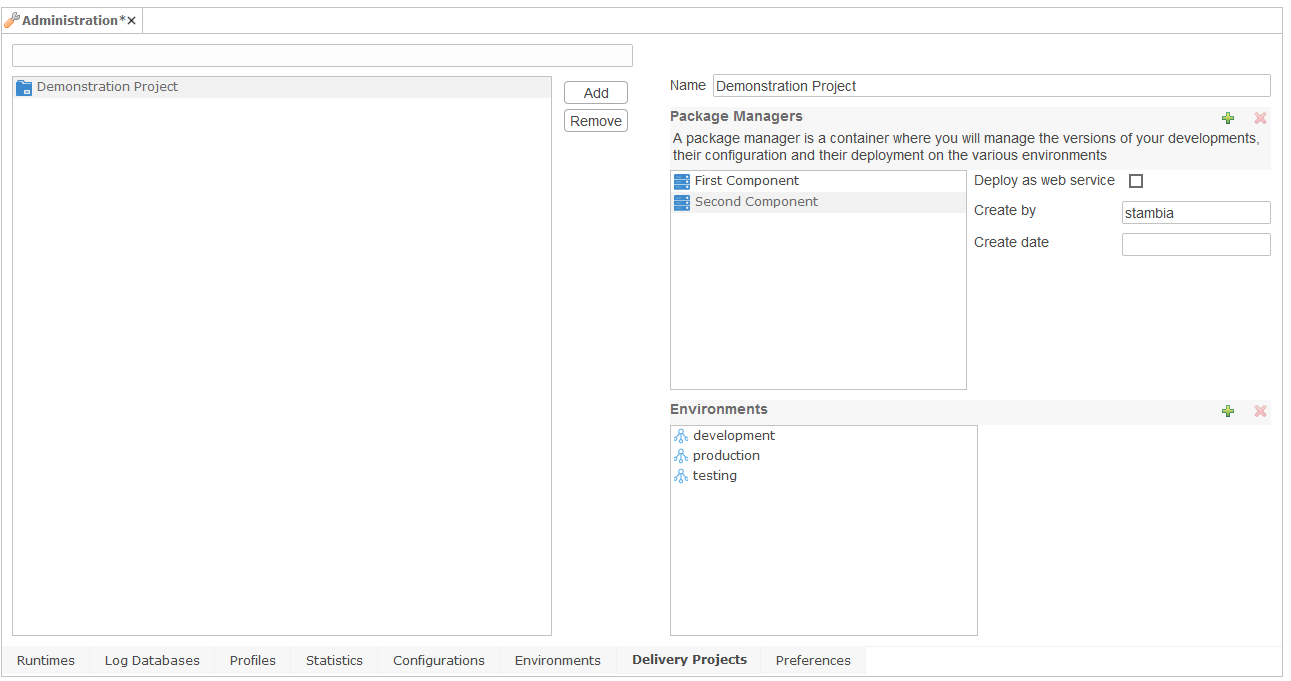
Note: If multiple Environments are selected for a same Delivery Project, it will be possible to manage the lifecycle of each Package Manager across the various Environments. For instance, if a Delivery Project uses the “Tests” and “Production” Environments, it will be possible to deploy for a given Package Version the Version 1.0 in “Production” and deploy Version 2.0 in “Tests” without impacting the “Production” Environment.
Defining log databases
In the Log databases tab you can define connections to one or more logging databases.
- Click on the Add button
- Specify the Name
- Define the Connection:
- Select Standard if you want Stambia Analytics to open its own JDBC Connection to the database and provide:
- the JDBC Driver class
- the connection URL
- the User
- the Password
- Select Datasource if you want Stambia Analytics to use a Datasource defined in your Application Server and provide the Datasource Name
- Select Standard if you want Stambia Analytics to open its own JDBC Connection to the database and provide:
- Specify the schema name, and if needed, the tables prefix
- Test the connection through the Test button
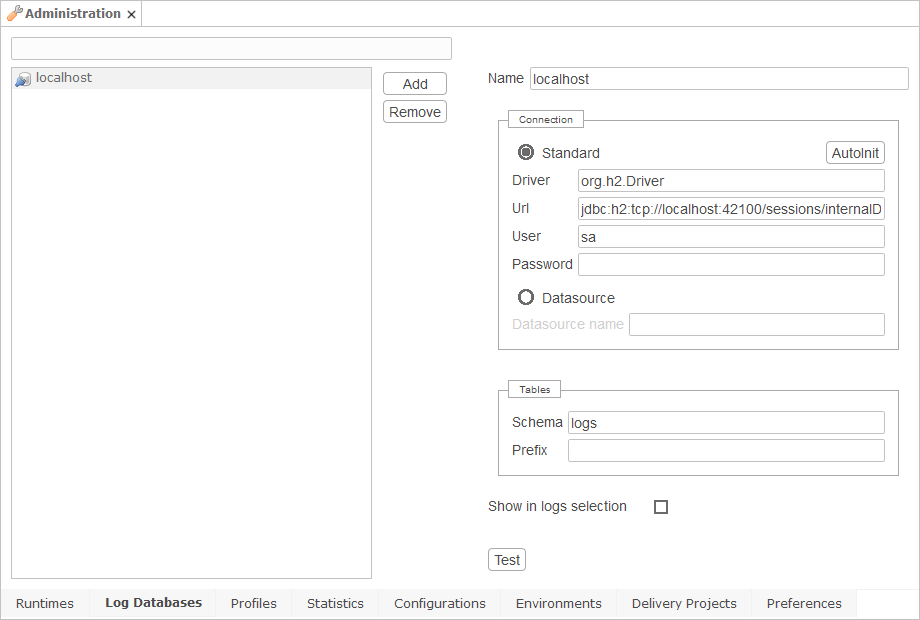
If you select the check box Show in logs selection, the database name will appear in the selection combo box under the main menu.
Note: To access to a database, don’t forget to open the needed IP ports.
Tip: You can automatically fill the database information by connecting to a Runtime that knows the connection information. To do this, click on the Autoinit button and specify a Runtime host or IP, and a Runtime port.
Important: Don’t forget to add the JDBC drivers corresponding to the log databases in:
<STAMBIA_WEBAPP_HOME>/jdbc folder
Defining Profiles
Profiles are useful to gather Sessions from Runtimes and log databases.
For example, a “Production” profile can be created to administer all Runtimes and logging databases dealing with production executions.
You can define a Profile in the Profiles tab.
- Click on the Add button
- Give a name
- Click on the button in the right of the Log providers text area. A new window will appear.
- In this window, add from left to right the databases and the Runtimes you want to add to the profile.
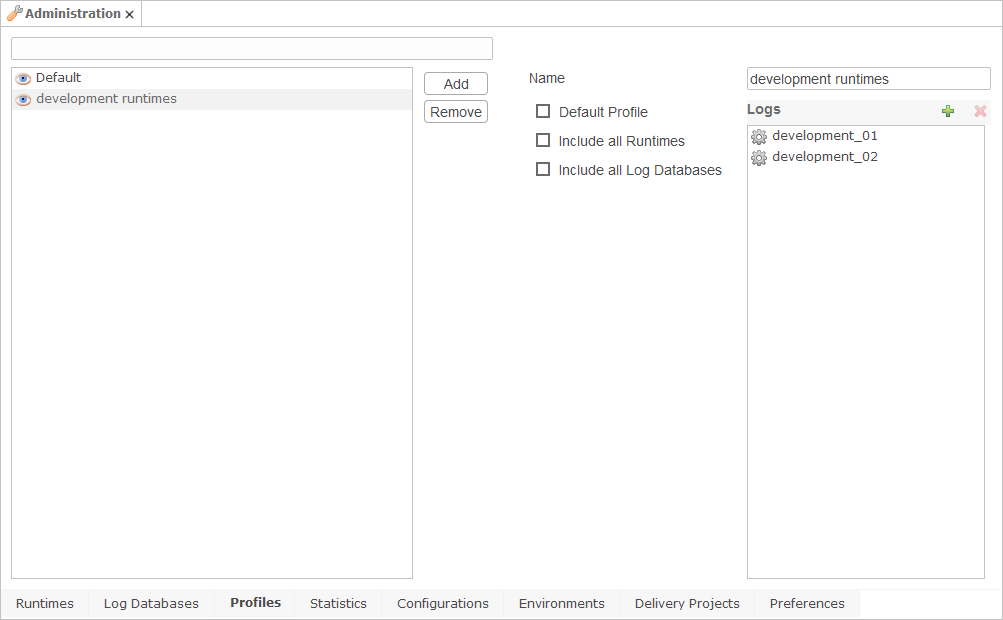
The created profile will be automatically usable in the selection combo box under the main menu.
You can check the Default Profile box if you want to use the Profile as default for users that doesn’t have any profile selected.
You can check All Runtimes if you want this profile to gather sessions from all Runtimes. When using this option, sessions will be gathered from all the Runtimes defined in Analytics.
You can check All Log Databases if you want this profile to gather sessions from all Log Databases. When using this option, sessions will be gathered from all the Log Databases defined in Analytics.
Defining statistics
Statistics can be added or removed in the Statistics tab.
Every numeric variable can become a statistic. These statistics will appear in the statistic view.
Defining preferences
In the Preferences tab, you can manage and configure Stambia Analytics behaviors.
The following properties are available:
| Property | Default | Description |
|---|---|---|
| Analyze Deployments at Package Editor opening | false | If true, Deployments statuses will be automatically analyzed when opening a Package Editor to check the availability of Runtimes, ... If false, you will have to use the refresh button after having opened the Package Editor if you want to analyze the status of Deployments. |
| Validate Delivery Projects on change | false | If true, when a modification is performed in a Package Editor, a validation of Delivery Projects is done, to make sure everything is configured, and to display error or warning icons in on Delivery Projects which requires attention in the Navigator. If false, you can do a manual check by right clicking on root “Delivery Projects” node (or on any of its child Delivery Projects and Packages) in Navigator View and choose “Validate”. |
| Display Version popup upon creation | true | If true, the package import popup is directly open when adding a new version. The Version Name is automatically selected. |
| Auto connect Runtimes | true | Stambia Analytics will maintain a connection to the Runtimes if this property is set to true. If the connection to a Runtime fails a new try is performed after the delay specified in ‘Runtime connection retry interval’. |
| Runtime connection retry interval | 60 seconds | Time to wait before retrying to connect to a Runtime that Stambia Analytics failed to contact. |
| Auto refresh enabled by default | true | Set it to true to enable auto-refresh on Session Reports. |
| Session refresh Frequency | 60 seconds | Refresh delay of Session Reports when Auto-Refresh is enabled. |
| Hide Actions in Session Reports | false | If true, all the actions that are usually shown under the sessions will be hidden and not loaded when retrieving sessions. This provide better performances when navigating in sessions having hundreds of actions. |
| Retrieve Deployments details in Session Reports | true | Stambia Analytics will analyze each session to check if this is coming from a delivery which have been generated from Stambia Analytics, and if it is the case, add a link in Information View to find back from which project it is coming from. |
| HTTP Sessions timeout | 5 minutes | Stambia Analytics session timeout. If no operations are performed during this delay, the session will be closed. |
Migration Procedure
Introduction
This section demonstrates how to migrate data from Stambia Analytics 2.x.x to Stambia Analytics 3.x.x versions.
The migration is performed through a migration wizard which is available directly inside Stambia Analytics 3.x.x.
You can choose exactly what you want to migrate through this wizard and you can do it in multiple iterations, you do not have to migrate everything at once.
Migration scope
Migration will retrieve previous information which was stored in files in Stambia Analytics 2.x.x home and migrate it to the new database system of Stambia Analytics 3.x.x.
You can find below the migration scope for each feature.
Profiles and preferences:
Profiles and preferences will be kept identical.
Statistics:
Statistics will be kept identical.
Runtime definitions:
Runtime definitions will be kept identical.
Log Database configurations:
Log Database configurations will be kept identical.
Session Reports:
Session Reports will be kept identical.
Deployment managers:
Deployment managers will require additional steps as this feature does not exist anymore in Stambia Analytics 3.x.x, replaced by Delivery Projects. Migrating Deployment managers will therefore require some user manual configuration in the wizard to specify the corresponding new environments.
Built deliveries:
History of builds which can be found in Deployment Managers will not be migrated.
You will need to rebuild every delivery you want to deploy with the new system.
Note that the build being now performed automatically when deploying through the GUI, or when using the corresponding build and deploy REST APIs, you do not have any specific operation to perform on this part.
Migration preparation
Backing up the current version
To be able to return to the current version in case of any issue during the migration, you should make a backup of existing configurations. On Stambia Analytics 2.x.x versions, everything is stored in the configuration folder, at STAMBIA_WEBAPP_HOME location. Simply make a copy or archive of this folder to make the backup.
Definition of webapp home
After having performed the backup of the previous version data, make sure the STAMBIA_WEBAPP_HOME environment variable exists and point to the Stambia Analytics 2.x.x webapp home folder.
Starting Stambia Analytics 3.x.x
Finally, after having performed the backup and making sure the STAMBIA_WEBAPP_HOME environment variable is correct, you can start Stambia Analytics 3.x.x application which will detect automatically the previous version items in the webapp home folder and propose them in migration wizard explained further.
This section will only give information about the migration process, refer to the installation procedure section for further information about installing Stambia Analytics 3.x.x
Checking everything is ready
At this point, you should have a running Stambia Analytics 3.x.x version which points to a STAMBIA_WEBAPP_HOME containing 2.x.x items.
Check that Stambia Analytics is well starting, and you are now ready to start migrating Stambia Analytics 2.x.x items into the Stambia Analytics 3.x.x database through the provided wizard.
Migration execution
Launching migration wizard
Migration is all performed through a dedicated wizard which helps to migrate in a few clicks.
As indicated in the introduction, you do not have to migrate everything at once, you can migrate in multiple iterations if you want, and you do not have to migrate everything: you can choose exactly what to migrate.
Migration wizard can be launched from Options > Migration pane.
Migrating Preferences and Statistics
Migration of Preferences and Statistics is performed in the main “Migration” tab.
Lead to this tab, where you will find two checkboxes for the migration of Preferences and Statistics.
Check the one you want to migrate, or both, and click on the Migrate button.
Note that existing Preferences and Statistics will be overridden by the ones coming from migration if already exist in current application.
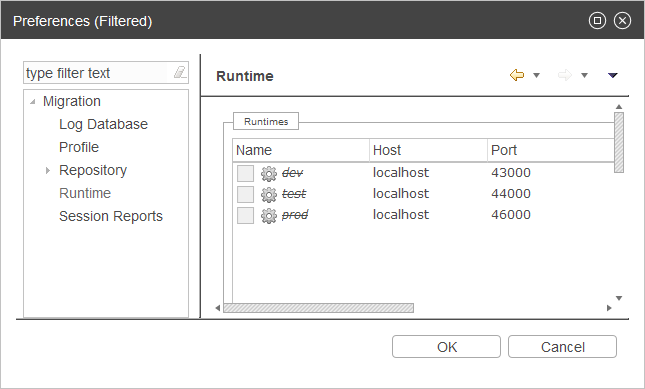
Migrating Runtimes
Migration of Runtime is performed in “Runtime” tab.
Lead to this tab, where you will find the list of Runtimes which can be migrated.
Click on the Runtimes you want to migrate, and then on the “Migrate” button.
Runtimes which already exist or which have already been migrated in the current application will appear strikethrough.
Migrating Log Databases
Migration of Log Databases is performed in “Log Database” tab.
Lead to this tab, where you will find the list of Log Databases which can be migrated.
Click on the Log Databases you want to migrate, and then on the “Migrate” button.
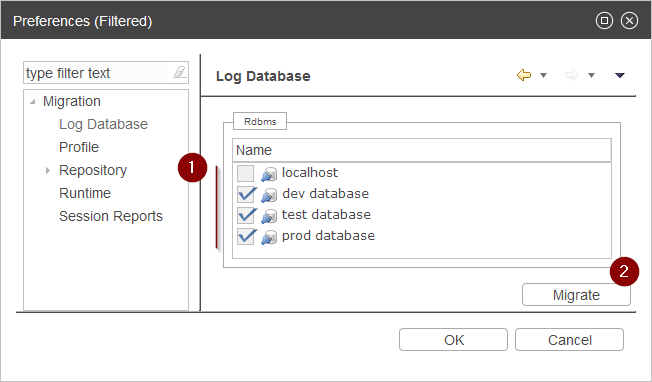
Log Databases which already exist or which have already been migrated in the current application will appear strikethrough.

Migrating Profiles
Migration of Profiles is performed in “Profiles” tab.
Lead to this tab, where you will find the list of Profiles which can be migrated.
Click on the Profiles you want to migrate, and then on the “Migrate” button.
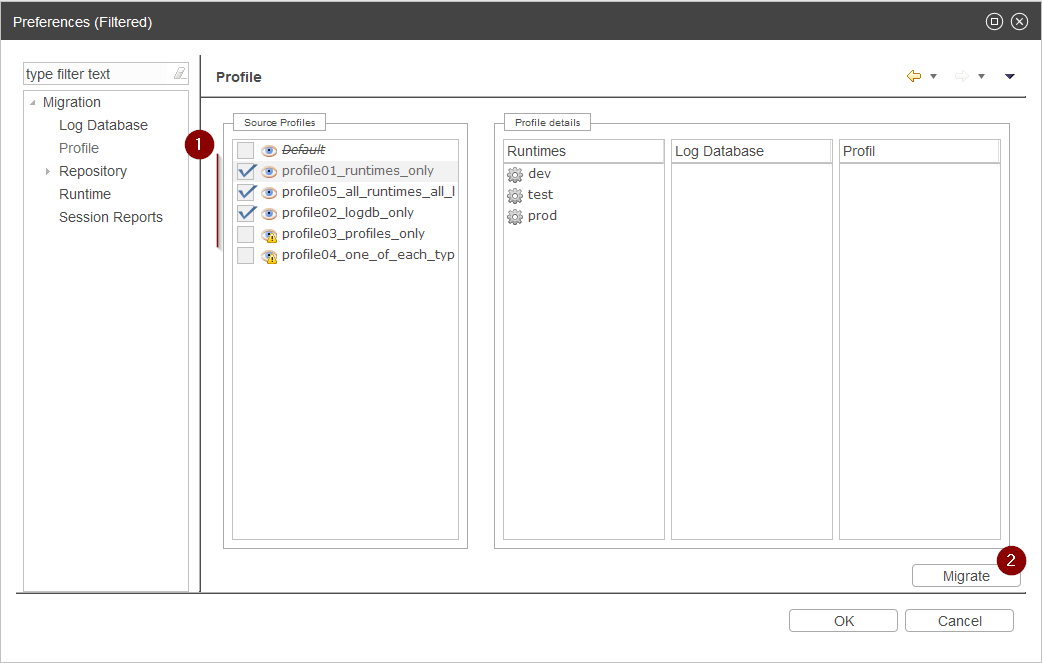
Profiles which already exist or which have already been migrated in the current application will appear strikethrough and greyed out.

Migration of a Profile requires that the Runtimes / Log Databases / Profiles which are part of the Profile exist in the application. A warning will be displayed when required items do not exist in the current application.
To fix the warning you’ll have to migrate or create the required items before the given Profile’s migration.
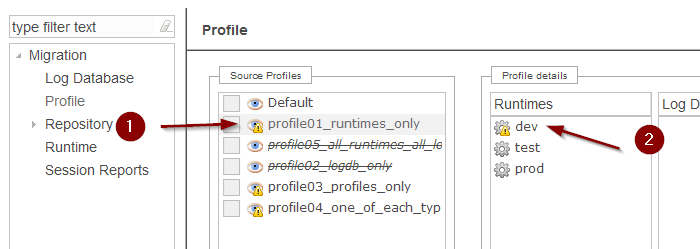
In this capture, it is not possible to migrate the “profile_01” because it is using a “dev01” Runtime which does not exist yet in the current application. To be able to migrate this Profile, the given missing Runtime must be created (through Runtime migration or manually in administration).
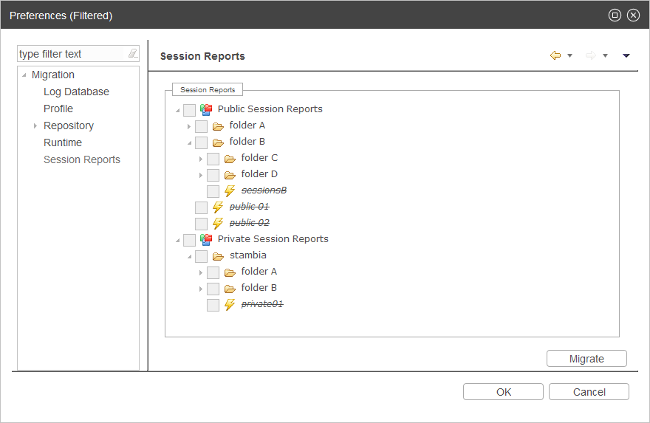
Migrating Session Reports
Migration of Session Reports is performed in “Session Reports” tab.
Lead to this tab, where you will find the list of Session Reports which can be migrated.
Click on the Session Reports you want to migrate, and then on the “Migrate” button.
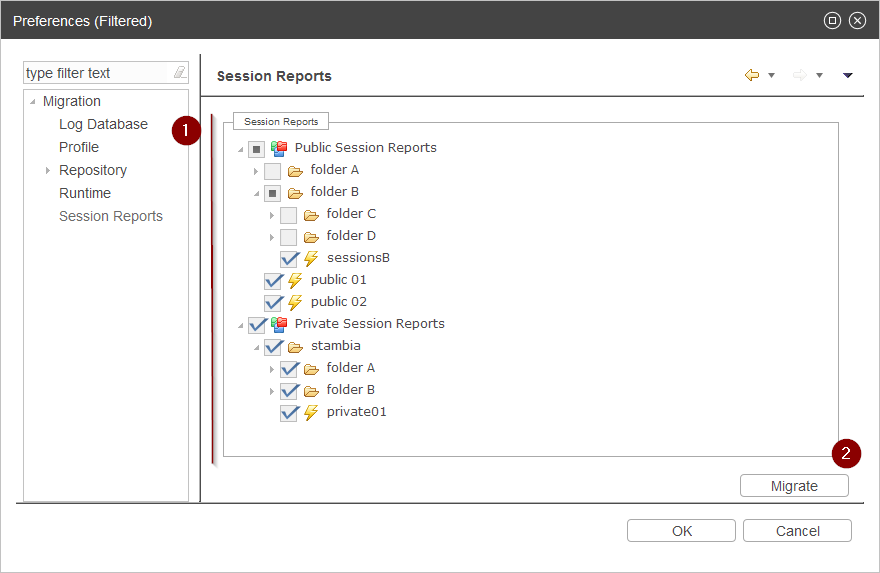
Session Reports which already exist or which have already been migrated in the current application will appear strikethrough and greyed out.
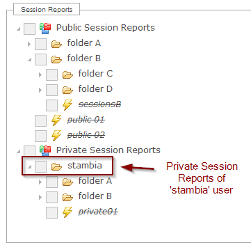
Session reports which are under “Private Session Reports” correspond to private Sessions Reports which are visible only to the corresponding users.
When migrating private Session Reports, they will be associated with the corresponding users who will, as on previous versions, be the only ones to be able to see it when accessing Stambia Analytics.
Migrating Repository
Overview
On Stambia Analytics 2.x.x a repository contained a bunch of Deployment Managers which were created by users and which were autonomous placeholders for deployments, each containing their own Metadata Configurations, Runtimes Configurations, Schemes and Processes.
On Stambia Analytics 3.x.x Deployment manager feature does not exist anymore, replaced by Delivery Projects and more centralized Metadata Configurations and Runtimes Configurations.
Migrating Deployment managers will therefore require some user manual configuration in the wizard to specify the corresponding new mechanisms.
Differences between Deployment Manager and Delivery Project
Below are the main differences between Deployment Managers and Delivery Projects.
Deployment Managers – Metadata Configurations
Deployment Managers Metadata Configurations, which were created on each Deployment Manager are now global to Stambia Analytics application. You’ll now have to define them once and you’ll then be able to use them in all your projects.
For instance, you will now create a global “Development” Configuration, which you can next use in all your projects which will then share the same values for the Metadata attributes.
The migration wizard will help to import and merge all the previous Deployment Managers Configurations into the new global Configuration system.
Deployment Managers – Deployment Scheme
The “Deployment Scheme” feature which allowed to have a placeholder regrouping Configuration and Runtimes in a Deployment Manager have been replaced by global “Environments” which work pretty the same except that they are now global to all the application.
For instance, you will now create a global “Development” Environment which will use a “Development” Metadata Configuration and a “Development” Runtime. You can then associate the Environment to your projects.
The migration wizard allows to migrate “Deployment Schemes” to the new Environment system.
Deployment Managers – Processes
On Stambia Analytics 2.x.x the version mechanism was performed for each Process imported in each Deployment Manager.
Source Packages archives were imported into a Deployment Manager and for each created Process, users had to build it and deploy it on Runtimes.
This mechanism has totally changed on Stambia Analytics 3.x.x on which source Packages and Processes are handled in a new and more global way through the Delivery Project feature. Refer to Stambia Analytics user guide for further information about how this new system works.
The migration wizard will migrate Deployment Managers and their corresponding Processes through specific rules which are explained further in this document.
Migrating Metadata Configurations
Migration of Metadata Configurations is performed in “Metadata Configuration” tab.
First step is to define the target Configuration in which Metadata attributes and values will be migrated.
For this simply enter the target Configuration name in the corresponding field (or select an existing one.)
If you enter or select the name of an already existing Configuration, migrated Metadata attributes and values will be merged based on the rules explained further, otherwise the target Configuration will be automatically created if not existing.
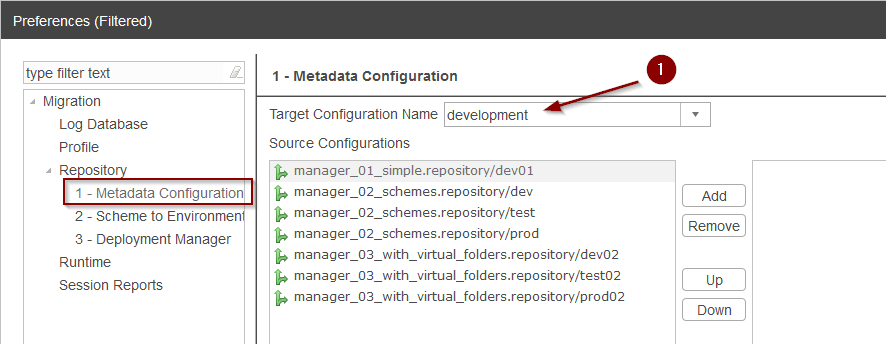
The next step is to add all the Sources Configurations you want to migrate into the target Configuration.
For this simply click on the desired Source Configuration and click on “Add” button.
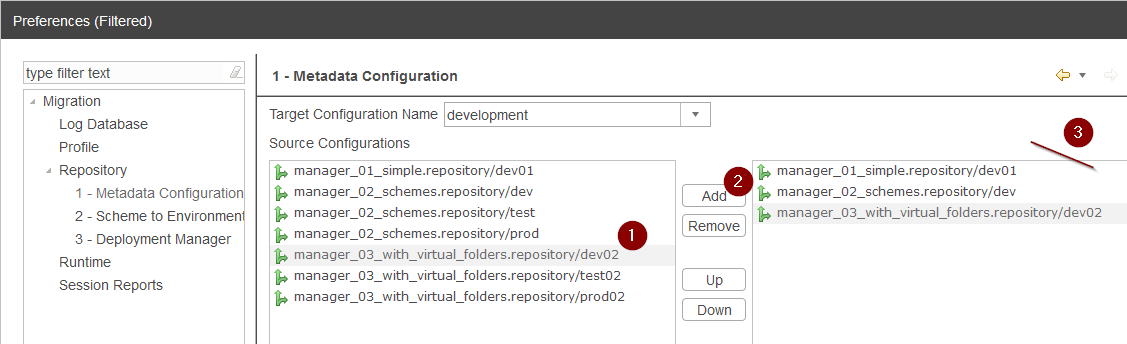
The order of Configuration on the right pane is important and defines an order of priority in case a Metadata attribute exists in multiple migrated Configurations, the higher on the list having the higher priority.
For instance, if a Metadata attribute exists in multiple migrated Configurations, the value which will be taken is the value of the higher Configuration in the list of the right pane.
Note also that if the Target Configuration Name corresponds to an existing Configuration and the Metadata attribute coming from migration already exists in this target Configuration, the value will not be migrated and the existing one will be kept as is. The migration does not override any existing attributes or value, and simply migrate new ones.
When you are satisfied with what is defined in this window, click on the “Migrate” button to migrate the Metadata Configurations.
Migrating Deployment Schemes
Migration of Deployment Schemes is performed in “Scheme to Environment” tab.
Migration of a Scheme simply consists of migrating the list of Runtimes and Configuration of a given Scheme to a target Environment.
First step is to define the target Environment in which selected Deployment Schemes will be migrated. For this simply enter the “Target Environment Name” in the corresponding field (or select an existing one.)
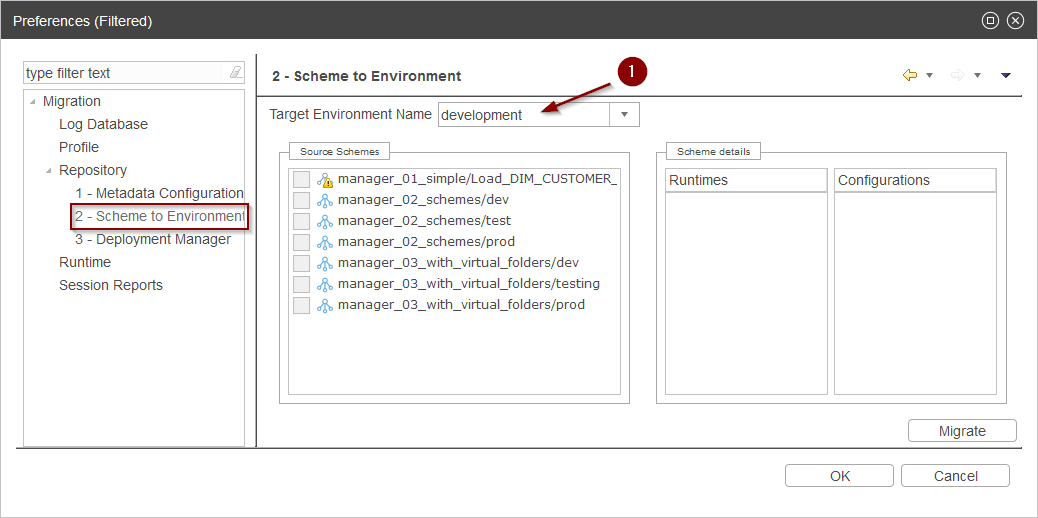
The next step is to add all the Sources Schemes you want to migrate into the target Environment.
For this simply check the desired Source Schemes.
If you entered or selected the name of an already existing Environment, the migration will add the new Runtimes and Configurations which are not already present in the target existing Environment, otherwise the target Environment will be automatically created if not existing.
When you are satisfied with what is defined in this window, click on the “Migrate” button to migrate the Schemes.
Example – migrating development schemes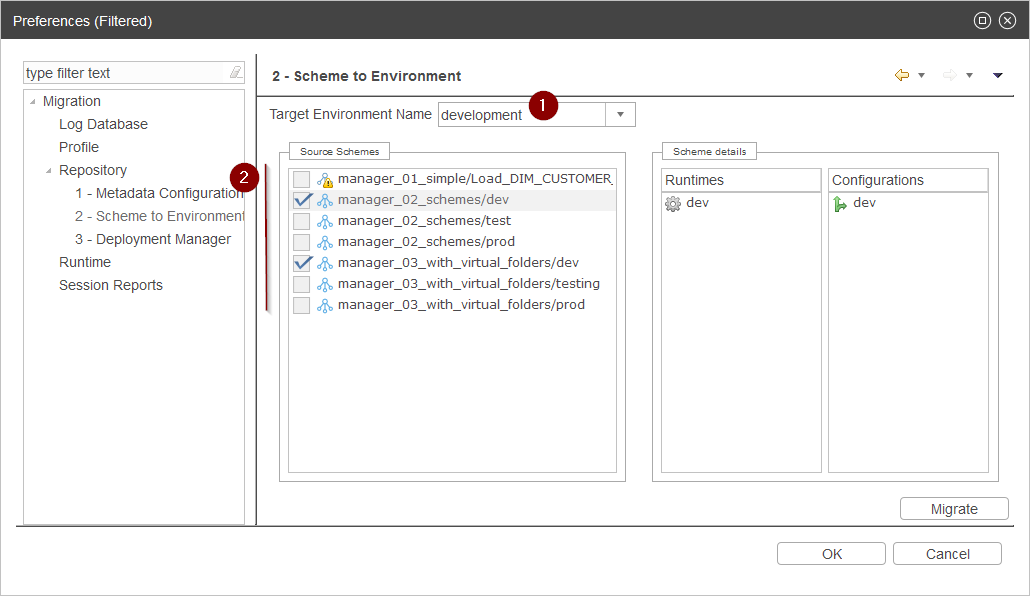
Example – migrating then production schemes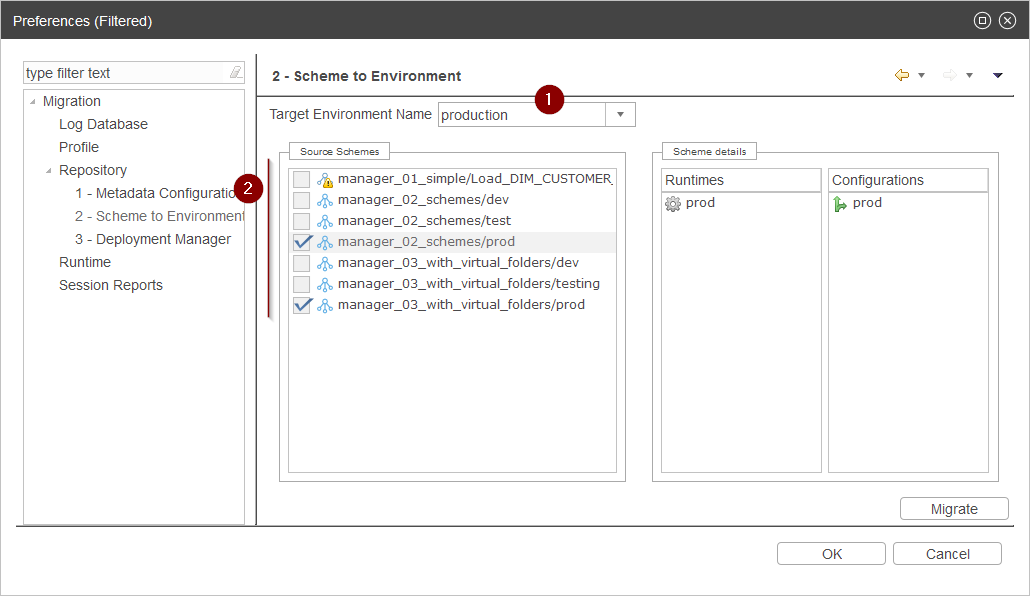
Note that to migrate a Scheme, the corresponding Runtimes and Configurations must exist in the application, so they must have been created manually or migrated before trying to migrate the Schemes using it.

In this capture, it is not possible to migrate the first scheme because it is using a ‘dev01’ Metadata Configuration which does not exist in the current application.
Note that you do not need to migrate all your schemes, which may have multiple times the same Runtimes or Configurations but only with different names, as on previous versions you had to create Schemes on each Deployment Manager, so you might have multiple “development” schemes for instance.
With 3.x.x version, concepts have changed and the idea is now to have global “Environments” which can be shared between all projects, so you can have one global “development” Environment used by all your projects.
Migrating Deployment Managers
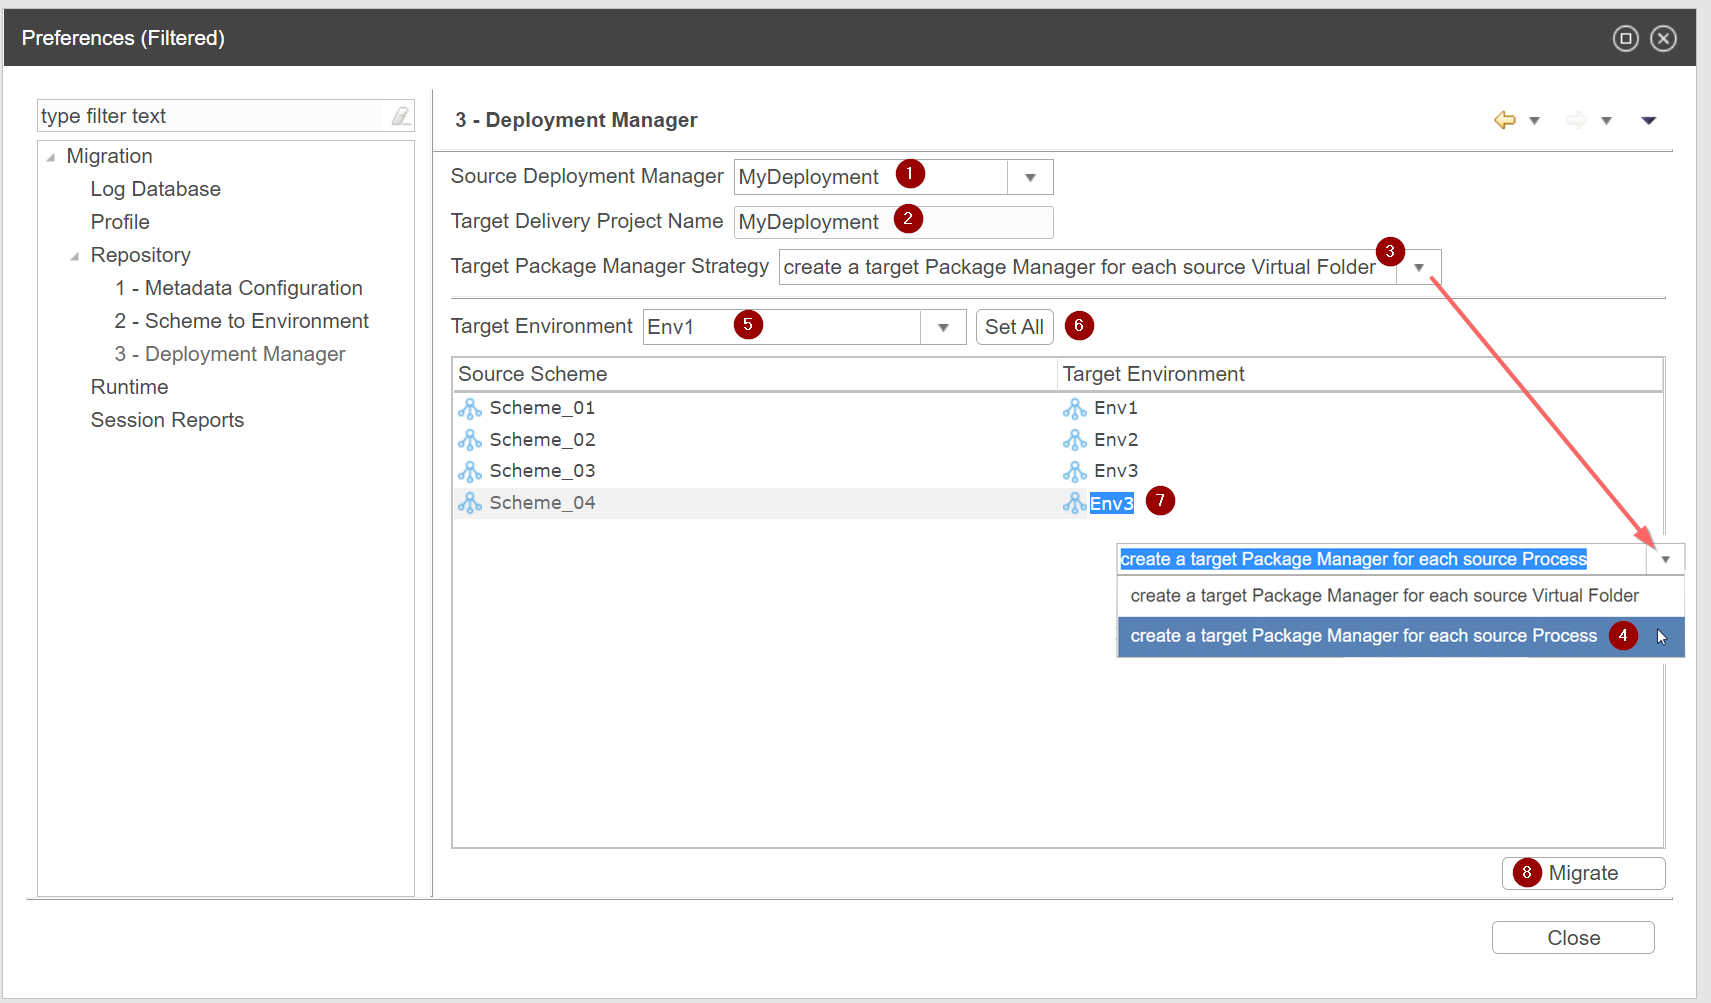
Migration of Deployment Managers is performed in “Deployment Manager” tab.
Migration of a Deployment Manager consists of migrating its Processes into a target Delivery Project.The migration of the Metadata Configurations must be done before.
If metadata are missing, a pop-up will appear to block the migration.
Migration process is simple:
- Choose the Deployment Manager you want to migrate in the top Source Deployment Manager box
- Define the target Delivery Project in which you want it to be migrated
- If you use Analytics 3.7.1 version, you can choose the target Package Manager Strategy. Default mode is “create a target Package Manager for each source Virtual Folder” but you can display the list to select another mode.
- Selecting the mode “create a target Package Manager for each source Process” means that one Package Manager will be created for each source Process during migration.
- Select from the list the target Environment to apply on the source Schemes
- Click on “Set all” to apply the specified target Environment to all source Schemes
- You can also manually choose a different target Environment for each source Scheme if needed
- Click on Migrate
There are a set of predefined rules which will be used to migrate the Processes into the new concepts of Delivery Project, Package Managers, Versions and Deployments, explained further in this document. We highly advise to have a look at them before migrating your Deployment Managers to make sure the result will be as you expect.
If you were not using the Scheme feature in 2.x.x, auto-generated Schemes will be listed for you to choose the target Environments. Those auto-generated schemes each represent a different association of Runtimes and Configurations which is present in the source Deployment Manager.
Migration Rules
You can find in this section the rules which are applied when performing the migrating of a Deployment Manager.
We highly advise to read them before migrating to make sure the result will be as you expect, as you may have to perform changes on your Deployment Managers to have a result which will be closer to what you expect.
Rule 1 – Virtual Folders are migrated into Package Managers
Each source Deployment Manager Virtual Folder will be transformed into a “Package Manager” item during migration, as shown in the following example.
Stambia Analytics 2.x.x Deployment Manager:
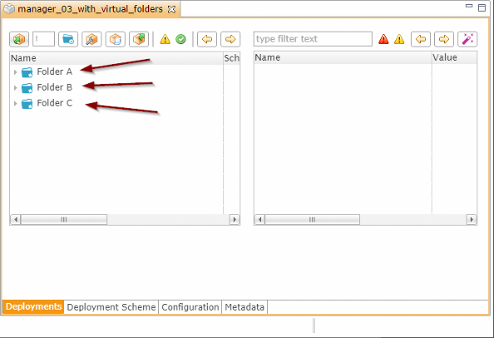
Stambia Analytics 3.x.x Delivery Project:
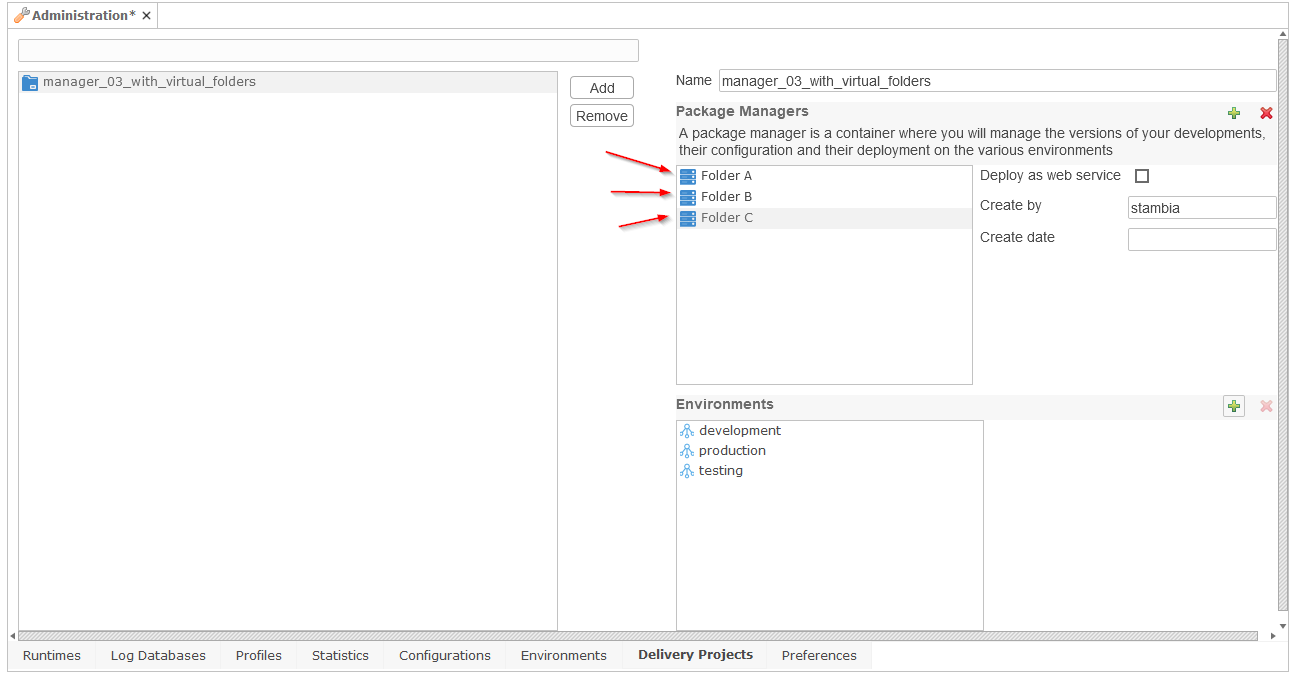
When there is no Virtual Folder in the source Deployment Manager, all the Processes will be migrated into one automatically generated Package Manager.
Rule 2 – Processes are imported into Package Manager Versions
Each source Deployment Manager Process will be imported into a target “Package Manager Version” item during migration, based on its source Deployment Scheme.
A target “Package Manager Version” will be created for each different source Scheme.
For instance, if you are in the following context in your source Deployment Manager:
- A Process A which is deployed using “Development” Scheme
- A Process B which is deployed using “Development” scheme
- A Process C which is deployed using “Production” scheme
The following Versions will be created in the target Delivery Project Package Manager:
- A first Version which contains both Process A and Process B, with a current working Deployment on “Development” Environment.
- A second Version which contains Process C, with a current working Deployment on “Production” Environment.
Example with Processes deployed on one scheme:
Stambia Analytics 2.x.x Deployment Manager:
As there is one Scheme used in source Deployment Manager, one Version will be created during migration to Stambia Analytics 3.x.x Delivery Project:

And the list of sources of this Version:

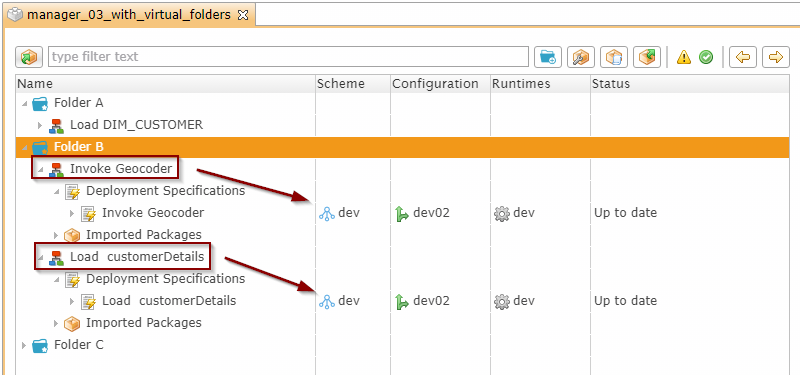
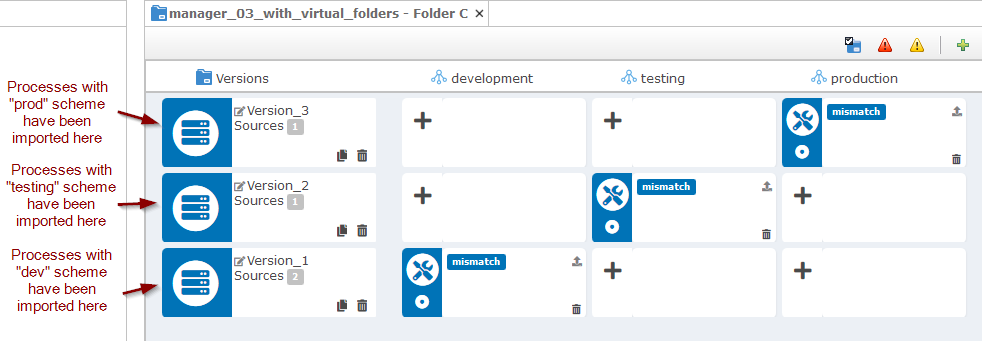
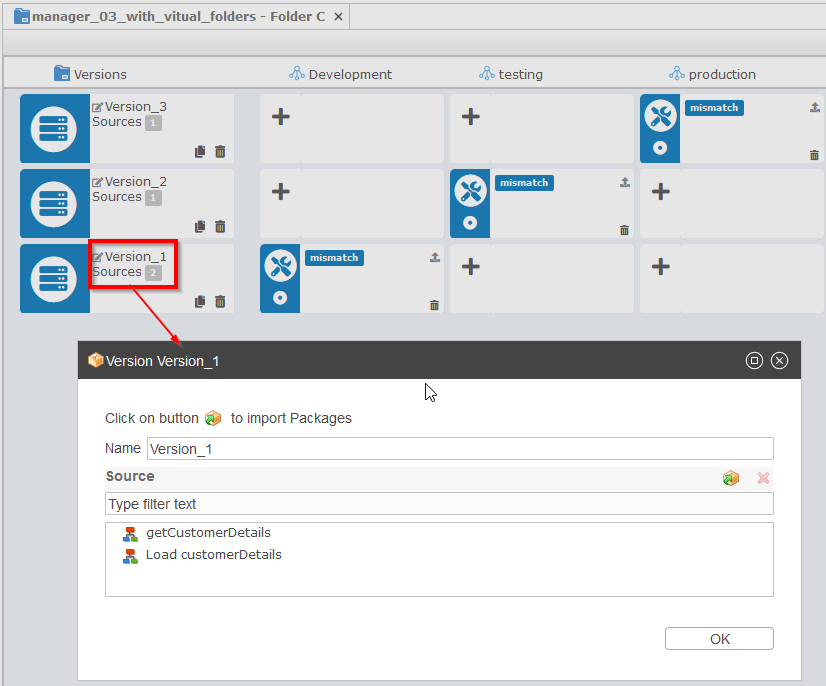
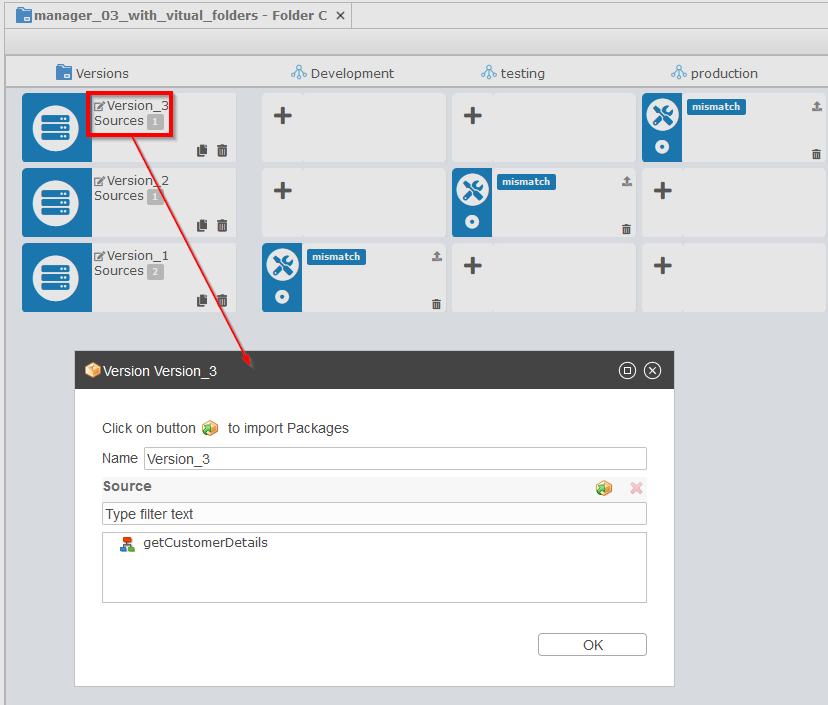
Another example with a Process being deployed on multiple schemes with different Deployment Specifications
Stambia Analytics 2.x.x Deployment Manager:
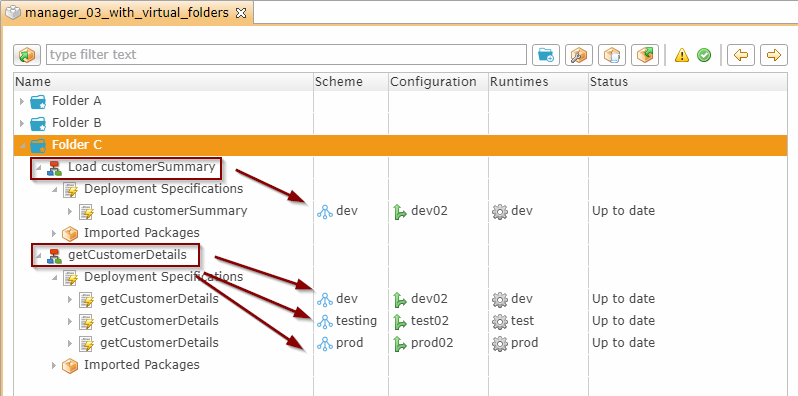
As there are three different Scheme used in source Deployment Manager, three Versions will be created during migration to Stambia Analytics 3.x.x Delivery Project:
List of sources of the first Version:
List of sources of the second Version:

List of sources of the third Version:
Appendix 1: User roles
The Stambia Analytics authentication relies on the application server authentication.
You have to declare the users and their roles on the application server.
Each user can have several roles in the following list:
- analyticsConnect: connection right (mandatory)
- analyticsAdmin: super administrator rights. This role overpasses the other roles, that means that an analyticsAdmin role gives all the rights.
- analyticsParameterConsult: the user can consult the parameters (Administration menu)
- analyticsParameterAdmin: the user can modify the parameters (Administration menu)
- analyticsSessionConsult: the user can consult the sessions
- analyticsSessionAdmin: the user can administer the sessions (creation of session views)
- analyticsSessionAction: the user can manage the sessions (start, stop, restart, delete)
- analyticsRuntimeConsult: the user can consult the Runtimes
- analyticsRuntimeAdmin: the user can administer the Runtimes
- analyticsRepositoryConsult: the user can consult the repositories
- analyticsRepositoryAdmin: the user can administer the repositories
The rights management in Stambia Analytics will rely on these roles.
Appendix 2: Database tables reference
You can find in this section the reference list of tables which are created and used in Analytics database.
Overview
You can find below the list of all tables with a quick comment on its purpose.
More details for each table can be found in the next section.
| Table Name | Description |
|---|---|
| STA_APP | Main Analytics application container. An application is the starting point from which all underlying tables and objects will be linked. At the moment, only one application per Analytics database is supported. |
| STA_APP_LOG | Internal table used as a link with application’s table (STA_APP) |
| STA_APP_PREFERENCE | Applications preferences. This corresponds to the preferences which can be defined by administrators in the graphical interface, such as defining session reports refresh frequency, etc. |
| STA_APP_PROFILE | Table containing all Analytics Profiles. |
| STA_APP_PROFILE_LOG | Table containing the links between Profiles and their associated logs (Runtimes, Log Databases, Profiles). |
| STA_APP_LOG_DB | Table containing the Log Databases defined in Administration. |
| STA_APP_RUNTIME | Table containing the Runtime defined in Administration. |
| STA_APP_STATISTIC | Table containing all the statistics defined in Administration. |
| STA_DLV_BUILDER | Table containing Projects builders. A builder corresponds to the Package Managers defined in a Delivery Project, and which will be used to perform operations such as importing sources, building or publishing deliveries on defined Versions and Environments. |
| STA_DLV_BUILDER_ENV | Table containing builders' Deployment, which corresponds to the intersection between an Environment and a Version in a builder. |
| STA_DLV_BUILD | Table containing the list of builds for a given environment and version. |
| STA_DLV_BUILD_ATTR | Table containing the list of Metadata attributes used for each Build, with their corresponding generated value. For each attribute, there is also the information from which configuration the value was taken when the Build has been generated. |
| STA_DLV_BUILD_SRC | Table containing the list of source Processes which were used for each Build. |
| STA_DLV_ENVIRONMENT | Table containing all Environments defined in Administration. |
| STA_DLV_ENVIRONMENT_CONF | Table containing the links between Environments and their associated Configurations. |
| STA_DLV_ENVIRONMENT_RT | Table containing the links between Environments and their associated Runtimes. |
| STA_DLV_PROJECT | Table containing all the Delivery Projects defined in Administration. |
| STA_DLV_PROJECT_ENV | Table containing the links between Delivery Projects and their associated Environments. |
| STA_DLV_VERSION | Table containing Builders Versions. Each Builder has its own set of Versions, which are then used to generated Builds and publish Deliveries on given Environments. |
| STA_DLV_VERSION_SRC | Table containing the links between a Version and its associated Sources. |
| STA_MET | Table containing the main containers of Metadata attributes. At the moment there is only one container for all Metadata attributes of an Analytics installation. |
| STA_MET_ATTRIBUTE | Table containing all imported Metadata attributes. Metadata attributes are imported when importing source packages into Analytics. They are then used in Configurations to define their values. |
| STA_MET_CONFIGURATION | Table containing the list of Configurations defined in Administration. |
| STA_MET_CONFIGURATION_ATTR | Table containing the attributes values which have been defined for given Configurations. |
| STA_MET_NODE | Table containing all imported Metadata Nodes. Metadata Nodes are the containers of Metadata Attributes. They are imported when importing sources into Analytics. |
| STA_NAV | Table containing Application’s Navigator. At the moment there is only one Navigator per Application. |
| STA_NAV_FOLDER | Table containing the folders created in the Navigator. Those are the folders which can be created in «My Session Reports» / «Public Session Reports» menus. |
| STA_NAV_RESOURCE | Table containing Navigator resources such as Session Reports. |
| STA_REP | Table containing Repositories. Repositories are main containers of Delivery Projects and underlying objects which will be lined to it. At the moment there is only one repository per Analytics Application. |
| STA_REP_PACKAGE | Table containing the list of source packages archives imported in Analytics Repository. |
| STA_REP_PACKAGE_SRC | Table containing the list of sources contained in given packages. Each row is a link between a source and a package in which it is used. |
| STA_REP_PROCESS | Table containing the list of imported Processes. |
| STA_REP_SOURCE | Table containing all imported sources. |
| STA_REP_SOURCE_ATTR | Table containing the list of default values for the attributes used by each source. The default value is retrieved when importing the sources. |
| STA_TEXT | Table which is used to store values that are larger than column size, such as when working with an attribute value which is larger than 1000 characters. |
| STA_SEQUENCE | Table containing sequences used to generate the unique database identifiers. |
Tables details
STA_APP
Description
Main Analytics application container.
An application is the starting point from which all underlying tables and objects will be linked.
At the moment, only one application per Analytics database is supported.
Columns
| Column Name | Description |
|---|---|
| DB_ID | Unique automatically generated database identifier for the application. |
| CRT_DT | Date when the application has first been created and initialized. |
| CRT_USR | User which created the application. |
| DB_VERSION | Application’s version, which is incremented when a modification is performed on the application. |
| UPD_DT | Latest date when the application has been updated. |
| UPD_USR | User which performed latest updates. |
| VERSION | Analytics database internal version, which is used by Analytics to know if the structure needs to be updated when upgrading to a newer Analytics version, for instance. |
| PROF_DB_ID | Database identifier of the application’s default Profile. |
Updates origin
Below are the actions which will be considered as an update of the application.
When performed, the UPD_DT, UPD_USR, and DB_VERSION will be updated / incremented accordingly.
- Any modification in Administration
STA_APP_LOG
Description
Internal table used as a link with application’s table (STA_APP).
Columns
| Column Name | Description |
|---|---|
| APP_DB_ID | Application database identifier. |
STA_APP_PREFERENCE
Description
Applications preferences.
This corresponds to the preferences which can be defined by administrators in the graphical interface, such as defining session reports refresh frequency, etc.
For further information about preferences details, such as complete description of each preference, refer to “Defining Preferences” part of this documentation.
Columns
| Column Name | Description |
|---|---|
| DB_ID | Unique automatically generated database identifier. |
| ANALYZE_AFTER_BUILD | Deprecated column which corresponds to a preference of previous versions which does not apply anymore. |
| AUTO_ANALYZE_RT | Corresponds to the value specified for the “Analyze Deployments at Package Editor opening” preference. |
| AUTO_CONNECT_RT | Corresponds to the value specified for the “Auto connect Runtimes” preference. |
| CHECK_CONNECTIONS_ON_CONF | Deprecated column which corresponds to a preference of previous versions which does not apply anymore. |
| CRT_DT | Date when preferences have first been created and initialized. |
| CRT_USR | User which created and initialized preferences. |
| DB_VERSION | Preferences version, which is incremented when a modification is performed on it. |
| DISPLAY_BUILD_UNDER_PACKAGE | Deprecated column which corresponds to a preference of previous versions which does not apply anymore. |
| HTTP_SESSION_TIMEOUT | Corresponds to the value specified for the “HTTP Sessions timeout” preference. |
| HIDE_SESSION_ACTION | Corresponds to the value specified for the “Hide Actions in Session Reports” preference. |
| AUTO_VALIDATE_DLV_PROJECT | Corresponds to the value specified for the “Auto Validate Delivery Project” preference. |
| SESS_SEARCH_SRC_REP | Corresponds to the value specified for the “Retrieve Deployments details in Session Reports” preference. |
| AUTO_CONNECT_RT_POLLINT | Corresponds to the value specified for the “Runtime connection retry interval” preference. |
| SESS_AUTO_REFRESH_BY_DEFAULT | Corresponds to the value specified for the “Auto refresh enabled by default” preference. |
| SESS_AUTO_REFRESH_FREQUENCY | Corresponds to the value specified for the “Session refresh frequency” preference. |
| UPD_DT | Latest date when preferences have been updated. |
| UPD_USR | User which performed latest updates. |
| APP_DB_ID | Application database identifier. |
Updates origin
Below are the actions which will be considered as an update of the preferences.
When performed, the UPD_DT, UPD_USR, and DB_VERSION will be updated / incremented accordingly.
- Any modification in Preferences
STA_APP_PROFILE
Description
Table containing all Analytics Profiles.
For further information about Profiles options such as “include all rdbms”, “Include all runtimes” or “Default Profile”, please refer to “Defining Profiles” part of this documentation.
Columns
| Column Name | Description |
|---|---|
| DB_ID | Unique automatically generated database identifier. |
| CRT_DT | Date when the Profile has been created. |
| CRT_USR | User which created the Profile. |
| DB_VERSION | Profile version, which is incremented when a modification is performed on it. |
| DESCRIPTION | User defined description for the Profile. |
| INCLUDE_ALL_LOG_DB | Corresponds to the value specified for the “include all rdbms” Profile option. |
| INCLUDE_ALL_RUNTIMES | Corresponds to the value specified for the “Include all runtimes” Profile option. |
| ID | UUID used internally by Analytics. |
| NAME | Profile name. |
| SETTABLE | Corresponds to the value specified for the “Default Profile” option. If the value is “1”, this means that this Profile is the default Profile of the application, otherwise the value will be 0. |
| UPD_DT | Latest date when the Profile has been updated. |
| UPD_USR | User which performed latest updates. |
| APP_DB_ID | Application database identifier. |
Updates origin
Below are the actions which will be considered as a Profile update.
When performed, the UPD_DT, UPD_USR, and DB_VERSION will be updated / incremented accordingly.
- Any modification in a Profile
STA_APP_PROFILE_LOG
Description
Table containing the links between Profiles and their associated logs (Runtimes, Log Databases, Profiles).
Note that multiple logs can be defined on one Profile, so you can have in this table multiple lines for the same PROF_DB_ID, one for each log provider specified on it.
Columns
| Column Name | Description |
|---|---|
| DB_ID | Unique automatically generated database identifier. |
| DB_VERSION | Version of the current link. |
| LOG_DB_ID | Log database identifier (which can be a Runtime, Log Database, or another Profile.) |
| PROF_DB_ID | Profile database identifier. |
Updates origin
Below are the actions which will be considered as a Profile Log update.
When performed, the DB_VERSION will be incremented accordingly.
- At the moment, there should not be any update on those rows, as the only possible operations on Profile are adding or removing a Log provider, which will add a new row in this table or remove an existing one.
STA_APP_LOG_DB
Description
Table containing the Log Databases defined in Administration.
For further information about Log Databases options please refer to “Defining Log Databases” part of this documentation.
Columns
| Column Name | Description |
|---|---|
| DB_ID | Unique automatically generated database identifier. |
| CRT_DT | Date when the Log database has been created. |
| CRT_USR | User which created the Log database. |
| DATA_SOURCE_NAME | Datasource name, which is defined when the Log Database is accessed directly through a JNDI datasource. |
| DATA_SOURCE_TYPE | Method used to access the Log Database, which can be JDBC or JNDI. JDBC is used when using standard connection, and JNDI when using datasource connection. |
| DB_VERSION | Log Database configuration version, which is incremented when a modification is performed on it. |
| DESCRIPTION | User defined description for this Log Database. |
| JDBC_DRIVER_CLASS | JDBC Driver class name when using standard connection. |
| LOGIN_PASSWORD | JDBC login password for connecting to the Log Database when using standard connection. |
| TABLE_PREFIX | Table prefix which is prefixing log tables names. |
| ID | UUID used internally by Analytics. |
| NAME | Log Database name |
| TABLE_SCHEMA | Schema in which the tables are located. |
| SETTABLE | Corresponds to the value specified for the “Show in logs selection”. |
| TIMESTAMP_QUERY | Corresponds to an option of previous 2.x versions which is kept for backward and migration compatibility. |
| UPD_DT | Latest date when the Log Database configuration has been updated. |
| UPD_USR | User which performed latest updates. |
| JDBC_URL | JDBC URL to access the Log Database when using standard connection. |
| LOGIN_USER | JDBC login user for connecting to the Log Database when using standard connection. |
| APP_DB_ID | Application database identifier. |
Updates origin
Below are the actions which will be considered as a Log Database configuration update.
When performed, the UPD_DT, UPD_USR, and DB_VERSION will be updated / incremented accordingly.
- Any modification in a Log Database configuration
STA_APP_RUNTIME
Description
Table containing the Runtime defined in Administration.
For further information about Runtimes options please refer to “Defining Runtimes” part of this documentation.
Columns
| Column Name | Description |
|---|---|
| DB_ID | Unique automatically generated database identifier. |
| CRT_DT | Date when the Runtime configuration has been created. |
| CRT_USR | User which created the Runtime configuration. |
| DB_VERSION | Runtime configuration’s version, which is incremented when a modification is performed on it. |
| DESCRIPTION | User defined description for this Runtime. |
| HIDE_IN_NAVIGATOR | Corresponds to the value specified for the “Hide in navigator” option. |
| HOST | Hostname or URL to access the Runtime. |
| NO_SESSION_ACCESS | Corresponds to the value specified for the “Disable log database proxy” option. |
| LOGIN_PASSWORD | Runtime’s login password if any. |
| PORT | Runtime’s port. |
| ID | UUID used internally by Analytics. |
| NAME | Runtime name. |
| SETTABLE | Corresponds to the value specified for the “Show in logs selection” option. |
| UPD_DT | Latest date when the Runtime configuration has been updated. |
| UPD_USR | User which performed latest updates. |
| LOGIN_USER | Runtime’s login user if any. |
| APP_DB_ID | Application database identifier. |
Updates origin
Below are the actions which will be considered as a Runtime configuration update.
When performed, the UPD_DT, UPD_USR, and DB_VERSION will be updated / incremented accordingly.
- Any modification in a Runtime configuration
STA_APP_STATISTIC
Description
Table containing all the statistics defined in Administration.
For further information about Statistics options please refer to “Defining Statistics” part of this documentation.
Columns
| Column Name | Description |
|---|---|
| DB_ID | Unique automatically generated database identifier. |
| CRT_DT | Date when the Statistic has been created. |
| CRT_USR | User which created the Statistic. |
| DB_VERSION | Statistic version, which is incremented when a modification is performed on the Statistic. |
| DISABLE | Corresponds to the value specified for the “Disable” option. |
| HIDDEN | Corresponds to the value specified for the “Hidden” option. |
| LABEL | User defined label for the Statistic. |
| NAME | Real name of the Statistic. |
| UPD_DT | Latest date when the Statistic has been updated. |
| UPD_USR | User which performed latest updates. |
| APP_DB_ID | Application database identifier. |
Updates origin
Below are the actions which will be considered as a Statistic configuration update.
When performed, the UPD_DT, UPD_USR, and DB_VERSION will be updated / incremented accordingly.
- Any modification on a Statistic
STA_DLV_BUILDER
Description
Table containing Projects builders.
A builder corresponds to a Package Manager defined in a Delivery Project, and which will be used to perform operations such as importing sources, building or publishing deliveries on defined Versions and Environments.
Columns
| Column Name | Description |
|---|---|
| DB_ID | Unique automatically generated database identifier. |
| CRT_DT | Date when the builder has been created. |
| CRT_USR | User which created the builder. |
| DB_VERSION | Builder version, which is incremented when a modification is performed on it. |
| DESCRIPTION | User defined description for the builder. |
| ID | UUID used internally by Analytics. |
| NAME | Builder name. |
| UPD_DT | Latest date when the builder has been updated. |
| UPD_USR | User which performed latest updates. |
| PROJ_DB_ID | Project database identifier, corresponding to the Project in which the builder is located. |
Updates origin
Below are the actions which will be considered as a builder update.
When performed, the UPD_DT, UPD_USR, and DB_VERSION will be updated / incremented accordingly.
- Any modification on the builder in the Administration.
STA_DLV_BUILDER_ENV
Description
Table containing builders' Deployments, which corresponds to the intersection between an Environment and a Version in a builder.
Columns
| Column Name | Description |
|---|---|
| DB_ID | Unique automatically generated database identifier. |
| CURRENT | Defines if this Deployment is considered as a current working Deployment. This is manually set by user through the REST API or through the radio button on UI. |
| DB_VERSION | Deployment version, which is incremented when a modification is performed on it. |
| LAST_PUBLISH | Latest date when this Deployment as been used to publish a delivery. |
| BUILDER_DB_ID | Builder database identifier, corresponding to the builder in which this Deployment is located. |
| ENV_DB_ID | Environment database identifier, corresponding to the Environment this Deployment is working on. |
| VER_DB_ID | Version database identifier, corresponding to the Version this Deployment is working on. |
Updates origin
Below are the actions which will be considered as a Deployment update.
When performed, the UPD_DT, UPD_USR, and DB_VERSION will be updated / incremented accordingly.
- When a build is deployed through the Deployment.
STA_DLV_BUILD
Description
Table containing the list of builds for a given environment and version.
Columns
| Column Name | Description |
|---|---|
| DB_ID | Unique automatically generated database identifier. |
| CRT_DT | Date when the build has been created. |
| CRT_USR | User which created the build. |
| DB_VERSION | Build version, which is incremented when a modification is performed on the build. |
| DESCRIPTION | User defined description for the build. |
| ID | UUID used internally by Analytics. |
| NAME | Build name. |
| UPD_DT | Latest date when the build has been updated. |
| UPD_USR | User which performed latest updates. |
| ENV_DB_ID | Environment database identifier corresponding to the Environment used to generate the build. |
| VER_DB_ID | Build Version’s database identifier, corresponding to the Version used to generate the build. |
Updates origin
Below are the actions which will be considered as a build update.
When performed, the UPD_DT, UPD_USR, and DB_VERSION will be updated / incremented accordingly.
- At the moment, there should not be any update on those rows, as the only possible operations on build are creating or deleting a build.
STA_DLV_BUILD_ATTR
Description
Table containing the list of Metadata attributes used for each Build, with their corresponding generated value.
For each attribute, there is also the information from which configuration the value was taken when the Build has been generated.
This table contains only the list of attributes and values used by generated Builds, with references to the corresponding Build and attribute. The complete list of Metadata attributes imported in Analytics is stored in STA_MET_ATTRIBUTE table.
Columns
| Column Name | Description |
|---|---|
| DB_ID | Unique automatically generated database identifier. |
| DB_VERSION | Build attribute version, which is incremented when a modification is performed on it. |
| VALUE | Real attribute value which is used by the build. |
| ATTR_DB_ID | Attribute database identifier, which corresponds to the source attribute. |
| BUILD_DB_ID | Build database identifier, which corresponds to the source Build. |
| CONF_DB_ID | Initial Configuration database identifier, which corresponds to the Configuration which should originally be used to generated the attribute value. |
| VAL_CONF_DB_ID | Final Configuration database identifier, which corresponds to the real Configuration which has been used to generate the attribute value when generating the Build. |
About CONF_DB_ID and VAL_CONF_DB_ID
When using a Configuration which do not have any parent Configuration defined, the CONF_DB_ID and VAL_CONF_DB_ID will be the same and the attribute value is generated from this Configuration.
When using a Configuration which has a parent Configuration, the value may differ as the attribute value may be generated from the child or the parent, depending on the following behavior:
- CONF_DB_ID will always be the identifier of the child Configuration, which has the priority on the parent and which is therefore considered as the main initial Configuration.
- VAL_CONF_DB_ID will then give the information about which between the parent and the child Configurations has finally been used to generate the attribute value. It will be the identifier of the child Configuration if the attribute has a value defined on the child Configuration, or the identifier of the parent Configuration if there is no value defined for the attribute (so the child is inheriting the value from the parent Configuration.)
Updates origin
Below are the actions which will be considered as a Build attribute update.
When performed, the DB_VERSION will be incremented accordingly.
- At the moment, there should not be any update on those rows, as they are fixed and history attribute values for given Builds.
STA_DLV_BUILD_SRC
Description
Table containing the list of source Processes which were used for each Build.
Columns
| Column Name | Description |
|---|---|
| DB_ID | Unique automatically generated database identifier. |
| CHECKSUM | Built Process chesksum. |
| DB_VERSION | Build Process version, which is incremented when a modification is performed on it. |
| ID | UUID used internally by Analytics. |
| BUILD_DB_ID | Build database identifier. |
| SRC_DB_ID | Source Process database identifier. |
Updates origin
Below are the actions which will be considered as a Build Process update.
When performed, the DB_VERSION will be incremented accordingly.
- At the moment, there should not be any update on those rows, as they are fixed and history rows for given Builds.
STA_DLV_ENVIRONMENT
Description
Table containing all Environments defined in Administration.
Columns
| Column Name | Description |
|---|---|
| DB_ID | Unique automatically generated database identifier. |
| CRT_DT | Date when the Environment has been created. |
| CRT_USR | User which created the Environment. |
| DB_VERSION | Environment version, which is incremented when a modification is performed. |
| DESCRIPTION | User defined description. |
| ID | UUID used internally by Analytics. |
| NAME | Environment name. |
| UPD_DT | Latest date when the Environment has been updated. |
| UPD_USR | User which performed latest updates. |
| APP_DB_ID | Application database identifier. |
Updates origin
Below are the actions which will be considered as an Environment update.
When performed, the UPD_DT, UPD_USR, and DB_VERSION will be updated / incremented accordingly.
- Any modification on the Environment
- Any addition / removing of Configurations and Runtimes to an Environment
STA_DLV_ENVIRONMENT_CONF
Description
Table containing the links between Environments and their associated Configurations.
Columns
| Column Name | Description |
|---|---|
| DB_ID | Unique automatically generated database identifier. |
| DB_VERSION | Link version, which is incremented when a modification is performed on it. |
| CONF_DB_ID | Configuration database identifier. |
| ENV_DB_ID | Environment database identifier. |
Updates origin
Below are the actions which will be considered as an update.
When performed, the DB_VERSION will be incremented accordingly.
- At the moment, there should not be any update on those rows, as the only possible operations are adding or removing a Configuration from an Environment, which will add a new row in this table or remove an existing one.
STA_DLV_ENVIRONMENT_RT
Description
Table containing the links between Environments and their associated Runtimes.
Columns
| Column Name | Description |
|---|---|
| DB_ID | Unique automatically generated database identifier. |
| DB_VERSION | Link version, which is incremented when a modification is performed on it. |
| ENV_DB_ID | Environment database identifier. |
| RT_DB_ID | Runtime database identifier. |
Updates origin
Below are the actions which will be considered as an update.
When performed, the DB_VERSION will be incremented accordingly.
- At the moment, there should not be any update on those rows, as the only possible operations are adding or removing a Runtime from an Environment, which will add a new row in this table or remove an existing one.
STA_DLV_PROJECT
Description
Table containing all the Delivery Projects defined in Administration.
Columns
| Column Name | Description |
|---|---|
| DB_ID | Unique automatically generated database identifier. |
| CRT_DT | Date when the Delivery Project has been created. |
| CRT_USR | User which created the Delivery Project. |
| DB_VERSION | Delivery Project database version, which is incremented when a modification is performed on it. |
| DESCRIPTION | User defined description. |
| ID | UUID used internally by Analytics. |
| NAME | Delivery Project name. |
| UPD_DT | Latest date when the Delivery Project has been updated. |
| UPD_USR | User which performed latest updates. |
| REP_DB_ID | Repository database Identifier. |
Updates origin
Below are the actions which will be considered as a Delivery Project update.
When performed, the UPD_DT, UPD_USR, and DB_VERSION will be updated / incremented accordingly.
- Any modification on the Delivery Project
- Any addition / removing of Environments and Package Managers in a Delivery Project
STA_DLV_PROJECT_ENV
Description
Table containing the links between Delivery Projects and their associated Environments.
Columns
| Column Name | Description |
|---|---|
| DB_ID | Unique automatically generated database identifier. |
| DB_VERSION | Link version, which is incremented when a modification is performed on it. |
| ENV_DB_ID | Environment database identifier |
| PROJ_DB_ID | Delivery Project database identifier. |
Updates origin
Below are the actions which will be considered as an update.
When performed, the DB_VERSION will be incremented accordingly.
- At the moment, there should not be any update on those rows, as the only possible operations are adding or removing an Environment from a Delivery Project, which will add a new row in this table or remove an existing one.
STA_DLV_VERSION
Description
Table containing Builders Versions.
Each Builder has its own set of Versions, which are then used to generated Builds and publish Deliveries on given Environments.
Columns
| Column Name | Description |
|---|---|
| DB_ID | Unique automatically generated database identifier. |
| CRT_DT | Date when the Version has been created. |
| CRT_USR | User which created the Version. |
| DB_VERSION | Version database version, which is incremented when a modification is performed on it, such as changing the name. |
| ORIGIN_ID | database identifier of the Version from which the current one has been duplicated, if any. |
| DESCRIPTION | User defined description. |
| ID | UUID used internally by Analytics. |
| NAME | Version name. |
| UPD_DT | Latest date when the Version has been updated. |
| UPD_USR | User which performed latest updates |
| BUILDER_DB_ID | Builder database identifier. |
Updates origin
Below are the actions which will be considered as a Version update.
When performed, the UPD_DT, UPD_USR, and DB_VERSION will be updated / incremented accordingly.
- Changing the name of the Version.
- Deploying deliveries on the Version.
STA_DLV_VERSION_SRC
Description
Table containing the links between a Version and its associated Sources.
Columns
| Column Name | Description |
|---|---|
| DB_ID | Unique automatically generated database identifier. |
| DB_VERSION | Link version, which is incremented when a modification is performed on it. |
| SRC_DB_ID | Source database identifier. |
| VER_DB_ID | Version database identifier. |
Updates origin
Below are the actions which will be considered as an update.
When performed, the DB_VERSION will be incremented accordingly.
- At the moment, there should not be any update on those rows, as the only possible operations are adding or removing a Source from a Version, which will add a new row in this table or remove an existing one.
STA_MET
Description
Table containing the main containers of Metadata attributes.
At the moment there is only one container for all Metadata attributes of an Analytics installation.
Columns
| Column Name | Description |
|---|---|
| DB_ID | Unique automatically generated database identifier. |
| CRT_DT | Date when the container has been created |
| CRT_USR | User which created the container. |
| DB_VERSION | Container Database version. |
| DESCRIPTION | User defined description. |
| ID | UUID used internally by Analytics. |
| NAME | Container name. |
| UPD_DT | Latest date when the container has been updated. |
| UPD_USR | User which performed latest updates. |
| APP_DB_ID | Application database identifier. |
Updates origin
Below are the actions which will be considered as an update.
When performed, the UPD_DT, UPD_USR, and DB_VERSION will be updated / incremented accordingly.
- When new root Metadata nodes are linked to this container in STA_MET_NODE table
STA_MET_ATTRIBUTE
Description
Table containing all imported Metadata attributes.
Metadata attributes are imported when importing source packages into Analytics.
They are then used in Configurations to define their values.
Columns
| Column Name | Description |
|---|---|
| DB_ID | Unique automatically generated database identifier. |
| CRT_DT | Date when the attribute has been imported. |
| CRT_USR | User which imported the attribute. |
| DB_VERSION | Attribute version, which is incremented when a modification is performed on it. |
| DISPLAY_NAME | Display name of the attribute, as it appears in Analytics UI and in Designer. |
| IMPORT_PACKAGE_ID | Internal id of the source Package from which this attribute was imported from. |
| IDX | |
| TYPE | Attribute’s type, such as string, list, password, ... |
| UNBOUNDED | |
| UPD_DT | Latest date when the attribute has been updated. |
| UPD_USR | User which performed latest updates. |
| XML_NAME | Attribute internal XML Name, which is the real technical name of the attribute. |
| PARENT_DB_ID | Parent Metadata Node database identifier. |
Updates origin
Below are the actions which will be considered as an update.
When performed, the UPD_DT, UPD_USR, and DB_VERSION will be updated / incremented accordingly.
- When the attribute is used for the first time in a given Configuration (a link is performed and this row is therefore updated to indicate something has changed.)
STA_MET_CONFIGURATION
Description
Table containing the list of Configurations defined in Administration.
Columns
| Column Name | Description |
|---|---|
| DB_ID | Unique automatically generated database identifier. |
| CRT_DT | Date when the Configuration has been created. |
| CRT_USR | User which created the Configuration. |
| DB_VERSION | Configuration version, which is incremented when a modification is performed on it. |
| DESCRIPTION | User defined description. |
| ID | UUID used internally by Analytics. |
| NAME | Configuration name. |
| UPD_DT | Latest date when the Configuration has been updated. |
| UPD_USR | User which performed latest updates. |
| APP_DB_ID | Application database identifier. |
| PARENT_DB_ID | Parent Configuration database identifier, if any. |
Updates origin
Below are the actions which will be considered as an update.
When performed, the UPD_DT, UPD_USR, and DB_VERSION will be updated / incremented accordingly.
- Any modification on the Configuration in Administration
- When an attribute is set for the first time for this Configuration in STA_MET_CONFIGURATION_ATTR (a link is performed and this row is therefore updated to indicate something has changed.)
STA_MET_CONFIGURATION_ATTR
Description
Table containing the attributes values which have been defined for given Configurations.
When a value is specified on an attribute on which there was no value defined before for a given Configuration, a new row is added in this table, with the value specified for the Configuration.
Columns
| Column Name | Description |
|---|---|
| DB_ID | Unique automatically generated database identifier. |
| CRT_DT | Date when the attribute value has been created. |
| CRT_USR | User which created the attribute value. |
| DB_VERSION | Attribute value version, which is incremented when a modification is performed on it. |
| UPD_DT | Latest date when the attribute value has been updated. |
| UPD_USR | User which performed latest updates. |
| VALUE | Attribute value for the given Configuration. |
| ATTR_DB_ID | Attribute database identifier. |
| CONF_DB_ID | Configuration database identifier. |
Updates origin
Below are the actions which will be considered as an update.
When performed, the UPD_DT, UPD_USR, and DB_VERSION will be updated / incremented accordingly.
- The value of the attribute is modified.
STA_MET_NODE
Description
Table containing all imported Metadata Nodes.
Metadata Nodes are the containers of Metadata Attributes.
They are imported when importing sources into Analytics.
Columns
| Column Name | Description |
|---|---|
| DB_ID | Unique automatically generated database identifier. |
| CRT_DT | Date when the Metadata Node has been created. |
| CRT_USR | User which created the Metadata Node. |
| DB_VERSION | Metadata Node version, which is incremented when a modification is performed on it. |
| DEF_TYPE | Metadata Node internal definition type. |
| ID | Metadata Node internal imported Id |
| IMPORT_PACKAGE_ID | Internal id of the source Package from which this Metadata Node was imported from. |
| MET_DB_ID | Metadata container database identifier. |
| NAME | Metadata Node name. |
| UPD_DT | Latest date when the Metadata Node has been updated. |
| UPD_USR | User which performed latest updates. |
| XML_NAME | Metadata Node internal XML Name, which is the real technical name of the attribute. |
| PARENT_DB_ID | Parent Metadata Node database identifier, if any. |
| ROOT_DB_ID | Metadata container database identifier, if this Metadata Node is a root node. |
Updates origin
Below are the actions which will be considered as an update.
When performed, the UPD_DT, UPD_USR, and DB_VERSION will be updated / incremented accordingly.
- When new Metadata Nodes are imported, if their parent nodes already exist, the parent nodes will be considered as updated.
STA_NAV
Description
Table containing Application’s Navigator.
At the moment there is only one Navigator per Application.
Columns
| Column Name | Description |
|---|---|
| DB_ID | Unique automatically generated database identifier. |
| CRT_DT | Date when the Navigator has been created. |
| CRT_USR | User which created the Navigator. |
| DB_VERSION | Navigator version, which is incremented when a modification is performed on it. |
| DESCRIPTION | User defined description. |
| ID | UUID used internally by Analytics. |
| NAME | Navigator name. |
| UPD_DT | Latest date when the Navigator has been updated. |
| UPD_USR | User which performed latest updates. |
| APP_DB_ID | Application database identifier. |
Updates origin
Below are the actions which will be considered as an update.
When performed, the UPD_DT, UPD_USR, and DB_VERSION will be updated / incremented accordingly.
- At the moment, there should not be any update on those rows.
STA_NAV_FOLDER
Description
Table containing the folders created in the Navigator.
Those are the folders which can be created in “My Session Reports” / “Public Session Reports” menus.
Columns
| Column Name | Description |
|---|---|
| DB_ID | Unique automatically generated database identifier. |
| ACCESS | Defines if the folder can be accessed by anyone (PUBLIC) or if this is a private user folder (PRIVATE). |
| CRT_DT | Date when the folder has been created. |
| CRT_USR | User which created the folder. |
| DB_VERSION | Folder version, which is incremented when a modification is performed on it. |
| DESCRIPTION | User defined description. |
| ID | UUID used internally by Analytics. |
| NAME | Folder name. |
| UPD_DT | Latest date when the folder has been updated. |
| UPD_USR | User which performed latest updates. |
| PARENT | Parent folder database identifier, if any. |
Updates origin
Below are the actions which will be considered as an update.
When performed, the UPD_DT, UPD_USR, and DB_VERSION will be updated / incremented accordingly.
- When a folder is renamed.
- When a sub-folder is created under a given folder, the parent folder is marked as updated.
STA_NAV_RESOURCE
Description
Table containing Navigator resources such as Session Reports.
Columns
| Column Name | Description |
|---|---|
| DB_ID | Unique automatically generated database identifier. |
| CRT_DT | Date when the resource has been created. |
| CRT_USR | User which created the resource. |
| DATA | Resource data. |
| DATA_COMPRESSED | Compressed resource data. |
| DB_VERSION | Resource version, which is incremented when a modification is performed on it. |
| DESCRIPTION | User defined description. |
| ID | UUID used internally by Analytics. |
| NAME | Resource name. |
| RESOURCE_TYPE | Resource type: CRITERIA. |
| UPD_DT | Latest date when the resource has been updated. |
| UPD_USR | User which performed latest updates. |
| PARENT_DB_ID | Parent folder database identifier. |
About resource types
At the moment this table is used only to store CRITERIA resources, which correspond to Session Reports.
DATA_COMPRESSION column is not used at this moment for this type of resource.
Updates origin
Below are the actions which will be considered as an update.
When performed, the UPD_DT, UPD_USR, and DB_VERSION will be updated / incremented accordingly.
- The resource is updated.
STA_REP
Description
Table containing Repositories.
Repositories are main containers of Delivery Projects and underlying objects which will be lined to it.
At the moment there is only one repository per Analytics Application.
Columns
| Column Name | Description |
|---|---|
| DB_ID | Unique automatically generated database identifier. |
| CRT_DT | Date when the Repository has been created. |
| CRT_USR | User which created the Repository. |
| DB_VERSION | Repository version, which is incremented when a modification is performed on it. |
| DESCRIPTION | User defined description. |
| ID | UUID used internally by Analytics. |
| NAME | Repository name. |
| UPD_DT | Latest date when the Repository has been updated. |
| UPD_USR | User which performed latest updates. |
| APP_DB_ID | Application database identifier. |
Updates origin
Below are the actions which will be considered as an update.
When performed, the UPD_DT, UPD_USR, and DB_VERSION will be updated / incremented accordingly.
- New Delivery Projects are created.
- New sources producing new rows in STA_REP_PROCESS are imported (when imported sources contains new Processes which had never been imported before.)
STA_REP_PACKAGE
Description
Table containing the list of source packages archives imported in Analytics Repository.
Columns
| Column Name | Description |
|---|---|
| DB_ID | Unique automatically generated database identifier. |
| AUTHOR | Package’s author, which is retrieved from package’s information when importing it. |
| BUILD_DATE | Package’s creation date, which is retrieved from package’s information when importing it. |
| CRT_DT | Date when the package has been imported into Analytics. |
| CRT_USR | User which imported the package into Analytics. |
| DB_VERSION | Package database version, which is incremented when a modification is performed on it. |
| DESCRIPTION | User defined description. |
| EXPORT_CONF | Name of the Configuration which was active when the package has been originally created. |
| ID | Package’s internal id. |
| NAME | Package’s name. |
| UPD_DT | Latest date when the package has been updated. |
| UPD_USR | User which performed latest updates. |
| REP_DB_ID | Application database identifier. |
Updates origin
Below are the actions which will be considered as an update.
When performed, the UPD_DT, UPD_USR, and DB_VERSION will be updated / incremented accordingly.
- At the moment, there should not be any update on those rows, as each generated package as a different internal id, so a new row is added in this table each team a package is imported.
STA_REP_PACKAGE_SRC
Description
Table containing the list of sources contained in given packages.
Each row is a link between a source and a package in which it is used.
Columns
| Column Name | Description |
|---|---|
| DB_ID | Unique automatically generated database identifier. |
| DB_VERSION | Link version, which is incremented when a modification is performed on it. |
| PCK_DB_ID | Package database identifier. |
| SRC_DB_ID | Source database identifier. |
Updates origin
Below are the actions which will be considered as an update.
When performed, the DB_VERSION will be updated / incremented accordingly.
- At the moment, there should not be any update on those rows.
STA_REP_PROCESS
Description
Table containing the list of imported Processes.
Columns
| Column Name | Description |
|---|---|
| DB_ID | Unique automatically generated database identifier. |
| CRT_DT | Date when the Profile has been imported. |
| CRT_USR | User which imported the Process. |
| DB_VERSION | Process database version, which is incremented when a modification is performed on it. |
| DESCRIPTION | User defined description. |
| ID | Process internal id. |
| NAME | Process name. |
| UPD_DT | Latest date when this row has been updated. |
| UPD_USR | User which performed latest updates. |
| REP_DB_ID | Repository database identifier. |
Updates origin
Below are the actions which will be considered as an update.
When performed, the UPD_DT, UPD_USR, and DB_VERSION will be updated / incremented accordingly.
- When importing an updated version of a Process which already exists in the table.
STA_REP_SOURCE
Description
Table containing all imported sources.
Columns
| Column Name | Description |
|---|---|
| DB_ID | Unique automatically generated database identifier. |
| CRT_DT | Date when the source has been imported. |
| CRT_USR | User which imported the source. |
| DB_VERSION | Source database version, which is incremented when a modification is performed on it. |
| DLV | Deprecated column which is not used anymore. |
| DLV_COMPRESSION | Deprecated column which is not used anymore. |
| DESCRIPTION | User defined description. |
| ID | Source internal id. |
| NAME | Source name. |
| UPD_DT | Latest date when the source has been updated. |
| UPD_USR | User which performed latest updates. |
| PROC_DB_ID | Process database identifier. |
Updates origin
Below are the actions which will be considered as an update.
When performed, the UPD_DT, UPD_USR, and DB_VERSION will be updated / incremented accordingly.
- When importing a source which already exists in the table.
STA_REP_SOURCE_ATTR
Description
Table containing the list of default values for the attributes used by each source.
The default value is retrieved when importing the sources.
Columns
| Column Name | Description |
|---|---|
| DB_ID | Unique automatically generated database identifier. |
| DB_VERSION | Link version, which is incremented when a modification is performed on it. |
| VALUE | Default value for the given attribute on the given source. |
| ATTR_DB_ID | Attribute database identifier. |
| SRC_DB_ID | Source database identifier. |
Updates origin
Below are the actions which will be considered as an update.
When performed, the DB_VERSION will be updated / incremented accordingly.
- At the moment, there should not be any update on those rows.
STA_REP_SOURCE_DATA
Description
Table containing source data, stored as binary.
Columns
| Column Name | Description |
|---|---|
| DB_ID | Unique automatically generated database identifier. |
| DATA | Source data as binary. |
| DATA_TYPE | Type of source data: DELIVERY, DOCUMENTATION. |
| DB_VERSION | Source data version, which is incremented when a modification is performed on it. |
| DATA_COMPRESSION_TYPE | Source data compression type: GZIP |
| SRC_DB_ID | Source database identifier. |
Updates origin
Below are the actions which will be considered as an update.
When performed, the DB_VERSION will be updated / incremented accordingly.
- At the moment, there should not be any update on those rows.
STA_TEXT
Description
Table which is used to store values that are larger than column size, such as when working with an attribute value which is larger than 1000 characters.
Columns
| Column Name | Description |
|---|---|
| FIELD_NAME | Field name |
| ENTITY_DB_ID | Database identifier of the given field. |
| VALUE | Field value. |
STA_SEQUENCE
Description
Table containing sequences used to generate the unique database identifiers.
Columns
| Column Name | Description |
|---|---|
| SEQ_NAME | Sequence name. |
| SEQ_COUNT | Actual sequence value. |
Appendix 3 – Installation of Stambia Analytics V2.x.x
Installation requirements
Stambia Analytics needs the following requirements:
- a J2EE Web Application Server such as:
- Apache Tomcat 7 or 8
- JBoss 6 or higher
- a Java virtual machine 1.7 or higher
- a folder to store parameters and data
Stambia Analytics can run on any operating systems that meet these requirements.
Installation
Stambia Analytics consists of a .war file (or .ear file) that shall be deployed on the application server.
Before proceeding:
- Ensure that the application server uses java virtual machine 1.7 or higher.
- Define a STAMBIA_WEBAPP_HOME environment variable. This will be the folder in which Stambia Analytics will store parameters and repositories information.
Warning: for the STAMBIA_WEBAPP_HOME variable, prefer a folder outside the application server. Don’t forget to set up backup procedure on this folder.
Tip: in the name of the STAMBIA_WEBAPP_HOME variable, you can add the IP Port like STAMBIA_WEBAPP_HOME_8081 to specify another installation of Stambia Analytics. This is useful when there are two installations of Stambia Analytics on the same server.
Right management
The Stambia Analytics authentication relies on the application server authentication.
You have to declare the users and their roles on the application server.
Each user can have several roles in the following list:
- analyticsConnect: connection right (mandatory)
- analyticsAdmin: super administrator rights. This role overpasses the other roles, that means that an analyticsAdmin role gives all the rights.
- analyticsParameterConsult: the user can consult the parameters
- analyticsParameterAdmin: the user can modify the parameters
- analyticsSessionConsult: the user can consult the sessions
- analyticsSessionAdmin: the user can administer the sessions (creation of session views)
- analyticsSessionAction: the user can manage the sessions (start, stop, restart, delete)
- analyticsRuntimeConsult: the user can consult the Runtimes
- analyticsRuntimeAdmin: the user can administer the Runtimes
- analyticsRepositoryConsult: the user can consult the repositories
- analyticsRepositoryAdmin: the user can administer the repositories
The rights management in Stambia Analytics will rely on these roles.
Tomcat detail
Setup
To setup Stambia Analytics on tomcat:
- Declare the STAMBIA_WEBAPP_HOME environment variable in the the profile of the user who will launch tomcat.
- Add the users and roles in Tomcat
- start tomcat
- copy the .war file provided by Stambia in the Tomcat folder "webapps". Tomcat will auto-deploy the application.
Warning: Tomcat versions higher than tomcat 8 are not supported.
Managing users and roles in Tomcat
In order to add your users and roles, you have to modify the "tomcat-users.xml" file.
Adding a user can be done with the following block:
<tomcat-users>
<user name="youruser" password="yourpassword" roles="admin-gui, manager-gui, analyticsAdmin, analyticsConnect" />
</tomcat-users>
In this example, the user has the two Stambia Analytics roles "analyticsAdmin" and "analyticsConnect", but also the two Tomcat roles “admin-gui” and “manager-gui”.
JBoss detail
JBoss 7
Setup
To setup Stambia Analytics on JBoss 7:
- Declare the STAMBIA_WEBAPP_HOME environment variable in the profile of the user who will launch JBoss.
- Add the users and roles in JBoss (see below)
- start JBoss
- copy the .war file provided by Stambia in the deployments JBoss folder. JBoss will auto-deploy the application.
Managing users and roles in JBoss 7
- Add the following text to the standalone.xml or domain.xml file according to your installation. Contact your JBoss administrator for this part:
<security-domain name="analyticsRealm">
        <authentication>
           <login-module code="UsersRoles" flag="required">
              <module-option name="usersProperties" value="${jboss.server.config.dir}/analytics-users.properties"/>
              <module-option name="rolesProperties" value="${jboss.server.config.dir}/analytics-roles.properties"/>
           </login-module>
        </authentication>
    </security-domain>
- Add the two files analytics-users.properties and analytics-roles.properties in the domain or standalone folder according to your installation. Contact your JBoss administrator to do this part:
- In the analytics-users.properties file add a user and a password. Here is an example:
user=password
- In the analytics-roles.properties file add the roles. Here is an example:
user=analyticsConnect,analyticsSessionConsult
JBoss 6
Setup
To setup Stambia Analytics on JBoss 6:
- Declare the STAMBIA_WEBAPP_HOME environment variable in the profile of the user who will launch JBoss.
- Add the users and roles in JBoss (see below)
- start JBoss
- copy the .war file provided by Stambia in the deployments JBoss folder. JBoss will auto-deploy the application.
Managing users and roles in JBoss 6
- Add the following text to the login-config.xml file in the server\default\conf\ folder, according to your installation. Contact your JBoss administrator to do this part:
<application-policy name="analyticsRealm">
      <authentication>
		  <login-module code="org.jboss.security.auth.spi.UsersRolesLoginModule"flag="required">
             <module-option name="usersProperties">props/analytics-users.properties</module-option>
				 <module-option name="rolesProperties">props/analytics-roles.properties</module-option>
				 <module-option name="unauthenticatedIdentity">anonymous</module-option>
         </login-module>
       </authentication>
   </application-policy>
- Add the two files analytics-users.properties and analytics-roles.properties in the server\default\conf\prop\ folder according to your installation. Contact your JBoss administrator to do this part:
- In the analytics-users.properties file add a user and a password. Here is an example:
user=password
- In the analytics-roles.properties file add the roles. Here is an example:
user=analyticsConnect,analyticsSessionConsult