Pre-requisites for Installation
In order to execute Stambia Designer, your system must meet the following requirements:
Operating System:
- Windows XP, Vista, 2008, 7, 8 or 10 / Both 32-bits and 64-bits are supported
- Linux / Both 32-bits and 64-bits are supported
- macOS 10.15 Catalina / 64-bits / (macOS Big Sur is not supported yet)
Memory
- At least 1GB of RAM
Disk Space
- The system must have at least 300 Mo of free disk space
Java Virtual Machine
- Java 8 or Java 11
Miscellaneous
- Linux Windowing System: GTK+ 2.6.0 and all its dependencies is required on Linux environments
Note: On a 64-bits system you should use a 64-bits JVM for better performance and compatibility.
Designer installation
Designer installation
Stambia Designer is shipped as an archive file you can unzip and run without additional installation tasks.
Windows
32-bits
On Windows 32-bits, start "./stambia32.exe"
64-bits
On Windows 64-bits, start "./stambia.exe"
Note : The user that launches Stambia Designer needs to have write privileges in the installation directory.
If installing Stambia on Windows in Program Files:
- Right click on ./stambia.exe (or ./stambia32.exe if running on a 32-bits system)
- Select Properties
- Go to the Compatibility tab
- Select "Run this program as an administrator"
- Click OK
Alternatively, you can install Stambia Designer in a folder where you have write privileges.
Linux
32-bits
On Linux 32-bits, start "./stambia-linux.gtk.x86"
Note that depending on your environment you may need to set execution permission to this file to be able to execute it.
64-bits
On Linux 64 bits, start "./stambia-linux.gtk.x86_64"
Note that depending on your environment you may need to set execution permission to this file to be able to execute it.
Note: if you are using a 32-bits JVM on a 64-bits system (not recommended), please use the 32-bits procedure above.
macOS
Start the Designer app.
Note that depending on your macOS version and environment, you may need to move the Designer application to /Application folder for Designer and included Runtime to be able to start.
Additional Components installation
If you want to install additional Components in the Designer please refer to the following article:
Designer configuration
Most of Designer’s configuration is done in Designer’s startup configuration file.
To update Designer’s startup settings, update the file corresponding to the launcher you use to start the Designer.
For instance if you are using stambia.exe, use stambia.ini configuration file.
For instance if you are using stambia32.exe, use stambia32.ini configuration file
Etc...
Changing Designer’s memory settings
If you want to allow the Designer to use more memory (RAM), update Designer’s startup configuration file.
Open the configuration file and update the following setting which corresponds to the maximum of memory allowed for the Designer:
-Xmx1024m
Changing Designer’s local Runtime location
If you want to change the folder where the Designer’s is managing its local Runtime, update Designer’s startup configuration file.
Open the configuration file and update the following setting which corresponds to the path where the Designer will manage its local Runtime.
-Dstambia.runtime.home=absolute or relative path
When this setting is not defined, Designer’s local Runtime is created in the Designer installation folder.
If you change the Designer’s local Runtime location, you should consider also changing the Designer’s Modules folder location to match the changed location of the local Runtime.
Example of absolute path:
-Dstambia.runtime.home=D:/Runtime/local
Example of relative path:
Relative paths are relative to Designer’s installation folder.
-Dstambia.runtime.home=stambiaRuntime
Example with current user home:
This setting also supports the @user.home variable which represents the current user home directory.
-Dstambia.runtime.home=@user.home/runtime/local
Changing Designer’s Modules folder location
If you want to change the folder where the Designer will manage the Modules (creation, edition, deletion, usage), update Designer’s startup configuration file.
Open the configuration file and update the following setting which corresponds to the path where the Designer will manage Modules.
This is by default a relative path to the local Runtime shipped within the Designer.
Using absolute path is also supported.
Refer to Developer’s Guide for further information about Modules.
-Dstambia.module.path.v1=absolute or relative path
If you change the Designer’s Modules location, all the Modules you will manage will be managed inside this folder. The local Runtime will therefore not be able to see and use those Modules unless you change the location of the Designer’s local Runtime also, as explained in previous section, or if you configure the Runtime to use the same Modules folder (refer to Runtime’s installation and configuration guide to learn how to change Runtime’s Modules folder path if you want to do so.)
Example with absolute path:
-Dstambia.module.path.v1=D:/Runtime/local/modules
Example with relative path:
-Dstambia.module.path.v1=stambiaRuntime/modules
Example with current user home:
This setting also supports the @user.home variable which represents the current user home directory.
-Dstambia.runtime.home=@user.home/runtime/local
Designer upgrade
Upgrade procedure is described below.
Depending on if you are upgrading between minor versions, or if you are upgrading to a new major version, the procedure may change.
Please read carefully the procedure details below.
Major version upgrade procedure
If you are upgrading to a new major version, for instance Stambia S19.x.x to Stambia 2020 (S20.x.x), please refer to complete upgrade / migration procedure:
Minor version upgrade procedure
If you are upgrading from a minor S20.0.x version to another minor S20.0.x version, you can proceed as follow:
Preparation
The first step is to prepare your old Designer and Workspace to the upgrade.
- Stop the local Runtime if it is running
- Close all the editors (Mappings, Processes, Metadata, SQL Editors...)
- Exit Stambia Designer
Backup
Next, back up all your work to avoid any loss in case of upgrade problem.
- Make a zip archive of your existing Stambia Designer installation
- Make a zip archive of your workspace(s)
Installation
Once everything is closed, stopped, and has been backed up, you are ready to install the new version.
- Download the new version of Stambia Designer
- Unzip this new version in a new directory
- Start the new Designer and select your workspace directory
- Launch a «Rebuild Cache» operation from the Impact view’s menu
- Re-install your Versioning System’s plugins, if you had any
- Re-install your additional Components, if you had any
- Re-install your existing Modules if you had any
To reinstall existing Modules, simply copy / paste them into the new local <designer_installation_folder>/stambiaRuntime/modules directory if you were using the default location.
If you externalized the Modules folder location, simply configure your new Designer to use this externalized location.
After having checked that everything is OK, you can remove the old Designer’s directory from your disk
You can check your Designer version in the menu Help / About Stambia Designer. The version number has this form: S99.9.9_YYYYMMDD_HHmmss.
Additional upgrade operations
Metadata, Mapping and Process upgrade
Metadata, Mappings, and Processes may sometimes need to be upgraded when upgrading Designer version.
Their internal models are improved over time and when structural changes happen, existing Metadata, Mappings or Processes will need to be upgraded.
This usually happens when upgrading to a new major version, but could also happen on minor versions in some cases.
When the model is improved, a little warning appears on each Metadata, Mapping or Process which is using the previous model version.
They will be upgraded automatically the next time they are saved, and working with Mappings from previous versions works well without any issue.
You can therefore leave them as is without necessarily upgrade them.
You can, however, if you want them to be up to date to benefit of performances improvements, and more, upgrade them manually from context menu.
Below are listed as an example several ways to upgrade to latest model version.
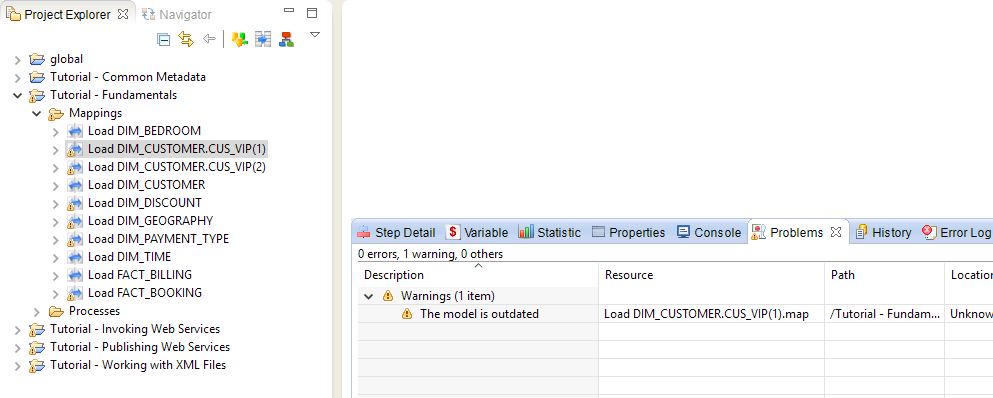
How to detect a model needs to be upgraded
When internal model changes in a new version, Metadata, Mappings, and Processes using the previous model are flagged with a warning icon and message:
Migration at save
Metadata, Mappings, and Processes are automatically upgraded to the latest model version when saving them.
The Designer checks if the version is up to date and upgrades them as a consequence if it is not.
User has nothing to do for this task, this is automatically done when saving them.
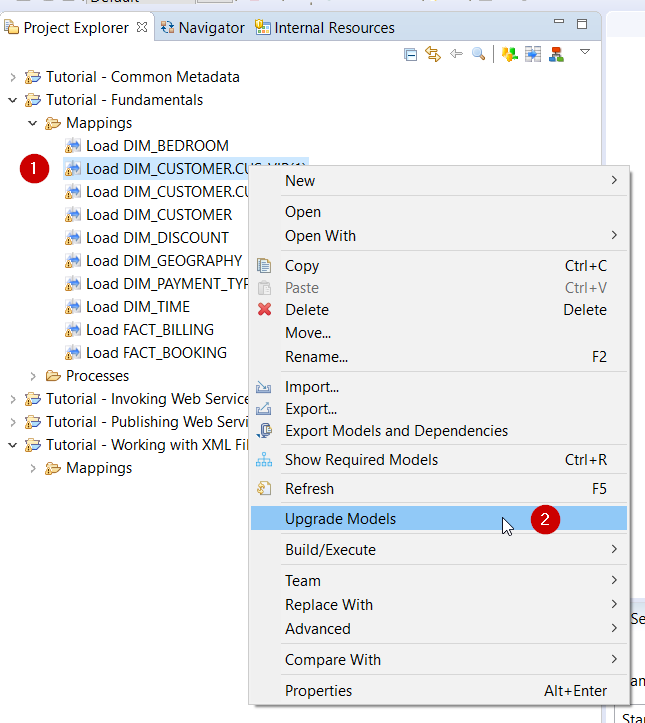
Migration from context menu
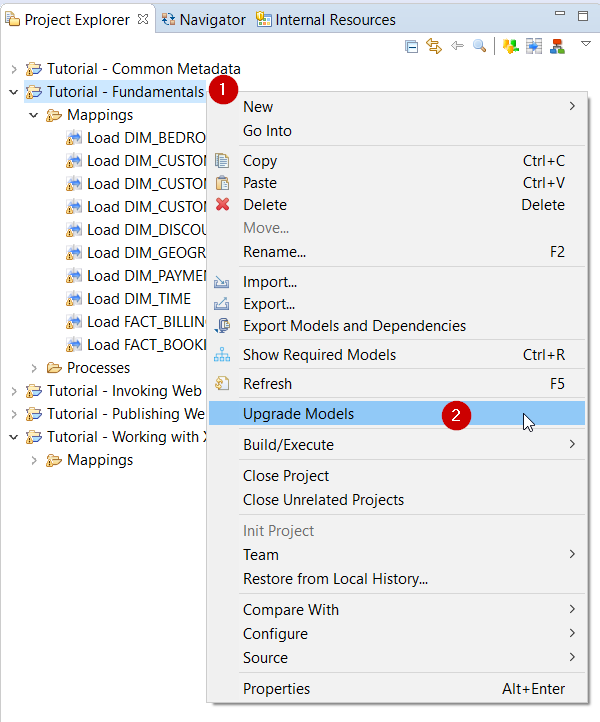
On the Project Explorer, the right-click context menu which is available on Projects / folders / or Metadata, Mappings, and Processes has an option to upgrade models, if some are outdated.
The option to «Upgrade Models» is available as long as one of selected element is outdated.
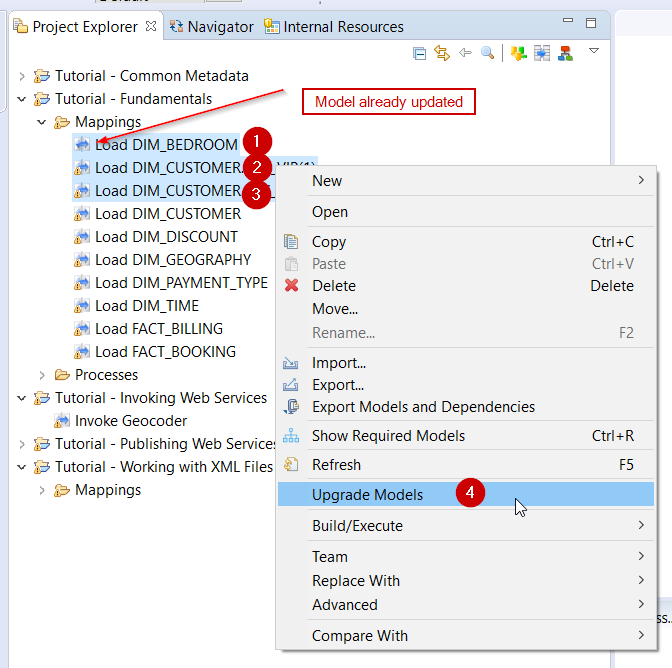
When the Metadata, Mappings, and Processes of the selection are up to date, the menu is not displayed, nothing has to be done.
You can notice which Metadata, Mappings, and Processes needs to be upgraded by looking at their icon in the Project Explorer.
As indicated above, when some are outdated, a little warning appears, with a dedicated entry in the «Problems» view.
You can find below some examples of upgrade from context menu in different situations:
Upgrading a selection of outdated Mapping
Upgrading a selection of outdated Mappings
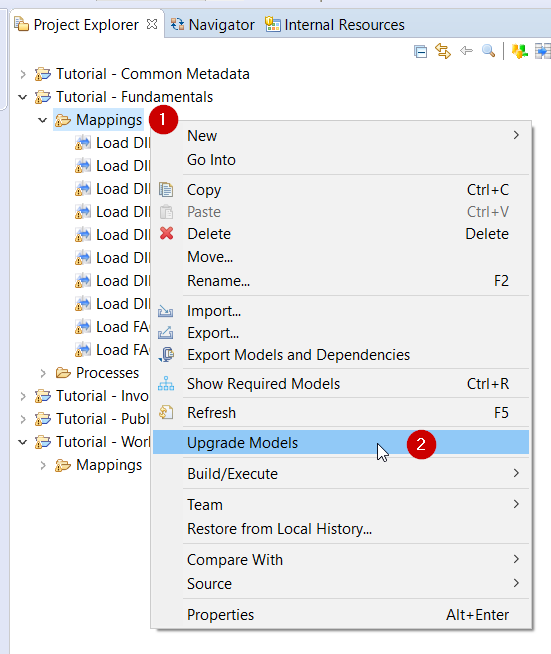
Upgrading all the outdated Mappings of a Project
Upgrading all the outdated Mappings of several Projects
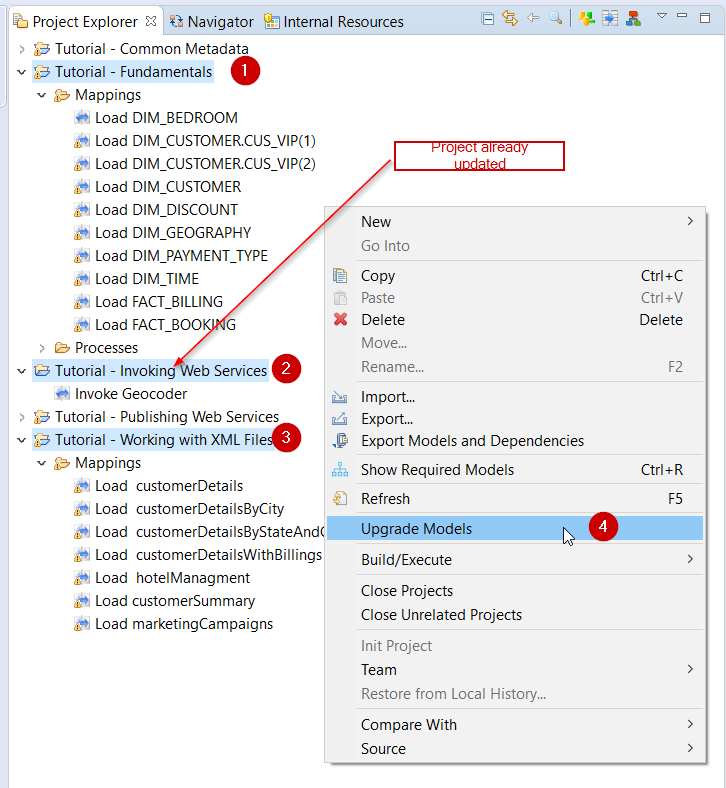
Upgrading all the outdated Mappings of a folder
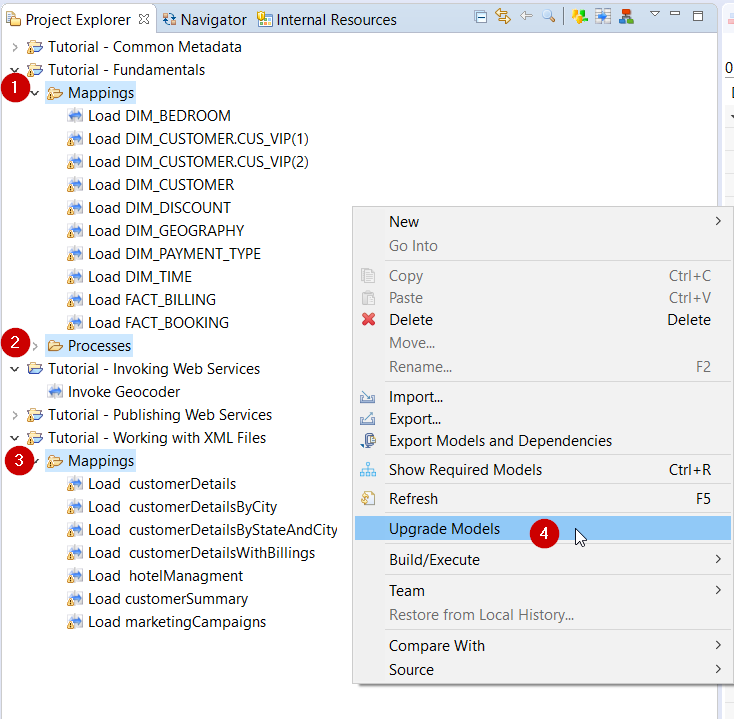
Upgrading all the outdated Mappings of several folders
Troubleshooting
You will find in this section some tips and help for troubleshooting common issues.
macOS – Runtime startup and execution time is slow
You installed a Runtime on macOS, and you notice that Runtime’s startup is very slow, as well as executing sessions.
Refer to the following article which will guide you to try resolving this issue.
Runtime startup and execution time is slow on macOS
macOS / Linux – folder with name containing ":"
When working with macOS or Linux, having a «:» in the name of a Project / folder will avoid Mappings in this folder to be built.
As a consequence, please avoid using «:» character in Project / folder names when working on those platforms.
This is a known issue which is caused by an issue in Eclipse framework which does not handle properly this case.
We’ll be able to fix it once the bug is fixed in Eclipse framework.