Preface
This guide contains information about using the product to manage production tasks, such as
- installation
- deployment
- Runtime parameters management
- delivery scheduling
Audience
This document is intended for users interested in deploying and optimizing the usage of the Stambia components on production servers.
Document Conventions
This guide uses the following formatting conventions:
| Convention | Meaning |
|---|---|
| boldface | Boldface type indicates a graphical user interface associated with an action, or a product specific term or concept. |
| italic | Italic type indicates a special emphasis or placeholder variable that you need to provide. |
monospace |
Monospace type indicates code example, text or commands that you enter. |
Other Stambia Resources
In addition to the product manuals, Stambia provides other resources available on its company website: www.stambia.com and community website www.stambia.org.
Obtaining Help
To get help you can:
- contact our global Technical Support Center: www.stambia.org/di/support.
- consult the articles on our community website www.stambia.org.
- consult or post topics on our forum on www.stambia.org.
Feedback
We welcome your comments and suggestions on the quality and usefulness of this documentation.
If you find any error or have any suggestion for improvement, please contact us at www.stambia.org/di/support and indicate the title of the documentation along with the chapter, section, and page number, if available. Please let us know if you want a reply.
Stambia Architecture
Architecture overview
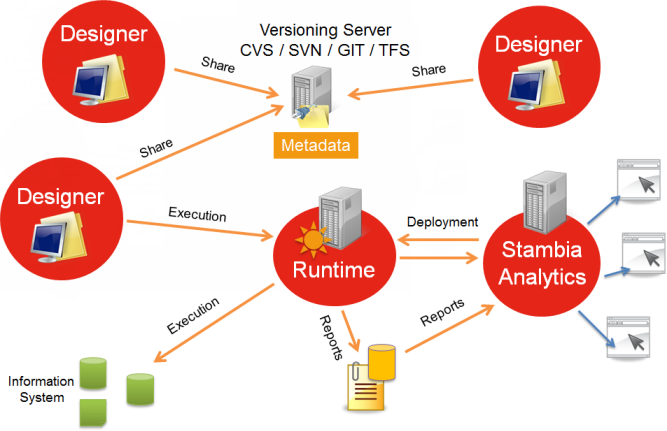
Stambia is built with three components:
- Designers: a heavy client, useful for setting parameters and developing flows.
- Runtimes (engines): this component executes the flows once they have been developed.
- Stambia Analytics: this component allows one to deploy, configure and manage flows as well as following and consult their executions in time.
The Runtimes
Overview
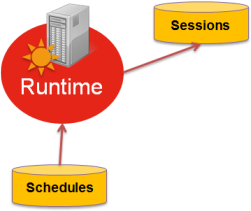
A Runtime is a Java component.
It saves its implementation reports (or session logs) in a database. Are also stored in a database any schedules made with the Runtime.
Services exposed by the Runtime
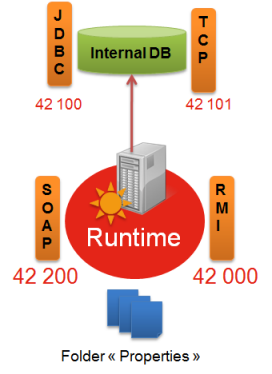
Runtimes can expose different services:
- An RMI service: this enables Java applications (Designer, Stambia Analytics, …) to converse with the Runtime. Its default port is 42000.
- An internal database which is the default destination of log sessions and schedules. Its default ports are 42100 and 42101.
- The Scheduler
- A Web Services REST or Soap API if the Runtime needs a Web service to launch the remote execution of a delivery. Its default port is 42200.
The different default listening ports
Stambia can potentially open several ports when launching:
- The RMI listening port, by default 42000
- The SOAP and REST listening port, by default 42200
- The JDBC listening port of the internal base, by default 42100
- The HTTP listening port of the internal base, by default 42101
Depending on the way the Runtime is used, these ports may have to be opened according to the security rules of the network (firewall for example), or they will have to be modified.
Port modification will be explained further on in this document.
Setting parameters on a Runtime
By default, the Runtime will store its sessions (log sessions) and the scheduler’s plannings in the internal database (Java H2 database).
The parameters of these services may be found in the properties folder.
Two different files are used to set the saving location of the reports and the schedules:
- properties\engineParameters.xml is the main Runtime configuration file.
- properties\engineScheduler.properties is the scheduler configuration file, used to define where schedules are saved for instance (this file is optional)
These files can always be modified later.
In this case, the Runtime will have to be restarted.
We will see further on what may be modified.
Parameters of the debug logs
The Runtime also stores “debug logs” in the “log” folder. These logs are configured via the file “log4j.xml”.
By default, the debug logs are rotary logs, which means the folder will never exceed a certain size. Parameters have to follow the Log4J standard.
This behavior may be modified, particularly if Stambia support has requested it, but usually, it is advisable not to change it.
Stambia Analytics
The Stambia Analytics component executes on a Web Server such as Apache Tomcat.
It is used to
- configure the deployment of the deliveries
- schedule the deliveries
- consolidate logs (session logs) originating from several runtimes (several databases).
- manage the runtimes
It is a WAR that has to be deployed. After deployment, configuration will take place directly in the Web interface.
The configuration files for this tool are stored in the folder which is specified by the environment variable STAMBIA_WEBAPP_HOME. Write permissions must be given in this folder to the user who is executing the application server.
The Web server’s log will give the information in the case of permission errors.
Installation
Pre-requisites for Installation
Stambia Designer
In order to execute Stambia Designer, your system must meet the following requirements:
Operating System:
- Windows XP, Vista, 2008, 7, 8 or 10 / Both 32-bits and 64-bits are supported
- Linux / Both 32-bits and 64-bits are supported
- Mac OS X / Only 64-bits is supported
Memory
- At least 1GB of RAM
Disk Space
- The system must have at least 300 Mo of free disk space
Java Virtual Machine
- JVM version 1.6 or higher
Miscellaneous
- Linux Windowing System: GTK+ 2.6.0 and all its dependencies is required on Linux environments
Note: On a 64-bits system you should use a 64-bits JVM for better performance and compatibility.
Stambia Runtime
In order to execute Stambia Runtime, your system must meet the following requirements:
Operating System:
- The Runtime can be installed on any system having a Java Virtual Machine (JVM)
Memory / CPU
- The memory and CPU capacity required will depend on the flows that are executed
Disk Space
- The system must have at least 80 MO of free disk space
Java Virtual Machine
- JVM version 1.6 or higher
Note: On a 64-bits system you should use a 64-bits JVM for better performance and compatibility.
Runtime versions prior to S17.1.17 used to require a JDK (Java Development Kit) for publishing Web Services.
For higher versions, a JVM is suffisant.
Warning: Careful, because of identified bugs, version 1.6.0.27 of the Java environment is forbidden.
Stambia Analytics
In order to execute Stambia Analytics, your system must meet the following requirements:
J2EE Web Application:
- Stambia Analytics needs a J2EE Web Application Server such as:
- Apache Tomcat 7 or 8
- JBoss 6 or higher
Java Virtual Machine
- JVM version 1.7 or higher
Disk Space
- The system must have at least 35 Mo of free disk space
Note: For more information on the Stambia Analytics installation, have a look at the Stambia Analytics documentation.
The present documentation focuses on the Designer and Runtime.
Stambia Designer installation
All the installation instructions are specified in the README.txt file shipped with the Designer.
- Unzip the Designer archive
- Follow the README.txt
Stambia Runtime Installation
Installing the Runtime on a Linux/Unix environment
Preliminary steps
- Install a Java Virtual Machine (JVM) 1.6 or higher
- Set the environment variable STAMBIA_JAVA_HOME to the folder situated located just before the “bin” folder in your JDK
Runtime Installation
- Unzip the archive which has been downloaded into the target folder
- Set the execution permissions on the SH files at the root (if needed)
- Set the write permissions, especially on the directories: ‘temp, ‘build’ and ‘sessions’
- Modify the engineParameters.xml file, as explained below.
- If needed create the file engineScheduler.properties, as explained below
- If necessary, put the ‘sh’ in the starting processes of the Linux server (this procedure depends on the system)
Some environment variables may be modified:
- STAMBIA_JAVA_HOME : path of the JVM that is used
- STAMBIA_PROPERTIES_LOCATION: path of the ‘properties’ folder
Note: In order to ease updates, it is recommended to copy the Stambia ‘properties’ folder into another place and to set the parameters of the STAMBIA_PROPERTIES_LOCATION variable so that it points to it. In this way, Runtime updates can be made by replacing the whole arborescence. The configuration data of the ‘properties’ folder will not be lost, since it will be elsewhere.
Installing the Runtime on a Windows environment
Please refer to Linux/Unix installation, except for points 2 and 6 that are not useful in Windows.
Service installation
The runtime can be easily installed as a Windows service if needed.
For this, navigate to the root directory of the Runtime and use the following commands:
- use the installEngineAsService.bat -i [<serviceName>] command to install the service
- use the installEngineAsService.bat -r [<serviceName>] command to remove the service
The <serviceName> parameter can be useful to install multiple Runtimes on the same machine.
If not set the service will be named ‹Stambia Runtime›.
The file «stambiaEngine.conf» which is in the folder external\stambiaService\conf can be used to configure some of the service’s properties. By default, it is not useful to modify this file.
Warning: Any modification of Stambia Runtime files or parameters (in “properties” or in the ‘.bat’ files) requires the removal and reinstallation of the Windows service, so that these modifications may be taken into account.
Tip: The specified user used to launch the Runtime (Windows service) should be changed to a user with network abilities, usually a domain user.
Stambia Analytics Installation
Refer to Stambia Analytics documentation.
Package Generation
A package is an archive containing all the needed files and folders to generate a delivery.
Most of the time, a package is generated by the development team when they have finished working on a Mapping / Process.
The package can then be used to generate the delivery that will be executed by the Runtimes.
To generate a package, there is two solutions:
- Generate the package directly from Stambia Designer.
- Generate the package from command line.
Generating a package from Stambia Designer
The most common way to generate the Package corresponding to a Mapping / Process is to do it from Stambia Designer.
The procedure for this is quite simple:
- Right click on the Mapping / Process
- From the menu, choose Build > Package [with documentation]
That’s all, you can now find the generated package under:
<Designer Installation>/stambiaRuntime/build/packages
Generating a package from command line
The other possibility is to generate the Package corresponding to a Mapping / Process from command line.
For this you’ll have to write a file containing the list of Packages to build, that will be specified on the command line tool.
The first step is to prepare the file listing the Packages to build.
The syntax is the following, and each new line represents a Package to build.
build package "<PROCESS_PATH_WITHIN_WORKSPACE>" -target "<TARGET_DIRECTORY>"
The following parameters are available:
| Parameter | Description |
|---|---|
| package <PATH_WITHIN_WORKSPACE> | Relative path within the workspace to the Process to build the package from. |
| -target <TARGET_DIRECTORY> | Target directory in which the generated package will be created. |
Example of file script:
build package "Tutorial - Fundamentals/Processes/Load All Datamart.proc.proc" -target "D:/Packages/"
build package "My Project - 01/Process01.proc" -target "D:/Packages/"
build package "My Project - 01/Process02.proc" -target "D:/Packages/"
If you want to generate the Package of a Mapping, specify the path of the Mapping’s built Process file, and not the .map file
As we now have the required script file, we can generate the Packages with the command line tool.
For this, navigate to the Designer installation root folder, and use the command below:
java -jar plugins/org.eclipse.equinox.launcher_1.3.0.v20120522-1813.jar -application com.indy.shell.application -data "WORKSPACE_PATH" -script "SCRIPT_PATH" [-logFile "LOG_FILE_PATH"] -console –noSplash
The following parameters are available:
| Parameter | Mandatory | Description |
|---|---|---|
| -data «WORKSPACE_PATH» | Yes | Path to the Stambia Designer workspace where the Processes are stored |
| -script «SCRIPT_PATH» | Yes | Path to the script file containing the list of packages to build, created earlier |
| -logFile «LOG_FILE_PATH» | No | Path to a log file where information about the Packages generation will be logged |
Example:
java -jar plugins/org.eclipse.equinox.launcher_1.3.0.v20120522-1813.jar -application com.indy.shell.application -data "D:/workspace/development" -script "D:/resources/scripts/packagesToGenerate.txt" -console –noSplash
Delivery Deployment
A delivery is what will be executed or scheduled in the final stage by the Runtimes.
It is a file which contains the complete roadmap of tasks to be done, with ready to use connections (server, ports, passwords, etc.).
Everything in it is already configured, is completely autonomous, and will only need a Runtime to become executable.
Starting a production will thus take two steps:
- Generation of a delivery
- Publication of the delivery on a Runtime
There are three possibilities to perform these steps:
- From Stambia Designer
- From Stambia Analytics
- From command line
From Stambia Designer
The first way to generate and publish a delivery is to do it directly from Stambia Designer.
With this method, you do not need to generate a Package before as the Designer will take care of everything.
This means that the configuration (connection properties, parameters, ...) of the delivery will be the one of the Designer at the moment it is generated.
The procedure for this is quite simple:
- Right click on the Mapping / Process
- From the menu, choose Build > Delivery if you only want to generate the delivery file locally
- From the menu, choose Publish > Delivery if you want to generate the delivery file, and automatically publish it to the currently connected Runtime.
That’s all, you can now find the generated delivery under:
<Designer Installation>/stambiaRuntime/build/deliveries
If you chose to only build the delivery locally, you’ll then have to manually publish this delivery to the Runtime where you want it to be available.
For this, just copy the delivery in the concerned Runtime.
If you chose the publish option, the delivery will be published automatically to the currently connected Runtime
It will then be immediately available in the concerned Runtime for execution / scheduling.
Be careful, as this will erase the already existing delivery, if any.
From Stambia Analytics
Generating a delivery can also be performed through Stambia Analytics.
The idea is to import into Stambia Analytics the Package generated by the development team, configure it, generate (build) the delivery from it, and then deploy it to the Runtime(s).
This method is the most recommended one for production use.
It offers the possibility to create configurations for each environment (development, test, production, ...) and easily build and deploy deliveries from a management web UI.
For more information, consult the Stambia Analytics documentation.
From command line
The last method to generate a delivery is to build it from command line.
The idea is to use the Package that has been generated by the development team to build the delivery, and then copy manually the delivery file in the Runtime(s).
Extracting a configuration file
In order to prepare the configuration properties of the delivery (connection properties, parameters, ...), you will need to extract a configuration file from the Package.
For this, enter the following command:
./buildDelivery.sh [PACKAGE_NAME] -conf [CONFIGURATION_NAME] -extract
Or
./buildDelivery.sh [PACKAGE_NAME] -confFile [FILE_NAME] -extract
This will generate a file where you will be able to change the properties.
The configuration name is your choice.
The file’s default name will be “PACKAGE_NAME.CONFIGURATION_NAME.conf”.
You can modify the file’s name with the parameter "-confFile"
Configuration properties modification
This file contains the properties which have to be left as such, or modified.
The developer in charge of the implementation procedure will specify which properties have to be changed.
Here is an example of a result file:
#################################################################
### Name: super/Rdbms MetaData/Hypersonic SQL/ServerDatamart_HSQL.rdbms
### Type: com.stambia.rdbms.server
#_hXz80FvYEeGmhptGa6rXTA/url=jdbc:hsqldb:hsql://localhost:62211
#_hXz80FvYEeGmhptGa6rXTA/user=sa
#_hXz80FvYEeGmhptGa6rXTA/password=3951C0D79B227B95C1DC348DD0BCE8F1
#################################################################
### Name: super/Rdbms MetaData/Hypersonic SQL/ServerDatamart_HSQL.rdbms/DATAMART
### Type: com.stambia.rdbms.schema
#_ha9XcFvYEeGmhptGa6rXTA/TABLE_SCHEM=DATAMART
#################################################################
### Name: super/Rdbms MetaData/Hypersonic SQL/ServerMotel_HSQL.rdbms
### Type: com.stambia.rdbms.server
#_Pu1T8FvYEeGmhptGa6rXTA/url=jdbc:hsqldb:hsql://localhost:62210
#_Pu1T8FvYEeGmhptGa6rXTA/user=sa
#_Pu1T8FvYEeGmhptGa6rXTA/password=3951C0D79B227B95C1DC348DD0BCE8F1
#################################################################
### Name: super/Rdbms MetaData/Hypersonic SQL/ServerMotel_HSQL.rdbms/MOTEL
### Type: com.stambia.rdbms.schema
#_P0qPIFvYEeGmhptGa6rXTA/TABLE_SCHEM=MOTEL
Usually, the elements that have to be modified are URLs, users or passwords. There can also be folders.
To modify this file, the user must take the comments away (remove the «#» at the beginning of the line), and modify the values.
If the property he is supposed to modify isn’t there, he can add a line like this:
[object identifier]/[property name]=[value]
The identifier is unique. This means you can share a configuration file with upcoming deliveries, so as not to repeat the whole process each time.
The generated modified file can be saved in a folder and be used for all other delivery generations.
Note: Passwords properties are waiting for passwords encrypted using the
encrypt <password>command on the Runtime engine console (engine command line tool).
Delivery generation
We can now start the command prompt in the Stambia Runtime folder and enter the following command to generate the delivery file:
./buildDelivery.sh [PACKAGE_NAME] -conf [CONFIGURATION_NAME]
Or
./buildDelivery.sh [PACKAGE_NAME] -confFile [CONF_FILE_NAME]
Example:
./buildDelivery.sh TEST_LAUNCH.pck -conf PROD
or
./buildDelivery.sh TEST_LAUNCH.pck -confFile production.conf
The generated delivery will be found in the folder build/deliveries
When using -confFile, you can build a configuration file gathering all the elements put into production (properties), and there will be no need to reconfigure all the connections every time something is put into production.
Delivery Execution
A delivery can be executed from Stambia, Stambia Analytics, or command line.
Two command line tools are available:
- startdelivery.sh: Creates a new Java process and executes the delivery as standalone outside a running Runtime.
- startcommand.sh: Connects to a Runtime. The execute delivery command can then be performed.
Tip: To optimize memory management, prefer the startcommand tool, as all the deliveries will be executed on a running Runtime, on the same Java process.
To proceed, with startdelivery:
./startdelivery.sh -name [DELIVERY_NAME]
Or
./startdelivery.sh -file [DELIVERY_FILE]
The script is synchronous: it waits for a return before handing back the commands to the caller.
The return code is:
- 0 if successful
- -1 if errors
- -2 if the session was stopped (properly killed by Stambia)
Defining variables
The developer can also define Parameters that have to be valued when executing the delivery:
./startdelivery.sh -name [DELIVERY_NAME] -var [VARPATH1] [VALUE1] … -var [VARPATHN] [VALUEN]
Example:
./startdelivery.sh -name myDelivery -var ~/var1 value1
Defining configuration
When working with multi-Configuration deliveries, the Configuration to use must be specified in the command line:
./startdelivery.sh -name [DELIVERY_NAME] -configuration [CONFIGURATION_NAME]
Defining repository
The repository, in which deliveries are stored, can also be defined with a parameter. Note that the repository must be configured in the Runtime.
./startdelivery.sh -name [DELIVERY_NAME] -repository [REPOSITORY_NAME]
Defining log level
The log information that must be kept after execution can be specified in the command line:
./startdelivery.sh -name [DELIVERY_NAME] -loglevel [LOG_LEVEL]
Available values:
| Value | Description |
|---|---|
| -1 | Do not log anything (even errors won’t be logged) |
| 0 | Logs everything during execution and deletes everything at the end. |
| 100 | Logs everything during execution and deletes everything but the session and its stats. |
| 200 | Logs everything during execution and deletes everything but the session/processes and their stats. |
| 300 | Logs everything during execution and deletes everything but the session/processes/actions and their stats. |
| 400 | Everything is logged. |
Delivery Scheduling
The deliveries executions can be scheduled from different ways, as explained below.
External scheduling
External scheduling consists in scheduling the script startdelivery.sh
The return code is:
- 0 if successful
- -1 if errors
- -2 if the session was stopped manually (session was stopped before the end)
In addition to the return code, the command sends further information on the standard exit:
##### BEGIN #####
04/05/2011 17:22:11,718 - SESSION: e5b70658db3117952ad056f12fbb9a21e08000 is started

-- DURATION = 00:00:11,907

##### STATISTICS #####

SQL_NB_ROWS=177051
SQL_STAT_INSERT=37969
SQL_STAT_UPDATE=0
SQL_STAT_DELETE=37972

04/05/2011 17:22:23,671 - SESSION: e5b70658db3117952ad056f12fbb9a21e08000 is ended
##### END #####
Scheduling with Stambia scheduler
Scheduling basics
You will be scheduling deliveries.
The scheduler helps you schedule out jobs, using triggers.
If you wish to schedule a Stambia delivery, by default, the job will have the same name as the delivery.
You can however schedule a delivery with several different names (or jobs).
You can link one or several triggers to one job.
A job is unique (its name is also unique).
Scheduling with a command line
Once you are in the command line (using startcommand.bat or startcommand.sh), you need to connect to the Runtime on which you wish to schedule a job.
To connect to the local Runtime:
>connect
To schedule a job:
- with only one cron
>schedule delivery MY_DELIVERY cron "0 15 10 * * ? *"
- with a starting date and/or an ending date
>schedule delivery MY_DELIVERY start "2009/12/10 12:55:22" cron "0 15 10 * * ? *"
>schedule delivery MY_DELIVERY start "2009/12/10 12:55:22" end "2009/12/25 12:55:22"  cron "0 15 10 * * ? *"
- with a variable
>schedule delivery MY_DELIVERY var ~/VAR1 VALUE1 var ~/VAR2 VALUE2 cron "0 15 10 * * ? *"
- with a configuration (for multi-Configuration deliveries)
>schedule delivery MY_DELIVERY configuration MY_CONFIGURATION cron "0 15 10 * * ? *"
- to get the schedules of a delivery
>get delivery schedules MY_DELIVERY
If you need more information about the command line:
>help
Cron Trigger tutorial
General syntax
A Cron expression is a character string containing 6 or 7 fields separated by spaces.
These fields can contain the characters listed in this table, or a combination of them.
| Field name | Mandatory | Authorized values | Authorized special characters |
|---|---|---|---|
| Seconds | YES | 0-59 | , - * / |
| Minutes | YES | 0-59 | , - * / |
| Hours | YES | 0-23 | , - * / |
| Day of the month | YES | 1-31 | , - * ? / L W |
| Month | YES | 1-12 or JAN-DEC | , - * / |
| Weekday | YES | 1-7 or SUN-SAT | , - * ? / L # |
| Year | NO | empty, 1970-2099 | , - * / |
Special Characters:
- « * » («all values») – used to select all the values for this field. For example, « * » in the minutes field means ‘every minute’.
- «?» («no specific value») – useful if you need to specify something in one of the two fields relevant to this special character, but not in the other one. For example, if you wish to set a trigger for a specific day in the month (let’s say the 10th), whatever the weekday. In this case, you will put ‘10’ in the ‘day of the month’ field, and ‘?’ in the ‘weekday’ field. For further understanding, check the examples.
- «-» used to specify an interval. For example, «10-12» in the ‘hour’ field means “hours 10, 11 and 12”.
- «,» – used to add more values. For example, «MON,WED,FRI» in the ‘weekday’ field means “Mondays, Wednesdays and Fridays”.
- «/» – used to specify repetition increments. For example, «0/15» in the ‘seconds’ field means “seconds 0, 15, 30 and 45”, in other words every 15 seconds, starting at 0 included. And «5/15» in the same field means «seconds 5, 20, 35, et 50». If you put ‘/’ with no number before and a number behind (for example ‘/5’) is equivalent to putting a 0 before the ‘/’. (i.e. ‘0/5’). Another example: ‹1/3› in the ‘day of the month’ field means “trigger every 3 days starting on the 1st of the month”.
- «L» («Last») – this character has different meanings depending on the field it is used in. For example, «L» in the ‘day of the month’ field means “the last day of the month”, i.e. the 31st for January, the 28th for February in non leap years. If ‘L’ is used in the ‘weekday’ field, it means the 7th day, i.e. Saturday (SAT). However, if ‘L’ is used in the ‘weekday’ field following a number, it will mean “the last X day in the month”; for example “6L” means “the last Friday in the month”. So as to have no ambiguity, it is advised not to use the ‘L’ character in value lists.
- «W» («weekday») – Used to specify the working weekday (Monday to Friday) that is nearest to a given date. For example, “15W” in the ‘day of the month’ field means “the working weekday the closest to the 15th”. So, if the 15th happens to be a Saturday, the trigger will position itself to Friday the 14th. And if the 15th happens to be a Sunday, the job will trigger on Monday the 16th. Take care, though, if you specify “1W” and the 1st happens to be a Saturday, the job will only be triggered on Monday the 3rd, since you cannot change the month. Also, ‘W’ will only work with unique values, not with intervals.
Characters ‘L’ and ‘W’ can be combined in the ‘day of the month’ field: “LW” will then mean “the last working weekday in the month”.
- «#» – used to specify “the n-th day XXX in the month”. For example, value «6#3» in the ‘weekday’ field means “the 3rd Friday of the month” (Day 6 = Friday, and #3 = the 3rd of the month).
Day names are not case-sensitive. This means ‘MON’ and ‘mon’ are identical.
Examples
| Expression | Meaning for the trigger |
|---|---|
| 0 0 12 * * ? | At 12 o’clock every day |
| 0 15 10 ? * * | at 10:15 every day |
| 0 15 10 * * ? | at 10:15 every day |
| 0 15 10 * * ? * | at 10:15 every day |
| 0 15 10 * * ? 2005 | at 10:15 every day of year 2005 |
| 0 * 14 * * ? | Every minute, between 14:00 and 14:59, every day |
| 0 0/5 14 * * ? | Every 5 minutes from 14:00 to 14:55, every day |
| 0 0/5 14,18 * * ? | Every 5 minutes from 14:00 to 14:55, every day, and every 5 minutes from 18:00 to 18:55, every day |
| 0 0-5 14 * * ? | Every minute from 14:00 to 14:05, every day |
| 0 10,44 14 ? 3 WED | at 14:10 and 14:44 every Wednesday of the month of March |
| 0 15 10 ? * MON-FRI | at 10:15 every Monday, Tuesday, Wednesday, Thursday and Friday |
| 0 15 10 15 * ? | at 10:15 on the 15th of each month |
| 0 15 10 L * ? | at 10h15 every last day of the month |
| 0 15 10 ? * 6L | at 10:15 the last Friday of each month |
| 0 15 10 ? * 6L 2002-2005 | at 10:15 the last Friday of each month for years 2002 to 2005 |
| 0 15 10 ? * 6#3 | at 10:15 the third Friday of each month |
| 0 0 12 1/5 * ? | at 12:00 every 5 days, each month, starting on the 1st |
| 0 11 11 11 11 ? | Every November 11th at 11:11 |
Runtime Configuration
Most of the Runtime’s configuration is done in the properties/engineParameters.xml file
This file allows to manage:
- The engine parameters (such as started services, listening ports, ...)
- The security of the Runtime (hostname and user / password restriction, roles)
- The repositories where the deliveries are stored
- The Java additional options to add at Runtime’s startup
- The log database configuration
Defining the started services
The services exposed by the Runtime, such as the scheduler, the SOAP component, or the internal Java database can be turned off if needed.
By default, they are all launched at the Runtime’s startup.
To specify which services should be started:
- Open the engineParameters.xml file
- Update the parameters accordingly to your needs.
<parameters>
	<...>
	<engineParameters>
		<...>
		<parameter name="launchSchedulerEngine" value="true"/>
		<parameter name="launchExecutionEngine" value="true"/>
		<parameter name="launchReportEngine" value="true"/>
		<parameter name="startInternalDb" value="true"/>
		<parameter name="startSoapServer" value="true"/>
		<...>
	</engineParameters>
	<...>
</parameters>
The following parameters are available:
| Parameter | Default value | Description |
|---|---|---|
| launchSchedulerEngine | true | start scheduler |
| launchExecutionEngine | true | start execution engine |
| launchReportEngine | true | start reporting ability |
| startInternalDb | true | start internal H2 database |
| startSoapServer | true | start soap service |
Defining the services ports
The services exposed by the Runtime are running on defined port, that can indeed be modified easily.
- Open the engineParameters.xml file
- Update the following parameters accordingly to your needs.
<parameters>
	<...>
	<engineParameters>
		<...>
		<parameter name="rmiPort" value="42000"/>
		<!--<parameter name="rmiCallbackPort" value="42000"/>-->
		<parameter name="internalDbTcpPort" value="42100"/>
		<parameter name="internalDbWebPort" value="42101"/>
		<parameter name="soapServerPort" value="42200"/>
		<...>
	</engineParameters>
	<...>
</parameters>
Defining the log database
The Runtime stores the information about sessions' execution in a log database.
This database is by default an internal H2 database, that is shipped with the Runtime and started with it.
This offers a ready-to-go environment that can be used immediately.
We however recommend to change it to a more robust database such as Oracle, Microsoft SQL Server (MSSQL), etc for production use.
Here is how to change the log database of the Runtime:
1) Open the engineParameters.xml file
The configuration is performed in this file, which contains samples for the most known databases.
2) Lead to the log database part (the <logs></logs> node)
You can find here the configuration for the default internal database:
<parameters>
	<...>
	<logs>
		<log userLogName="logDatabase" autoUpdate="true" userLogClass="com.indy.engine.userLog.RdbmsUserLog">
			<parameter name="userLogRdbmsDriver" value="org.h2.Driver"/>
			<parameter name="userLogRdbmsUrl" value="jdbc:h2:tcp://localhost:42100/sessions/internalDb/sessionLogs"/>
			<parameter name="userLogRdbmsUser" value="sa"/>
			<parameter name="userLogRdbmsPassword" value=""/>
			<!--<parameter name="userLogRdbmsEncryptedPassword" value=""/>-->
			<parameter name="userLogRdbmsVarcharType" value="varchar"/>
			<parameter name="userLogRdbmsVarcharMaxSize" value="1000"/>
			<parameter name="userLogRdbmsNumericType" value="numeric"/>
			<parameter name="userLogRdbmsClobType" value="clob"/>
			<parameter name="userLogRdbmsBlobType" value="blob"/>
			<parameter name="userLogRdbmsSchemaName" value="logs"/>
			<parameter name="userLogRdbmsUseSchemaNameForIndexCreation" value="true"/>
			<parameter name="userLogRdbmsDeleteSyntaxe" value="Delete from"/>
			<!--<parameter name="userLogRdbmsTablePrefix" value="STB_LOG_"/>-->
			<!-- bestCompression / bestSpeed / default-->
			<parameter name="userLogRdbmsCompressedLevel" value="bestCompression"/>
			<!-- text / binary / compressed-->
			<parameter name="userLogRdbmsDeliveryFormat" value="compressed"/>
			<parameter name="userLogRdbmsPropertyMaxVarcharSize" value="1000"/>
			<!-- -1 : infinite -->
			<parameter name="userLogRdbmsPropertyMaxClobSize" value="10000"/>
			<!-- binary / compressed-->
			<parameter name="userLogRdbmsPropertyBinaryFormat" value="compressed"/>
			<parameter name="userLogRdbmsTimestampQuery" value="select now()"/>
			<parameter name="userLogRdbmsInactivityDetectionPeriod" value="90000"/>
			<parameter name="userLogRdbmsActivityRefreshInterval" value="60000"/>
			<parameter name="userLogRdbmsDeletionWithNotExists" value="true"/>
			<!--<parameter name="userLogRdbmsIndexCreationOption" value=""/>-->
			<!--<parameter name="userLogRdbmsTableCreationOption" value=""/>-->
		</log>
	</logs>
	<...>
</parameters>
Under this node, you can find examples of configuration for other databases.
Simply remove or comment the default configuration, and replace it by one of them.
The example below is for an Oracle database:
<parameters>
	<...>
	<logs>
		<log userLogName="logDatabase" autoUpdate="true" userLogClass="com.indy.engine.userLog.RdbmsUserLog">
			<parameter name="userLogRdbmsDriver" value="oracle.jdbc.driver.OracleDriver"/>
			<parameter name="userLogRdbmsUrl" value="jdbc:oracle:thin:@[host]:[port]:[sid]"/>
			<parameter name="userLogRdbmsUser" value="[USER]"/>
			<parameter name="userLogRdbmsPassword" value="[PASSWORD]"/>
			<parameter name="userLogRdbmsSchemaName" value="[SCHEMA_NAME]"/>
			<parameter name="userLogRdbmsVarcharType" value="varchar2"/>
			<parameter name="userLogRdbmsVarcharMaxSize" value="4000"/>
			<parameter name="userLogRdbmsClobType" value="clob"/>
			<parameter name="userLogRdbmsBlobType" value="blob"/>
			<parameter name="userLogRdbmsNumericType" value="number"/>
			<parameter name="userLogRdbmsDeleteSyntaxe" value="Delete from"/>
			<parameter name="userLogRdbmsDeliveryFormat" value="text"/>
			<parameter name="userLogRdbmsPropertyMaxVarcharSize" value="1000"/>
			<parameter name="userLogRdbmsPropertyMaxClobSize" value="10000"/>
			<parameter name="userLogRdbmsPropertyBinaryFormat" value="compressed"/>
		</log>
	</logs>
	<...>
</parameters>
The minimum to modify are the following parameters:
- userLogRdbmsUrl
- userLogRdbmsUser
- userLogRdbmsPassword
- userLogSchemaName
Note: Refer to the ‹Runtime parameter reference› part of this documentation for the list of all available parameters with explanations.
Defining Repositories
Repositories are the locations where the Runtime will look for the delivery files at execution.
There are two types of repositories:
- File Repositories: a location where .deliv files are stored on the filesystem.
- Http Repositories: permit to retrieve deliveries through HTTP protocol. The Runtime will connect to Stambia Analytics Deployment Managers in order to retrieve deliveries that are marked as Remotely Available.
To add, configure, and specify repositories:
- Open the engineParameters.xml file
- Configure the repositories
Example of repositories configuration:
<parameters>
	<...>
	<repositories>
		<fileRepository name="default" default="true" folder="build/deliveries/"/>
		<fileRepository name="webService" default="true" folder="build/deliveries/wsdl/" webService="true" synchPollingInterval="10000" scanMode="polling"/>
		<httpRepository name="PROD" default="false" url="http://localhost:8080/analytics" user="stambia" uncryptedPassword="stambia" unreachableTolerancePeriod="30000"/>
	</repositories>
	<...>
</parameters>
Important: It is possible to specify multiple repositories on a same Runtime, but note that you can only set one as default for standard deliveries, and one as default for web service deliveries.
Tip: You can specify the repository name at execution time:
startdelivery.bat -name myDeliv -repository demo
File Repositories
| Parameter | Default value | Description |
|---|---|---|
| name | The name of the repository. This is the repository name specified when starting a delivery on a specific repository. | |
| default | false | If set to true, the Runtime will by default try to get its deliveries from this repository. |
| folder | The folder containing the deliveries. | |
| webService | false | If set to true, the repository will be used for deliveries exposed as web service. |
| scanMode | polling | Define the scan method used by the Runtime for synchronizing the content of the repository. This offers to automatically expose the web service deliveries that are manually added in the repository while the Runtime is running. |
| synchPollingInterval | 10000 | The time interval in milliseconds to scan the repository for new deliveries. This applies only in polling scanMode. |
scan Modes
- polling: The Runtime will check periodically if new deliveries are available in the repository. This is useful only for deliveries exposed as web service. To define the polling interval, please see the synchPollingInterval parameter.
- disable: The Runtime will not check for new deliveries in the repository. This means that the runtime must be restarted to take into account the web service deliveries that are manually added or modified in the repository. This do not apply for deliveries published from a Designer, that are automatically exposed.
Examples:
<parameters>
	<...>
	<repositories>
		<fileRepository name="defaultRepository" default="true" folder="build/deliveries"/>
		<fileRepository name="wsdlRepository" default="true" folder="build/deliveries/wsdl/" webService="true" synchPollingInterval="10000" scanmode="polling">
		<...>
	</repositories>
	<...>
</parameters>
Http Repositories
| Parameter | Default value | Description |
|---|---|---|
| name | The name of the repository (must match the name of the Deployment Manager in Stambia Analytics) | |
| default | If set to true, the Runtime will by default try to get its deliveries from this repository. | |
| url | URL of Stambia Analytics | |
| user | Login/Username of Stambia Analytics to use. | |
| password | Encrypted password of the user. | |
| uncryptedPassword | Uncrypted password of the user. | |
| unreachableTolerancePeriod | Timeout in milliseconds to wait for the server when it’s unreachable. | |
| webService | false | If set to true, the repository will be used for deliveries exposed as web service. |
| scanMode | polling | Define the scan method used by the Runtime for synchronizing the content of the repository. This offers to automatically expose the web service deliveries that are manually added in the repository while the Runtime is running. |
| synchPollingInterval | 10000 | The time interval in milliseconds to scan the repository for new deliveries. This applies only in polling scanMode. |
scan Modes
- polling: The Runtime will check periodically if new deliveries are available in the repository. This is useful only for deliveries exposed as web service. To define the polling interval, please see the synchPollingInterval parameter.
- disable: The Runtime will not check for new deliveries in the repository. This means that the runtime must be restarted to take into account the web service deliveries that are manually added or modified in the repository. This do not apply for deliveries published from a Designer, that are automatically exposed.
Note: Passwords are encrypted using the
encrypt <password>command on the Runtime engine console (engine command line tool).
Example:
<parameters>
	<...>
	<repositories>
		<httpRepository name="PROD" default="false" url="http://localhost:8080/analytics" user="stambia" uncryptedPassword="stambia" unreachableTolerancePeriod="30000"/>
		<...>
	</repositories>
	<...>
</parameters>
Defining Java Additional Options
Java options are generally added to the Java command launching the Runtime with the -DmyOption01=value01 argument.
This part allows to set them directly in the Runtime’s Configuration file through the javaConfiguration node.
The options specified inside will be loaded just after the Runtime’s start.
- Open the engineParameters.xml file
- Set the additional options you want to add at Runtime’s startup.
The syntax is the following:
<parameters>
	<...>
	<javaConfiguration>
		<property name="myOption01" value="value01"/>
		<property name="myOption02" value="value02"/>
		<...>
	</javaConfiguration>
	<...>
</parameters>
Securing the Runtime
A Runtime installed with the default configuration can be accessed by anyone.
Any user can connect and make operations on it, such as listing or executing sessions.
This behavior can be configured easily in the Runtime Properties (engineParmeters.xml) , that offer the possibility to secure the connection through
- User / Password system with roles (permissions)
- Hostname / IP restriction
- HTTPS for Web Service Endpoints
A basic security configuration looks like this:
<parameters>
	<...>
	<security>
		<user anonymous="true" roles="Connect View"/>
		<user name="admin"  uncryptedPassword="admin" roles="Admin"/>
		<user name="developer"  uncryptedPassword="developer" roles="Connect View Execute"/>
		<user name="consult"  uncryptedPassword="consult" roles="Connect View"/>
		<allow address="192.168.0.42"/>
	</security>
	<...>
</parameters>
Warning: The security node must contain at least one user, which can be a normal or anonymous user.
And for the HTTPS part:
<parameters>
	<...>
	<engineParameters>
		<...>
		<parameter name="webServiceSecureProtocol" value="TLSv1.1"/>
		<parameter name="webServiceKeyStoreFile" value="D:/keystore/mykeystore.jks"/>
		<parameter name="webServiceKeyStoreType" value="JKS"/>
		<parameter name="webServiceKeyStorePassword" value="password"/>
		<parameter name="webServiceKeyPassword" value="password"/>
		<...>
	</engineParameters>
	<...>
</parameters>
User / Password Restriction and Roles
You can define the users that can connect to the Runtime and their permissions.
The syntax is the following:
<parameters>
	<...>
	<security>
		<...>
		<user anonymous="true" roles="Connect View"/>
		<user name="user01"  password="encrypted password" uncryptedPassword="plain text password" roles="Connect View Execute"/>
		<user name="user02"  password="encrypted password" uncryptedPassword="plain text password" roles="Connect View Execute"/>
		<...>
	</security>
	<...>
</parameters>
The following parameters are available:
| Parameter | Description |
|---|---|
| name | User name, that will be used as the login credential |
| password | Encrypted password of the user |
| uncryptedPassword | Uncrypted (plain text) password of the user |
| roles | Space separated list of roles for the user |
The following roles are available:
| Role | Description |
|---|---|
| Connect | The user can connect to the Runtime (required) |
| View | The user can list and view all the sessions of the Runtime |
| Execute | The user can execute deliveries on the Runtime |
| Admin | The user has the full permissions on the Runtime. This is required for operations such as purging the sessions or scheduling deliveries. |
About the Anonymous User:
An anonymous user can be set, to specify the permissions of the users that connect to the Runtime without specifying credentials.
<user anonymous="true" roles="Connect View"/>
When the anonymous user is set, it is therefore not mandatory to specify credentials when connecting.
The connected user will have the permissions of the anonymous user.
When the anonymous user is not set, specifying credentials when connecting is mandatory.
Anonymous connections will then be rejected.
Note that only one anonymous user can be set at a time.
Notes:
* Passwords are encrypted using theencrypt <password>command on the Runtime engine console (engine command line tool).
* Only one of the password or uncryptedPassword should be set
* Multiple roles can be assigned to one user, separated with space characters
Warning: The security node must contain at least one user, which can be a normal or anonymous user.
Hostname / IP restriction
You can define the hostnames / IP addresses that are allowed to connect to the runtime.
The syntax is the following:
<parameters>
	<...>
	<security>
		<...>
		<allow address="Hostname or IP Address"/>
		<allow address="Another Hostname or another IP Address"/>
		<...>
	</security>
	<...>
</parameters>
Warning: The security node must also contain at least one user, which can be a normal or anonymous user.
Enabling HTTPS on Web Services Endpoints
Deliveries published as Web Service can be accessed through the different Web Services Endpoints exposed by the Runtime.
These endpoints can be accessed by default through HTTP using the URLs indicated on the console at Runtime’s startup.
This default behavior can be modified easily in the Runtime configuration file to enable the use of HTTPS, as explained below.
The following parameters are available to enable HTTPS:
<parameters>
	<...>
	<engineParameters>
		<...>
		<parameter name="webServiceSecureProtocol" value="TLSv1.1"/>
		<parameter name="webServiceKeyStoreFile" value="D:/keystore/mykeystore.jks"/>
		<parameter name="webServiceKeyStoreType" value="JKS"/>
		<parameter name="webServiceKeyStorePassword" value="password"/>
		<parameter name="webServiceKeyPassword" value="password"/>
		<...>
	</engineParameters>
	<...>
</parameters>
And here is their description:
| Role | Description |
|---|---|
| webServiceSecureProtocol | Protocol to be used for securing the endpoints, like TLSv1.1 for instance. |
| webServiceKeyStoreFile | Path to the Java keystore containing the certificate to use for securing the endpoints. |
| webServiceKeyStoreType | Java keystore type, such as ‹JKS›. |
| webServiceKeyStorePassword | Password of the keystore file. |
| webServiceKeyPassword | Password of the certificate key. |
Configuring the scheduler
The scheduler shipped with the Runtime stores all the schedules into a database.
This database is by default an internal H2 database, that is shipped with the Runtime and started with it.
If you want to change this and store the schedules into another database:
- Create the necessary tables in the target database using the scripts that are in stambiaRuntime/scripts/scheduler
- Copy the stambiaRuntime/properties/samples/schedules/engineScheduler.properties into stambiaRuntime/properties
- Open it and configure it as explained below
When the property org.quartz.jobStore.dataSource is set to internal (which is the default), the scheduler stores its schedules in the internal database.
Therefore, change it to another name when you want to use another database.
Finally, define the datasource parameters to match the location where the tables are created.
org.quartz.jobStore.class=org.quartz.impl.jdbcjobstore.JobStoreTX
org.quartz.jobStore.driverDelegateClass=org.quartz.impl.jdbcjobstore.StdJDBCDelegate
org.quartz.jobStore.useProperties=false
#org.quartz.jobStore.dataSource=internal
org.quartz.jobStore.dataSource=database01
org.quartz.jobStore.tablePrefix=STB_
org.quartz.jobStore.isClustered=false
#============================================================================
# Configure Datasources
#============================================================================
org.quartz.dataSource.database01.driver =org.h2.Driver
org.quartz.dataSource.database01.URL = jdbc:h2:tcp://localhost:42100/scheduler/internalDb;SCHEMA=SCHEDULER
org.quartz.dataSource.database01.user = sa
org.quartz.dataSource.database01.password =
org.quartz.dataSource.database01.maxConnections = 5
org.quartz.dataSource.database01.validationQuery=
Starting a Runtime with a configuration file
A Runtime may be started with a specific configuration file.
To specify this file, use the environment variable STAMBIA_CONF_FILE_LOCATION
By default, the value configured in the file «initvariable.sh (.bat)» is this:
STAMBIA_CONF_FILE_LOCATION=$STAMBIA_PROPERTIES_LOCATION/engineParameters.xml
Automatic log purge
You can plan an automatic purge of the Runtime session logs.
This can be done in Stambia and Stambia Analytics in the Purge tab of the Runtime Editor or alternatively on command line as explained below.
To proceed:
- Launch startCommand (.bat or .sh).
- Then use the purge scheduling command, the description of which follows:
schedule purge keep <number> <minute|hour|day|session> cron <cronExpression> [sessionname <name,name2,...>] [status <done,error,killed>] [on host <hostname>] [port <hostport>]
It is possible to purge while keeping:
- A number of days, hours or minutes
- A number of sessions
For example, to keep 90 days and schedule the purge every evening at 23h:
schedule purge keep 90 day cron "0 0 23 * * ?"
Runtime parameters reference
The configuration of the Runtime is done in the engineParameters.xml file that can be found in the properties folder of the Runtime’s installation.
This file allows to manage:
- The engine parameters (such as started services, listening ports, ...)
- The security of the Runtime (hostname and user / password restriction, roles)
- The repositories where the deliveries are stored
- The Java additional options to add at Runtime’s startup
- The log database configuration
Take care, it is highly recommended to check first with Stambia the modifications you wish to bring to the XML files containing the Runtime parameters.
You can moreover find configuration samples in the properties/samples folder.
Note: Passwords are encrypted using the
encrypt <password>command on the Runtime engine console (engine command line tool).
Tip: All the parameters are centralized in this file but can be easily externalized if required.
Engine Parameters
Common Parameters
| Parameter | Default value | Comment |
|---|---|---|
| userLogDefaultName | internalDB | Name of the log where session logs are written. This is the name defined in the userLogName attribute on the log database configuration. |
| debugLevel | 0 | Debug level in the Runtime |
| sessionFolder | sessions | Folder (relative or absolute) used to store the session logs. Now used to store the data of the internal base. |
| deliveryFolder | build/deliveries Folders where the Runtime will find the deliveries | |
| temporaryFolder | temp | Temporary folder for the Runtime. Used by developers as a workspace, and by the Runtime to store some temporary files. |
| deliveryExtension | deliv | Extension of the deliveries. Do not change this value. |
| defaultFetchSize | 1000 | Default fetch value for reading data in databases. This value may be overloaded by the developers or when putting into production directly in the deliveries. |
| defaultBatchSize | 1000 | Default batch update value for writing data into databases. This value may be overloaded by the developers or when putting into production directly in the deliveries. |
| defaultJdbcConnectionTimeout | 100 | Default timeout value for connections to databases, in seconds |
| defaultJdbcQueryTimeout | 10 | Default timeout value for queries to databases, in seconds |
| defaultSessionReportNumber | 10 | Default number of sessions for the reporting part of the Runtime. Usually overloaded by the graphical interface. |
| memoryLogScanDelay | 10000 | Scan delay of the logs that have been brought back to memory so as to be purged, in milliseconds. |
| memoryLogCacheDelay | 300000 | Time during which logs stay in memory, in milliseconds. |
Services Parameters
| Parameter | Default value | Comment |
|---|---|---|
| launchSchedulerEngine | true | Condition for starting the scheduler that is integrated to the Runtime. |
| launchExecutionEngine | true | Condition for starting the execution part of the Runtime. This must stay true. |
| launchReportEngine | true | Condition for starting the reporting part of the Runtime. This must stay true. |
| startInternalDb | true | Condition for starting the internal database used for the session logs and the scheduler |
| startSoapServer | true | Condition for starting the SOAP services that enable Stambia to expose web services |
| rmiHost | The RMI host is automatically calculated. If specified, this parameter skips this step. Useful when there are multiple domains, or address translations that generate different IP addresses for the same host. The host that is indicated (IP or name) must be reachable by the client | |
| soapHost | See above. |
Services Ports Parameters
| Parameter | Default value | Comment |
|---|---|---|
| rmiPort | 42000 | IP port of the Java RMI service used for communication between the Runtime and graphical interfaces |
| rmiCallbackPort | In the RMI protocole, the client can also receive queries from the server. In this case, it uses the rmiCallbackPort. The default value is that of the rmiPort. | |
| internalDbTcpPort | 42100 | IP port of the internal database |
| internalDbWebPort | 42101 | IP port of the Web interface of the internal database |
| soapServerPort | 42200 | IP port used by the SOAP server |
Services Miscellaneous Parameters
| Parameter | Default value | Comment |
|---|---|---|
| enableConnectionPoolForJdbcDatabases | false | If this parameter is set to true, connections created and used by the Runtime for exchanges with JDBC databases will be performed through a pool of connection. This can help to reduce the amount of connections created to these databases, as they will be re-used instead of re-created each time. |
| enableConnectionPoolForLogDatabase | false | If this parameter is set to true, connections created and used by the Runtime for exchanges with its Log Database will be performed through a pool of connection. This can help to reduce the amount of connections created to the Log Database, as they will be re-used instead of re-created each time. |
Standard Output Parameters
| Parameter | Default value | Comment |
|---|---|---|
| stackTraceOnStdOutput | true | To write the stacktrace on the standard output, if there is an error. |
| statisticsOnStdOutput | true | To write the statistics on the standard output, at the end of a session. |
| sumVariables | … | List of the variables used to calculate the session’s statistics |
Web Services Parameters
| Parameter | Default value | Comment |
|---|---|---|
| soapServerUser | Optional user for queries to the SOAP server | |
| soapServerPassword | Optional password for queries to the SOAP server | |
| soapServerUncryptedPassword | Optional unencrypted password for queries to the SOAP server | |
| soapServerThreadPoolSize | Maximum number of concurrent threads on the SOAP server. If number exceeds this size, sessions are put on hold | |
| httpRestServerUser | Optional user for queries to the REST server | |
| httpRestServerPassword | Optional password for queries to the REST server | |
| httpRestServerUncryptedPassword | Optional unencrypted password for queries to the REST server | |
| webServiceInputMessageKeep | if_error | Specifies if the input files created during web services invocations should be kept or not. The possible values are: yes, no, if_error |
| webServiceOutputMessageKeep | if_error | Specifies if the output files created during web services invocations should be kept or not. The possible values are: yes, no, if_error |
| webServiceFaultMessageKeep | if_error | Specifies if the fault files created during web services invocations should be kept or not. The possible values are: yes, no, if_error |
Logs parameters
In this part, the default values will be those used for the logs in H2 (the internal base). For other logs examples, please refer to the example files that are provided.
Log header
| Parameter | Example value | Comment |
|---|---|---|
| userLogName | internalDB | Name of the log, that must then be used in the userLogDefaultName engine Parameter |
| autoUpdate | true | Condition for the automatic update of the log structures |
| userLogClass | com.indy.engine.userLog.RdbmsUserLog | Java class that is used (do not change) |
Internal parameters
| Parameter | Example value | Comment |
|---|---|---|
| userLogRdbmsDriver | org.h2.Driver | Java driver which will be used (this file must be in the Runtime folder lib/jdbc) |
| userLogRdbmsUrl | jdbc:h2:tcp://localhost:42100/sessions/internalDb/sessionLogs | Connection url |
| userLogRdbmsUser | sa | Connection user |
| userLogRdbmsPassword | Connection password (non encrypted, plain text) | |
| userLogRdbmsEncryptedPassword | Connection password (encrypted) | |
| userLogRdbmsVarcharType | varchar | Type used when the data is a character string |
| userLogRdbmsVarcharMaxSize | 1000 | Maximum length of the character strings with the type defined above. |
| userLogRdbmsNumericType | numeric | Type used when the data is numerical |
| userLogRdbmsClobType | clob | Type used when the data is text (clob, limitless text) |
| userLogRdbmsBlobType | blob | Type used when the data is binary (blob) |
| userLogRdbmsSchemaName | logs Database scheme used to create the tables | |
| userLogRdbmsUseSchemaNameForIndexCreation | true | Condition for adding a scheme to prefix indexes during creation |
| userLogRdbmsDeleteSyntaxe | Delete from | Syntax of the delete commands. The name of the table will be added behind. |
| userLogRdbmsCompressedLevel | bestCompression | Type of compression used (if activated). Possible values: bestCompression, bestSpeed or default |
| userLogRdbmsDeliveryFormat | compressed | Gives the delivery’s storage format in the database. Possible values: text,binary or compressed |
| userLogRdbmsPropertyMaxVarcharSize | 1000 | Size of the character strings beyond which the data will be stored as CLOB |
| userLogRdbmsPropertyMaxClobSize | 10000 | Size of the CLOB beyond which the data will be stored as BLOB. -1 means «infinite» |
| userLogRdbmsPropertyBinaryFormat | compressed | Specifies the compression of the BLOB. Possible values: binary or compressed |
| userLogRdbmsTimestampQuery | select now() | SQL order to retrieve the current time stamp. |
| userLogRdbmsInactivityDetectionPeriod | 90000 | |
| userLogRdbmsActivityRefreshInterval | 60000 | |
| userLogRdbmsIndexCreationOption | Character string that is added after the SQL order which creates indexes. Useful to specify physical storage parameters such as «tablespaces» or underlying physical types. For example, with MysqlENGINE = InnoDB | |
| userLogRdbmsTableCreationOption | Character string that is added after the SQL order which creates tables. Useful to specify physical storage parameters such as «tablespaces» or underlying physical types. For example, with MysqlENGINE = InnoDB |
Note: Passwords are encrypted using the
encrypt <password>command on the Runtime engine console (engine command line tool).
Runtime command reference
General commands
connect
Once you are in the command line (using startcommand.bat, startcommand.sh, ...), you need to connect to the Runtime with the connect command:
connect [to <host>] [port <port>] [silent]
| Parameter | Mandatory | Description |
|---|---|---|
| to <host> | No | Hostname or address of the host. If not set localhost is used. |
| port <port> | No | Runtime port. |
| silent | No | Avoids the feedback normally written on the standard output. |
runtime version
Return the version of the currently connected Runtime.
runtime version
execute commands in file
Execute a list of Runtime commands contained in a file.
execute commands in file <file>
| Parameter | Mandatory | Description |
|---|---|---|
| file <file> | Yes | Path to a file containing Runtime commands, separated with a line return |
Example of file:
execute delivery myDelivery synch
execute delivery myDelivery2
stop runtime
encrypt
Encrypt a password. The result can be used in various places in Stambia, especially in Process actions, when providing passwords manually.
encrypt <password>
stop runtime
Stop the currently connected Runtime properly.
The services are all stopped and by default, all running sessions are killed.
stop runtime [wait sessions]
| Parameter | Mandatory | Description |
|---|---|---|
| wait sessions | No | When set, the Runtime waits for all the sessions to be executed before stopping. No sessions can be started during this time (An exception will be thrown). |
kill runtime
Kill the currently connected Runtime.
kill runtime
help
Show a description and the list of parameters available for the Runtime commands.
help [on <commandName>]
| Parameter | Mandatory | Description |
|---|---|---|
| on <commandName > | No | Shows the help of a specific command. |
Service commands
Service management commands
Management of services. Stopping a service will not stop its running tasks. For example, stopping the execution service will not stop the currently running deliveries.
<start|stop|restart> <name> service
Example:
stop execution service
soap server
Management of soap server.
soap server [build|start|stop]
get services
Show information about status and running time of services.
get services [name <name>] [format <format>]
| Parameter | Mandatory | Description |
|---|---|---|
| name <name> | No | Specifies a service with its name. |
| format <format> | No | Columns to show on the output, separated with a comma. Available columns: %name, %status, %duration. |
Example:
get services format %name,%status
Result:
rmi,Running
rdbms,Running
execution,Stopped
soap,Running
listener,Running
scheduler,Running
versions
Return the version of the different services.
versions
Delivery management commands
execute delivery
Execute a delivery on the currently connected Runtime.
execute delivery <delivery> [configuration <configuration>] [var <varPath> <varName>] [synch] [sessionName <sessionName>] [format <format>]
| Parameter | Mandatory | Description |
|---|---|---|
| configuration | No | When working with multi-Configuration deliveries, the Configuration to use must be specified with this parameter. |
| var <varPath> <varName> | No | Passes a Variable to the delivery. Multiple var parameters can be set. |
| synch | No | Waits for a return before handing back the commands to the caller. |
| sessionName | No | Can be used to customize the name of the session that will be executed, which defaults to the name of delivery if no set. |
| format | No | This option can be used to customize the output of the command, which information to return and how. The following columns are available: %name,%status,%begindate,%enddate,%configuration,%id,%executionmode,%guesthost,%iter,%launchmode,%returncode,%errormessage |
Examples:
execute delivery myDeliv var ~/myVar1 value1 var "~/my var 2" "value 2"
execute delivery myDeliv format "%name, %id, %returncode"
execute delivery myDeliv format "%name | %id | %begindate | %enddate | %status | %returncode | %errormessage"
schedule delivery
Schedule a delivery on the currently connected Runtime.
schedule delivery <delivery> [scheduleName <scheduleName>] [sessionName <sessionName>] [jobName <jobname>] [with command] [on host <hostname>] [port <hostport>] [start <startDate>] [end <endDate>] [var <path> <value>] [var ...] [configuration <configuration>] cron <cronExpression>
| Parameter | Mandatory | Description |
|---|---|---|
| scheduleName <scheduleName> | No | Name that will identify this schedule, automatically generated if not set. |
| sessionName <sessionName> | No | Name of the session. If no set, the session is named after the delivery. |
| jobName <jobname> | No | Internal name for the schedule job. This is by default the delivery name. See below for further information. |
| with command | No | Executes the delivery with the command line tool. If no set, the delivery is invoked in memory in the currently connected Runtime. |
| on host <hostname> | No | Hostname or address of the Runtime host. If not set the currently connected Runtime is used. |
| port <hostport> | No | Runtime port. |
| start <startDate> | No | Start date of the schedule. |
| end <endDate> | No | End date of the schedule. |
| configuration | No | When working with multi-Configuration deliveries, the Configuration to use must be specified with this parameter. |
| var <varPath> <varName> | No | Passes a Variable to the delivery. Multiple var parameters can be set. |
| cron <cronExpression> | Yes | Cron expression to planify the schedule. |
Example:
schedule delivery myDeliv start "2015/12/10 12:55:22" end "2015/12/25 12:55:22" var ~/myvar myValue cron "0 15 10 * * ? *"
About the jobName
The jobName is used to identify the unicity of schedules.
Therefore, multiple schedules with the same jobName will not be able to be executed at the same time.
If this happens, only one of the two will be started.
This is to avoid the start of multiple schedules if their execution at the same time is not functionally possible.
This is, at purpose, the default behavior when having multiple schedules on the same delivery.
If you want to change that, just specify a jobName when scheduling a delivery.
Example: Two schedules that will not be able to be started at the same time:
schedule delivery myDeliv var ~/myvar myValue01 cron "0 15 10 * * ? *"
schedule delivery myDeliv var ~/myvar myValue02 cron "0 15 10 * * ? *"
Example: Two schedules that are allowed to start at the same time:
schedule delivery myDeliv jobName job01 var ~/myvar myValue01 cron "0 15 10 * * ? *"
schedule delivery myDeliv jobName job02 var ~/myvar myValue02 cron "0 15 10 * * ? *"
get repositories
Return the list of available Runtime delivery repositories.
get repositories
get deliveries
Return several information about the deliveries contained on the currently connected Runtime.
get deliveries [id <id1,id2,idn>] [format <format>] [repository <repository>]
| Parameter | Mandatory | Description |
|---|---|---|
| id <id1,id2,idn> | No | Deliveries ids, separated with a coma. |
| format <format> | No | Columns to show on the output, separated with a comma. Available columns: %name, %builduser, %configuration, %id, %packageid, %processid, %username, %version, %builddate, %exportdate. |
| repository <repository> | No | Runtime delivery repository to search in. If not set, the deliveries are search in the default repository. |
Example:
get deliveries format %name,%configuration,%builddate,%exportdate
get list deliveries
Retrieve the list of deliveries contained on the currently connected Runtime.
get list deliveries [to <file>]
| Parameter | Mandatory | Description |
|---|---|---|
| to <file> | No | Exports the result to a file. |
get delivery schedules
Retrieve information about delivery schedules, and optionally export it in a file. If a different job name has been specified during scheduling, it won’t appear in the list.
get delivery schedules <deliveryName> [to <file>]
| Parameter | Mandatory | Description |
|---|---|---|
| to <file> | No | Exports the result to a file. |
remove delivery
Remove / unpublish a delivery from the Runtime.
This operation will delete the delivery file from the Runtime.
remove delivery <name> [repository <repository>]
| Parameter | Mandatory | Description |
|---|---|---|
| name | Yes | Name of the Delivery to remove. |
| repository <repository> | No | Runtime delivery repository to search in for the delivery to remove. If not set, the delivery will be removed from the default repository. |
Session management commands
get sessions
Return the list of sessions existing in the Log Database configured for this Runtime as well as the sessions currently in memory.
get sessions [name <name>] [id <id1,id2,idn>] [status <running,error,done,stopped>] [duration <min>] [to <max>] [limit <limit>] [format <format>]
| Parameter | Mandatory | Description |
|---|---|---|
| name <name> | No | Session Name. |
| id <id> | No | Session Id. |
| status <status> | No | Session status. Available: running, error, done, stopped. |
| duration <min> | No | Session minimum duration in milliseconds. |
| to <max> | No | Session maximum duration in milliseconds. |
| limit <limit> | No | Number of sessions to retrieve. |
| format <format> | No | Columns to show on the output, separated with a comma. Available columns %name, %status, %begindate, %enddate, %configuration, %id, %deliveryid, %runtimehost, %runtimeport, %executionmode, %guesthost, %errormessage |
stop|restart|wait session
Management of sessions.
<stop|restart|wait> session <id>
Example:
stop session c0a84b0b01513de0c511e38b414f0e6e
Result:
Session :c0a84b0b01513de0c511e38b414f0e6e is stopping
purge
Purge the Runtime’s sessions specified. All the information about these sessions will be deleted.
purge keep <number> <minute|hour|day|session> [sessionname <name,name2,...>] [status <done,error,killed>]
| Parameter | Mandatory | Description |
|---|---|---|
| keep <number> <minute|hour|day|session> | Yes | Number of sessions to keep. |
| sessionname <name> | No | Sessions' names, separated by a comma. |
| status <done,error,killed> | No | Sessions' status, separated by a comma. |
Example:
Keep only last 100 sessions:
purge keep 100 session
Keep only five of the sessions which name is mySession and which status is done.
purge keep 5 session sessionname mySession status done
Keep sessions from last 3 days:
purge keep 3 day
schedule purge
Schedule a purge of Runtime’s sessions.
schedule purge keep <number> <minute|hour|day|session> cron <cronExpression> [sessionname <name,name2,...>] [status <done,error,killed>] [on host <hostname>] [port <hostport>]
| Parameter | Mandatory | Description |
|---|---|---|
| keep <number> <minute|hour|day|session> | Yes | Number of sessions to keep. |
| cron <cronExpression> | yes | Cron expression to planify the purge. |
| sessionname <name> | No | Sessions' names, separated by a comma. |
| status <done,error,killed> | No | Sessions' status, separated by a comma. |
| on host <hostname> | No | Hostname or address of the Runtime host. If not set the currently connected Runtime is used. |
| port <hostport> | No | Runtime port. |
Example:
schedule purge keep 10 session cron "0 15 10 * * ? *"
Trigger commands
A trigger is created when a delivery or purge schedule is added.
get list triggers
Retrieve the list of triggers contained in the Runtime.
get list triggers [to <file>]
| Parameter | Mandatory | Description |
|---|---|---|
| to <file> | No | Exports the result to a file. |
get trigger detail
Retrieve detail of a specific trigger.
get trigger detail <triggerName> [to <file>]
| Parameter | Mandatory | Description |
|---|---|---|
| to <file> | No | Exports the result to a file. |
get triggers
Retrieve the list of triggers contained in the Runtime with details.
get triggers [name <name1,name2,namen>] [format <format>]
| Parameter | Mandatory | Description |
|---|---|---|
| name <name1,name2,namen> | No | Trigger name. |
| format <format> | No | Columns to show on the output, separated with a comma. Available columns %name, %cronexpression, %deliveryname, %executiontype, %starttime, %endtime, %nextexecution, %purgesize, %purgeunit, %jobname |
pause trigger
Pause the execution of a trigger.
pause trigger <name>
resume trigger
Resume the execution of a trigger.
resume trigger <name>
remove trigger
Remove a trigger.
remove trigger <triggerName>