Welcome to Stambia MDM.
This Getting Started tutorial provides a step-by-step introduction to Stambia MDM (Master Data Management).
Preface
Audience
| If you want to learn about MDM or discover Stambia MDM, you can watch our tutorials. |
| The Stambia MDM Documentation Library, including the development, administration and installation guides is available online. |
Document Conventions
This document uses the following formatting conventions:
| Convention | Meaning |
|---|---|
boldface |
Boldface type indicates graphical user interface elements associated with an action, or a product specific term or concept. |
italic |
Italic type indicates special emphasis or placeholder variable that you need to provide. |
|
Monospace type indicates code example, text or commands that you enter. |
Other Stambia Resources
In addition to the product manuals, Stambia provides other resources available on its web site: http://www.stambia.com.
Obtaining Help
There are many ways to access the Stambia Technical Support. You can call or email our global Technical Support Center (support@stambia.com). For more information, see http://www.stambia.com.
Feedback
We welcome your comments and suggestions on the quality and usefulness
of this documentation.
If you find any error or have any suggestion for improvement, please
mail support@stambia.com and indicate the title of the documentation
along with the chapter, section, and page number, if available. Please
let us know if you want a reply.
Overview
This Getting Started tutorial provides a step-by-step introduction to Stambia MDM (Master Data Management).
What is Stambia MDM?
Stambia MDM is designed to support any kind of Enterprise Master Data Management initiative. It brings an extreme flexibility for defining and implementing master data models and releasing them to production. Stambia MDM can be used as the target deployment point for all master data of your enterprise or in conjunction with existing data hubs to contribute to data transparency and quality with federated governance processes. Its powerful and intuitive environment covers all common use cases for setting up a successful master data governance strategy.
Tutorial Overview
In this tutorial, you will:
-
Design a master data hub containing employees, customers and cost centers information. You will also configure the Integration Rules to load, enrich and consolidate data coming from several distinct source systems and produce certified golden records.
-
Deploy the MDM Hub.
-
Integrate data from various source systems into the hub, and review the consolidated data.
-
Design an Application for business users and data stewards to access the MDM hub data.
-
Use the application to Browse the master data and modify this data through Human Workflows.
Installing Stambia MDM
Requirements
Before starting this tutorial, make sure that the following requirements are met:
-
Oracle Database version 10.2 or above is installed and configured.
-
A Java Runtime Environment (JRE) or Development Kit (JDK) 7 ou 8 is installed and the JAVA_HOME or JRE_HOME environment variable is configured to point to this installation of Java. Set JAVA_HOME to your JDK installation directory (e.g.,
c:\Progra~1\java\jdk1.7.0) or set JRE_HOME to the JRE base directory (e.g.,c:\Progra~1\java\jre1.7.0).
Getting the Oracle Database
Oracle Database can be downloaded for free for Linux and Windows at the following URL: http://www.oracle.com/technetwork/database/enterprise-edition/downloads/index-092322.html
|
Stambia MDM works with Oracle Express Edition (not
available for Windows 64-bits machines). It also is possible to use with
any other edition of Oracle (Standard or Enterprise). These are free to
use for the purpose of developing, testing and prototyping. Note: Amazon Web Services (AWS) offers Oracle as part of its Cloud Relational Database Service (RDS). |
If you have any difficulty figuring out a good solution for getting Oracle, please contact support@stambia.com
Installing the Stambia MDM Demo
Configure the Database Schemas
Stambia MDM uses four schemas for the demonstration environment:
-
MDM_DEMO_REPOSITORYcontains the Stambia MDM Repository. -
MDM_DEMO_MDMis the schema into which you will deploy your MDM Hub. -
MDM_DEMO_SOURCEcontains sample source data used to load the MDM Hub. -
MDM_DEMO_PULSEcontains the Pulse Metrics data used in the MDM Hub dashboards.
To configure the database schemas:
-
Connect with a system account to the Oracle Database.
-
Run the following script to create the Stambia MDM demo schemas:
CREATE USER MDM_DEMO_REPOSITORY IDENTIFIED BY MDM_DEMO_REPOSITORY DEFAULT TABLESPACE USERS TEMPORARY TABLESPACE TEMP;

CREATE USER MDM_DEMO_SOURCE IDENTIFIED BY MDM_DEMO_SOURCE DEFAULT TABLESPACE USERS TEMPORARY TABLESPACE TEMP;

CREATE USER MDM_DEMO_MDM IDENTIFIED BY MDM_DEMO_MDM DEFAULT TABLESPACE USERS TEMPORARY TABLESPACE TEMP;

CREATE USER MDM_DEMO_PULSE IDENTIFIED BY MDM_DEMO_PULSE DEFAULT TABLESPACE USERS TEMPORARY TABLESPACE TEMP;

GRANT CONNECT, RESOURCE TO MDM_DEMO_REPOSITORY, MDM_DEMO_SOURCE, MDM_DEMO_MDM;
GRANT CONNECT, RESOURCE, SELECT ANY TABLE, CREATE ANY VIEW TO MDM_DEMO_PULSE;

-- The following command should be used for Oracle 12c and above
GRANT UNLIMITED TABLESPACE TO MDM_DEMO_REPOSITORY, MDM_DEMO_SOURCE, MDM_DEMO_MDM, MDM_DEMO_PULSE;
If you have already created these schemas and wish to delete them beforehand, use the following script:
DROP USER MDM_DEMO_REPOSITORY CASCADE;
DROP USER MDM_DEMO_MDM CASCADE;
DROP USER MDM_DEMO_SOURCE CASCADE;
DROP USER MDM_DEMO_PULSE CASCADE;
Install and Start the Stambia MDM Server
Stambia MDM runs as a web application in a Java Application Server. A simple Apache Tomcat Server, pre-configured with Stambia MDM is used for this tutorial.
In the following section, the stambia-mdm-preconfigured-xxx.zip file refers to
the Stambia MDM - Pre-Configured with Apache Tomcat file
that you can download to install Stambia MDM. The name
of this file varies as it includes the Stambia MDM version and
build number.
-
Download the Stambia MDM archive. Make sure to download the version that includes the pre-configured Tomcat Server. It is named
stambia-mdm-preconfigured-xxx.zip. -
Install and start the Apache Tomcat Server:
-
On a Windows Platform:
-
Decompress the
mdm-server/folder from the archive in a folder called/stambiamdmin your machine. -
Open Windows Explorer, and go to the
/stambiamdm/binfolder. -
Run
startup.bat.
-
-
On a UNIX/Linux Platform:
-
Decompress the
mdm_server/folder from the archive in a$HOME/stambiamdmfolder in your machine. -
In a Shell window, run
$HOME/stambiamdm/bin/startup.sh.
-
-
The Apache Tomcat server starts by default on the port
8088. If this port is already used by another application and you wish
to start the server on a different port, edit the /conf/server.xml
file with a text editor, and change the port value in the following
line: <Connector port="8088" protocol="HTTP/1.1"
|
The Stambia MDM server is preconfigured with JDBC datasources pointing to the schemas you created (called
MDM_DEMO_REPOSITORY, MDM_DEMO_SOURCE, MDM_DEMO_MDM and MDM_DEMO_PULSE), stored in an Oracle instance started on the
local machine and listening on port 1521 (that is: localhost:xe:1521).
If the Oracle instance that you are using is configured differently:
First, stop the Stambia MDM server, edit the
/conf/catalina/localhost/stambiamdm.xml to change the configuration of
the datasources and then restart the Stambia MDM server.
|
To shut down the Stambia MDM server, run the shutdown.bat
(Windows) or shutdown.sh (UNIX/Linux) script in the /bin folder.
Install the Repository
Stambia MDM holds all its information in a repository stored in a database schema. The first task when connecting Stambia MDM is to create this repository structure in the database schema previously created.
-
Open your web browser and connect to the following URL:
http://localhost:8088/stambiamdm/workbench
(update the port number if you changed it during the installation process) -
In the login prompt, enter the following:
-
User: mdmadmin
-
Password: mdmadmin
-
-
The Stambia MDM Workbench opens with the license agreement. Review the End-User License Agreement.
-
Check the I have read and accept Stambia’s End-User License Agreement box and then click Next.
-
In the License Key File page, select a valid license key by clicking the Upload License Key file… button and then click Next.
-
In the Repository Creation wizard, select Design for the type of repository and then click Finish.
-
Click OK when the Repository Successfully Created message appears.
The repository has been created and Stambia MDM is now up and running.
Create the Demo Model
The Tutorial Environment contains a Customer and Financial Hub model. This model simulates an MDM project in progress. During this tutorial, you will finish the design of this model, deploy the MDM Hub and load it from sample data sources.
To seed the Customer and Financial Hub model:
-
In the Stambia MDM menu, select Help > Demo Environment > Create Demo Model…
-
In the Getting Started Setup wizard, select the Partial Setup option and then click Next.
-
The second wizard screen allows you to rename the model:
-
If you are running this tutorial for the first time, leave the fields unchanged.
-
If you have already seeded a demonstration model in this repository and want to seed the model a second time with a different name, edit the Demo Model Name (for example, enter CustomerAndFinancialMDM2). Note that you will have to use this new name for the rest of the tutorial every time you are requested to enter CustomerAndFinancialMDM as a value.
-
-
Click Finish.
-
Click OK in the confirmation window.
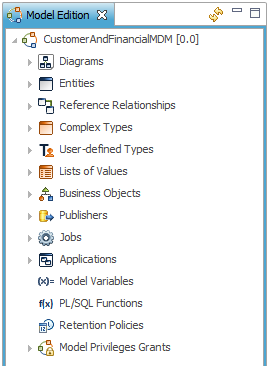
The demonstration model is seeded, and the Model Edition view opens.
Congratulations! You have successfully installed and configured Stambia MDM. You can now proceed and work with the Customer and Financial Hub model.
Designing the MDM Hub
In this chapter, you will design a master data hub containing employees, customers, contacts and cost centers information. You will also configure the integration rules to augment, validate and consolidate data coming from several distinct source systems and produce certified golden records.
What is a Model?
A Model contains the description of the master data.
A Model in Stambia MDM is not a physical data model but
a logical model. It includes the logical Entity-Relation definition of
the objects stored in the hub — the entities with their
attributes. It also includes the various customized data types, constraints and
rules that apply to these entities.
The model also contains the definition of the integration jobs that
run on the platform to create golden data from raw information pushed
by publishers (third party applications).
In the first part of the tutorial, we will explore the Customer and Financial Hub model.
Creating Customized Data Types
Stambia MDM includes built-in data types for the attributes of
the model’s entities, such as String, Number, etc.
You can declare customized types that will be reused across the model,
including:
-
User-Defined Types are a restriction of a built-in data type.
-
Complex Types are composite types made of attributes.
-
List of Values or LOV are list of Code/Label pairs.
User Defined Types
-
Expand the User-defined Types node in the Model Edition.
-
Double-click the GenericNameType node. The editor for this user-defined type opens.
-
In the Details group, you can see that this user-defined type is based on the String built-in type, but with a fixed Length of 80 characters.
-
Click the Used in Attributes group (in the left banner of the editor) to see the attributes in the model using this user-defined type. For example, the Employee’s First Name and Last Name use this type. If the User-Defined type is modified (for example, if we extend the length to 120 characters), every attribute in the model using this type will automatically benefit from this change.
-
-
Close this GenericNameType editor by clicking the Close icon on the editor tab.
Complex Types
A Complex Type is a user-created type that contains several attributes.
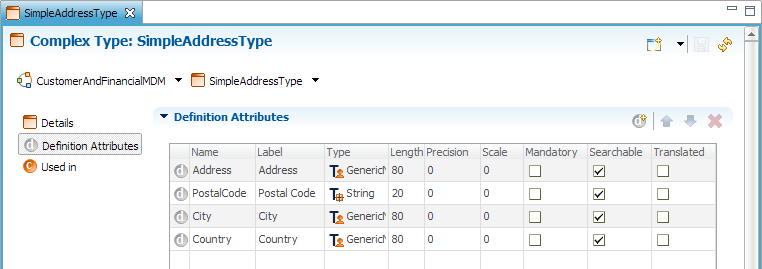
In this example, we will create a complex type called SimpleAddressType to represent a postal address. This type will have the following definition attributes: Address, PostalCode, City and Country. We will reuse the GenericNameType user-defined type for some of these definition attributes.
| Auto fill is a feature in Stambia MDM that automatically generates field values such as Labels for objects when you provide their name in CamelCase. CamelCase consists of having all words joined without spaces, with each word’s initial letter capitalized (Examples: FirstName, ZipCode, SubjectArea). CamelCase is a recommended naming convention for objects in Stambia MDM. For this tutorial, we will use this naming convention to benefit from the Auto fill feature. |
To create the SimpleAddressType complex type:
-
Right-click the Complex Types node and select Add Complex Type
-
In the Create New Complex Type wizard, enter the following values:
-
Name: SimpleAddressType. Note that as the Auto Fill box is checked, the Label is automatically filled in.
-
-
Click Finish to close the wizard. The Complex Type: SimpleAddressType editor opens.
-
In the Description field, enter the following description: Type that can be used to represent a simple address.
-
Select the Definition Attributes group (in the left banner of the editor).
-
Click the Add Definition Attribute
 button in the
Definition Attributes table to add a new attribute to the complex
type.
button in the
Definition Attributes table to add a new attribute to the complex
type. -
In the Create New Definition Attribute dialog, set the following properties.
-
Name: Address
-
Type: GenericNameType [User-defined Type]
-
-
Click Finish to close the dialog.
-
Click the Add Definition Attribute
button. -
In the Create New Definition Attribute dialog, set the following properties.
-
Name: PostalCode
-
Type: String [Built-in Type]
-
Length: 20
-
-
Click Finish to close the dialog.
-
Click the Add Definition Attribute
button. -
In the Create New Definition Attribute dialog, set the following properties.
-
Name: City
-
Type: GenericNameType [User-defined Type]
-
-
Click Finish to close the dialog.
-
Click the Add Definition Attribute
button. -
In the Create New Definition Attribute dialog, set the following properties.
-
Name: Country
-
Type: GenericNameType [User-defined Type]
-
-
Click Finish to close the dialog.
-
Select File > Save in the menu. You can alternately press the Save button in the toolbar or CTRL+S to save the editor.
-
Close the Complex Type: SimpleAddressType editor.
Stambia MDM also models how artifacts are displayed. The Display Name for SimpleAddressType will define how an address stored in this type is displayed in a compact format in the user interface.
To create a display name for the SimpleAddressType type:
-
Expand the Complex Types node in the Model Edition.
-
Right-Click the SimpleAddressType node in the tree view and then select Define Display Name. The Create New Display Name wizard appears.
-
In first wizard screen, select the content of the Separator field and replace it with a space.
-
Click Next
-
In the Display Name Attributes page, click the Add All >> button to add all available attributes to the Selected Attributes. Use the Move Up and Move Down buttons to arrange them in the following order: Address, Postal Code, City and Country.
-
Click Finish to close the wizard.
-
Press CTRL+S to save the Display Name: SimpleAddressType editor.
-
Close the editor.
With this display name, an address stored in a SimpleAddressType will display all the selected attributes, separated by a space.
Designing Entities
Creating Entities
An entity represents an object in the MDM hub. For example Customers, Contacts or Parties are entities. Usually, MDM entities are clearly defined and the definition is agreed upon at the corporate level or according to your organization’s data architecture strategy.
In this example, we will create a Customer Entity, and use the customized data types for its attributes. The Customer entity represents for our organization the companies we are doing business with. Customer data is scattered and duplicated in various applications. This entity will be designed to de-duplicate (fuzzy matching) and consolidate this data into single golden customer records.
To create the Customer entity:
-
In the Model Edition view, expand the
 Diagrams node.
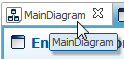
 -
Double-click the
MainDiagram
node. The MainDiagram editor opens. This diagram displays the entities
of the model in a graphical way and allows the creation or modification
of these entities. This model already contains the Contact,
Employee and CostCenter entities. -
In the Palette (on the right side of the editor), click to select the
 Add Entity tool.
 -
Click in the diagram. The Create New Entity wizard opens.
-
In the Create New Entity wizard first screen, make sure that the Auto Fill box is checked and then enter the following:
-
Name: Customer
-
Plural Label: Customers
-
Select Fuzzy Matching for the Matching Behavior.
-
-
Click Next
-
In the Primary Key Attribute screen, make sure that the ID Generation is set to Sequence starting with a value of 1.
-
Click Finish to close the wizard. The new Customer entity is added to the diagram.
-
Press CTRL+S to save the editor.
-
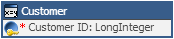
Double-click the title of the Customer entity in the diagram. The Entity: Customer editor opens.
-
In this editor, enter the following value in the Description Field:
Entity that represents all customers we are doing business with. Customers come from various source applications such as the CRM and Marketing applications. -
Press CTRL+S to save the editor and leave it open.
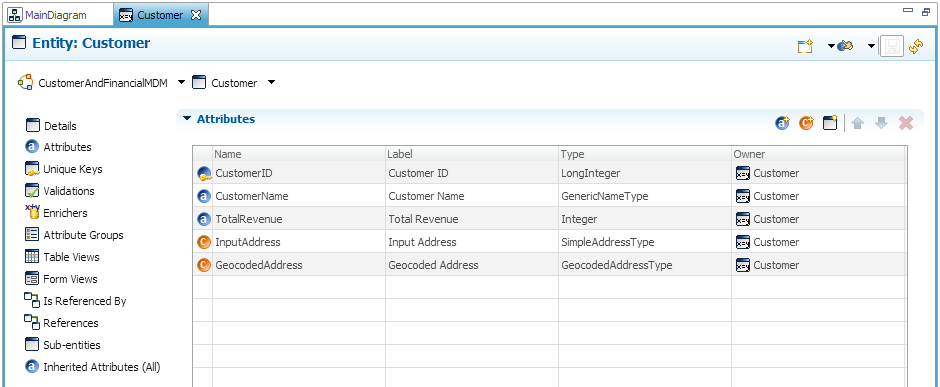
To add attributes to the Customer entity:
Now that the Customer entity is created, we will add Attributes
(fields) to this entity, such as the CustomerName.
Each attribute will be of a certain type (built-in, user-defined, complex, etc.). We
will also define whether these attributes are mandatory or not.
-
In the Entity: Customer editor, select the
 Attributes section (in the left
banner of the editor).
Attributes section (in the left
banner of the editor).
The list of attributes is displayed. It already contains the primary key field CustomerID defined when we created the entity. -
In the Attributes table, select the
 Add Simple
Attribute button.
Add Simple
Attribute button. -
In the Create New Simple Attribute dialog, make sure that the Auto Fill box is checked and then enter the following:
-
Name: CustomerName
-
Type: GenericNameType [User-defined Type]
-
Check the Mandatory box.
-
Mandatory Validation Scope: Pre and Post Consolidation
-
-
Click Finish. The CustomerName attribute is created. It is a mandatory attribute for this entity.
-
In the Attributes table, select the
Add Simple
Attribute button. -
In the Create New Simple Attribute dialog, make sure that the Auto Fill box is checked and then enter the following:
-
Name: TotalRevenue
-
Type: Integer [Built-in Type]
-
Keep the Mandatory box unchecked.
-
-
Click Finish.
-
In the Attributes table, select the
 Add Complex
Attribute button.
Add Complex
Attribute button. -
In the Create New Complex Attribute dialog, make sure that the Auto Fill box is checked and then enter the following:
-
Name: InputAddress
-
Physical Prefix: INP
-
Complex Type: SimpleAddressType [Complex Type]
-
-
Click Finish. The complex attribute InputAddress is now created.
-
In the Attributes table, select the
Add Complex
Attribute button. -
In the Create New Complex Attribute dialog, make sure that the Auto Fill box is checked and then enter the following:
-
Name: GeocodedAddress
-
Physical Prefix: GEO
-
Complex Type: GeocodedAddressType [Complex Type]
-
-
Click Finish.
-
Press CTRL+S to save the Entity: Customer editor and leave it open.
| The Physical Table Name, Physical Column Name and Physical Prefix, define the name of the physical database objects created for the entities and attributes. As this tutorial includes loading scripts targeting predefined database objects, it is important to use the correct physical prefix and names when designing the model, in order to deploy physical database objects with the expected names. |
To create a display name for the Customer entity:
We will now define the Display name for the entity, which is how you display entity data in a compact way (for example, in a tree view). For the Customer entity, we only want to show the CustomerName.
-
Select the Customer node in the Outline view (right of the screen), right-click and then select Define Display Name. The Create New Display Name wizard appears.
-
In first wizard screen, select the content of the Separator field, and replace it with a space.
-
Click Next
-
In the Display Name Attributes screen, select the CustomerName attribute and click the Add >> button to add it to the Selected Attributes.
-
Click Finish to close the wizard.
-
Press CTRL+S to save the Entity: Customer editor and leave it open.
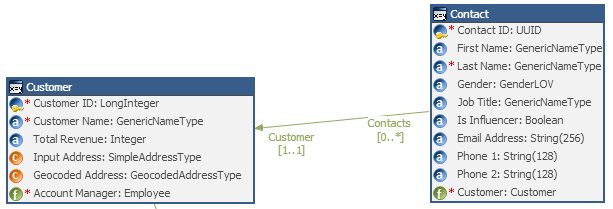
You can now return to the MainDiagram editor by selecting
it.
The diagram now displays the Customer entity with its various attributes
as shown below.
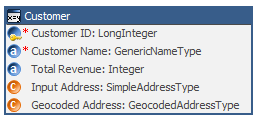
Congratulations! You have successfully created your first entity
| Attributes can also be created directly in the diagram by right-clicking on any of the entities and selecting the appropriate actions. |
Creating References
Entities are related using References Relationships. We will now create the following relations on the newly created Customer entity:
-
CustomerHasAccountManager, representing the fact that a Customer is managed by one Employee (his Account Manager).
-
ContactBelongsToCustomer, representing the fact that a Contact (a person) is directly attached to a Customer (a company).
To create the CustomerHasAccountManager relation:
-
In the Palette of the MainDiagram editor, click to select the
 Add Reference tool.
 -
Click and drag from Customer to Employee. The Create New Reference Relationships wizard opens.
-
In the Create New Reference Relationships wizard screen, make sure that the Auto Fill box is checked and then enter the following:
-
Name: CustomerHasAccountManager
-
Validation Scope: Pre and Post Consolidation
-
In the Referencing group, check that Referencing Entity is set to Customer [Entity].
-
In the Referencing group, set the following values:
-
Referencing Role Name: Customers
-
Referencing Role Label: Managed Customer
-
Referencing Role Plural Label: Managed Customers
-
-
In the Referenced group, check that Referenced Entity is set to Employee [Entity].
-
In the Referenced group, set the following values:
-
Referenced Role Name: AccountManager
-
Select the Mandatory (One to Many) option.
-
-
-
Review the content of the wizard.

-
Click Finish to close the wizard. The reference appears now in the diagram as an arrow linking the Customer entity to the Employee entity.
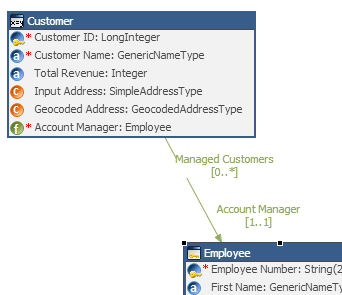
-
Press CTRL+S to save the editor.
This reference has a Pre and Post Consolidation Validation Scope: On the source data as well as after consolidating the candidate customer golden records, we will check that customers reference valid account managers. As the reference is marked as Mandatory, we will not allow null values. Customer records that do not respect these rules will be rejected as errors.
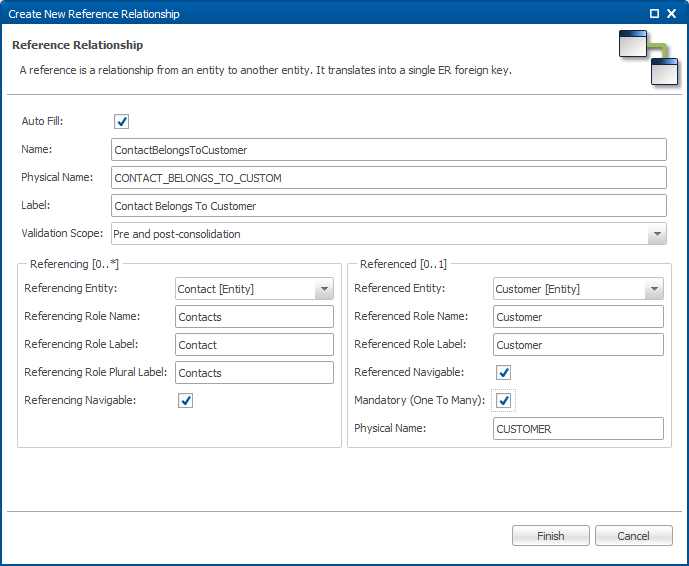
To create the ContactBelongsToCustomer relation:
-
In the Palette of the MainDiagram editor, click to select the
Add Reference tool. -
Click and drag from Contact to Customer. The Create New Reference Relationships wizard opens.
-
In the Create New Reference Relationships wizard screen, make sure that the Auto Fill box is checked and then enter the following:
-
Name: ContactBelongsToCustomer
-
Validation Scope: Pre and post-consolidation
-
In the Referencing group, check that Referencing Entity is set to Contact [Entity].
-
In the Referencing group, set the following values:
-
Referencing Role Name: Contacts
-
Referencing Role Label: Contact
-
Referencing Role Plural Label: Contacts
-
-
In the Referenced group, check that Referenced Entity is set to Customer [Entity].
-
In the Referenced group, select the Mandatory (One to Many) option.
-
-
Review the content of the wizard.
-
Click Finish to close the wizard. The reference appears now in the diagram as an arrow linking the Contact entity to the Customer entity.
-
Press CTRL+S to save the editor.
This reference is marked as Mandatory and its Validation Scope is Pre and post-consolidation: We will check that contacts are always attached to valid customers in the source records as well as in the candidate golden records.
Review the Diagram
You can rearrange the diagram elements as shown below, and close the diagram editor.
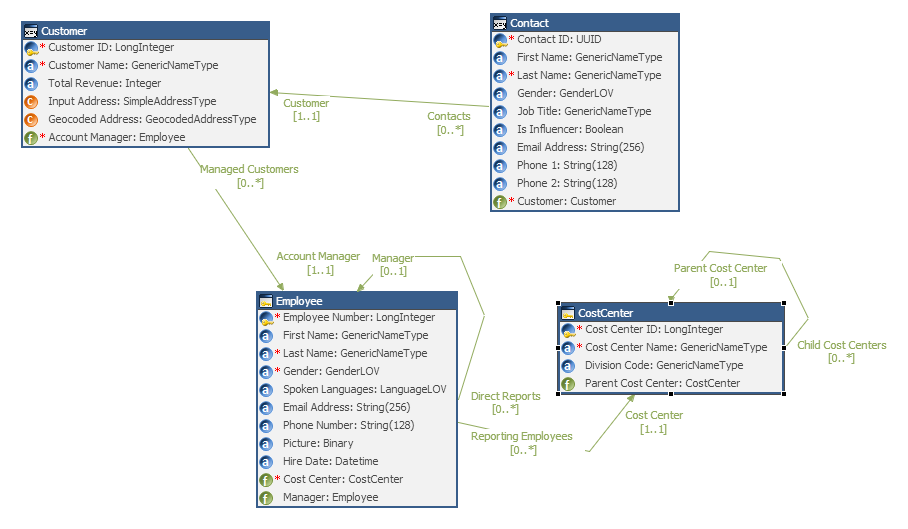
Congratulations! You have now created relations between the Customer entity and the rest of the logical model.
Defining Constraints
While creating attributes and references, we have introduced data quality rules (mandatory attributes and references that must point to a valid record). We will now create a Validation rule to enforce a certain level of completeness on the customer’s postal address.
Constraints add validation rules to entities, which can run when the
hub processes information from a variety of sources to create golden data.
Constraints may be mandatory attributes, unique keys, validations, list
of values, etc. Reference relationships are also constraints as they may
define referential integrity between entities.
Constraints are checked at various points of the integration process:
-
A Pre-Consolidation validation checks the records before they are matched, de-duplicated and consolidated. Only records that meet these validations participate in the matching/de-duplication and consolidation phases.
-
A Post-Consolidation validation validates the records after they are de-duplicated and consolidated, and before they become golden.
To add a validation:
-
Return to the Customer entity editor.
-
In the Outline view, expand the Customer Node.
-
In the Outline view, right-click the Validations node and then select Add SemQL Validation
-
In the Create New SemQL Validation wizard, enter the following:
-
Name: ValidateAddressCompleteness
-
Label is auto filled with: Validate Address Completeness
-
Description: Source address should contain at least one address line and either a postal code or a city.
-
Condition:
InputAddress.Address is not null and ( not ( InputAddress.PostalCode is null and InputAddress.City is null ) )
-
Validation Scope: Pre-Consolidation Only
-
-
Click Finish to create the validation. You return to the Entity: Customer editor.
-
Press CTRL+S to save this editor and leave it open.
Note that the validations, as well as the transformation expressions in Stambia MDM, are defined using the SemQL Language, which is executed within the Oracle Database engine. Stambia MDM leverages the transformation capabilities and processing power of the database hosting the MDM Hub, providing the best performance for building golden records from very large source data volumes.
Understanding the Certification Process
Source data is published to the MDM Hub from enterprise applications
(for example via an ETL tool), or entered by users through human
workflows.
This information is frequently incomplete, inconsistent, not
standardized, and contains data that violates some of the constraints or
restrictions defined for the entities. There is also duplicate data that
must be matched, de-duplicated and consolidated into the golden records.
The certification process is a key element of master data management. It uses the various rules defined in the model to refine imperfect source data into golden data.
Enriching Source Data
The process that certifies source data into golden data uses the data quality rules previously defined in the tutorial. It must also include Enrichers to augment and standardize the source data.
In this example, we will create several Enrichers:
-
A SemQL Enricher that uses the SemQL language and the Oracle Database to enrich data submitted by the publishers for the Customer entity.
-
A Plug-in Enricher that enriches and standardizes the employees’ phone numbers.
-
A Plug-in Enricher that uses the Google Maps API for enriching the customer addresses with geographical information.
Both plug-in enrichers illustrate the Stambia MDM extensibility framework.
Creating a SemQL Enricher
To create a SemQL enricher:
-
In the Outline view, right-click the Enrichers node and then select Add SemQL Enricher
-
In the Create New SemQL Enricher wizard, enter the following:
-
Name: StandardizeCustomerData
-
-
Click Next
-
In the Enricher Expressions screen, double-click the Customer Name line in the Available Attributes list. It is added to the Used Attributes list.
-
Repeat the previous operation to add InputAddress.Address, InputAddress.City and InputAddress.Country to the Used Attributes list.
-
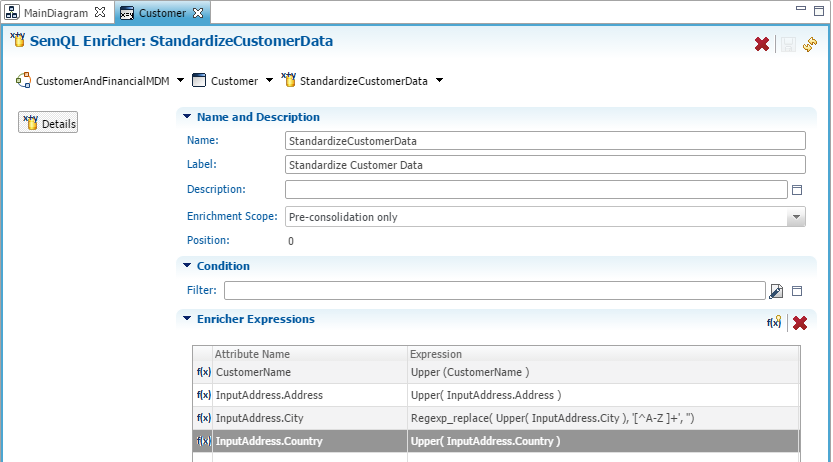
Click Finish. The SemQL Enricher: StandardizeCustomerData editor appears. This editor contains the list of attributes to enrich in the Enricher Expressions table, but there is no expression to enrich them.
-
Define the expression for CustomerName:
-
In the Enricher Expression table, select the Expression column for the CustomerName attribute and then click the
 Edit Expression
button in the cell. The SemQL Editor appears.
Edit Expression
button in the cell. The SemQL Editor appears. -
In the Expression field, enter:
Upper( CustomerName ) -
Click OK to close the SemQL editor.
-
-
Repeat these operations to create the following Enricher Expressions:
-
InputAddress.Address:
Upper( InputAddress.Address ) -
InputAddress.City:
Regexp_replace( Upper( InputAddress.City ), '[^A-Z ]+', '') -
InputAddress.Country:
Upper( InputAddress.Country )
-
-
Press CTRL+S to save this editor and leave it open.
Creating a Plug-in Enricher
Plug-in Enrichers process Inputs (information provided to the enricher) and deliver Outputs. When using such an enricher, you need to map inputs and outputs to the attributes of the entity to be enriched.
For example, the Google Maps Enricher that is used in this example takes as the input basic address information (address line, city name, country and postal code) and outputs a fully geocoded address (street name/number, longitude/latitude, etc.) .
Enriching Postal Addresses
| This enricher uses the Google Maps Service and requires an Internet connection. Creating this enricher is an optional step. If you do not have access to the Internet, you can skip this step and go to the Enriching Phone Numbers step. Per Google’s terms of service, there is a limitation to the number of requests you can perform on this service. Please refer to the Google Site for more information. |
To create a plug-in enricher for addresses:
-
In the Outline view, right-click the Enrichers node and then select Add Plug-in Enricher
-
In the Create New Plug-in Enricher wizard, enter the following:
-
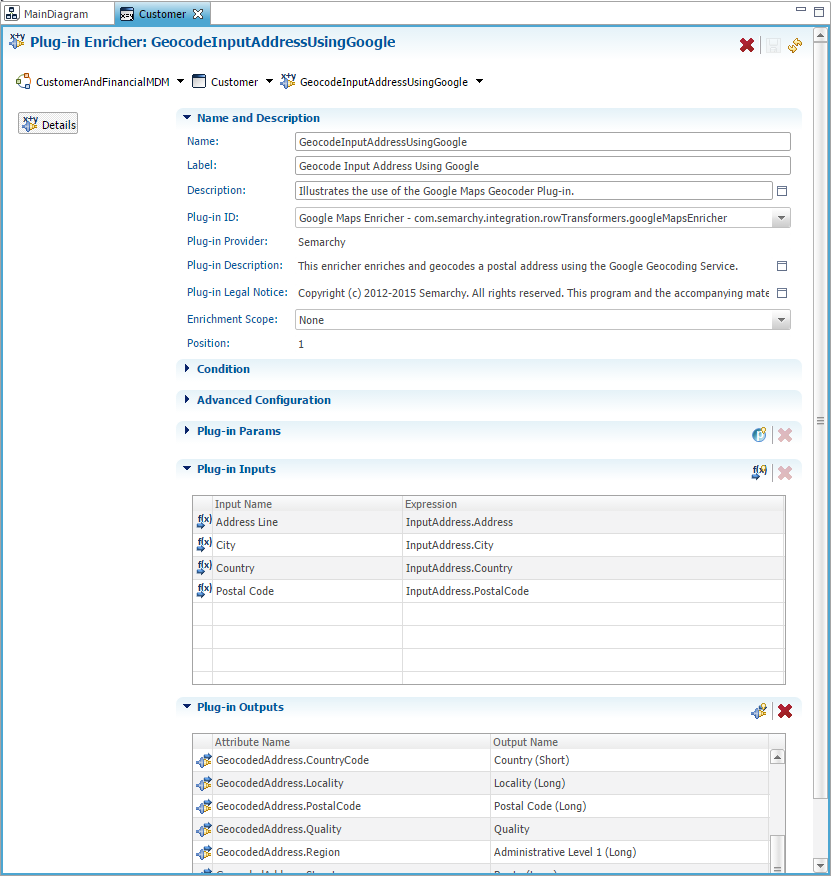
Name: GeocodeInputAddressUsingGoogle
-
Label is auto filled with: Geocode Input Address Using Google
-
Plug-in ID: Google Maps Enricher - com.semarchy.integration…
-
-
Click Finish to create the Plug-in Enricher. The Plug-in Enricher: GeocodeInputAddressUsingGoogle editor appears.
-
In the Description field, enter: Illustrates the use of the Google Maps Geocoder Plug-in.
-
Set the Enrichment Scope to None if you are not connected to the Internet.
-
In the Plug-in Params table, select all the parameters (Hold the CTRL key for multiple selection), and then click the
 Delete button to remove them.
 -
Now, you must provide values for the plugin input parameters. To map the Address Line plug-in input:
-
In the Plug-in Inputs table, select the Expression column for the Address Line input and then click the
Edit Expression
button in the cell. The SemQL Editor appears. -
In the Expression, enter
InputAddress.Address. You can alternately double-click this attribute in the Attributes list available on the left side of the editor to add it to the expression. -
Click OK to close the SemQL Editor.
-
-
Repeat the same operation to map the other Plug-in inputs with the following attributes:
-
City :
InputAddress.City -
Country:
InputAddress.Country -
Postal Code:
InputAddress.PostalCode
-
-
Select the Language plug-in input and then click the
Delete button to remove it as it
is unused. -
Map the plug-in outputs:
-
Scroll down in the Editor, and in the Plug-in Outputs table, click the
 Define Plug-in
Outputs button. The Define Output Bindings dialog appears.
Define Plug-in
Outputs button. The Define Output Bindings dialog appears. -
In this dialog, select all the attributes starting with GeocodedAddress in the Available Attributes list and then click the Add >> button. All these attributes are added to the Used Attributes list.
-
Click Finish to close the dialog. The attributes from the entity that were selected now appear in the Plug-in Outputs table. They must be mapped to the output of the plug-in.
-
-
Define the bindings for the GeocodedAddress.Region attribute.
-
In the Plug-in Outputs table, click the Output Name column on the GeocodedAddress.Region plug-in output line. This column is a drop-down list from which you can now select Administrative Level 1 (Long).
-
-
Repeat the same operation to map the other attributes of the GeocodedAddress complex type attribute of the Customer entity on the plug-in outputs according to the list below:
-
GeocodedAddress.BoxEast: East bound longitude
-
GeocodedAddress.BoxNorth: North bound latitude
-
GeocodedAddress.BoxSouth: South bound latitude
-
GeocodedAddress.BoxWest: West bound longitude
-
GeocodedAddress.CoordLatitude: Latitude
-
GeocodedAddress.CoordLongitude: Longitude
-
GeocodedAddress.Country: Country (Long)
-
GeocodedAddress.CountryCode: Country (Short)
-
GeocodedAddress.Locality: Locality (Long)
-
GeocodedAddress.PostalCode: Postal Code(Long)
-
GeocodedAddress.Quality: Quality
-
GeocodedAddress.Street: Route (Long)
-
GeocodedAddress.StreetNum: Street Number (Short)
-
-
Press CTRL+S to save this editor and leave it open.
Enriching Phone Numbers
This enricher uses a built-in library that parses and standardizes
international and national phone numbers and optionally infers
geographical information from the phone numbers. For this example, we
will standardize the phone numbers from the US employees in the national
format (ddd) ddd-dddd.
|
To create a plug-in enricher for employee phone numbers:
-
In the Model Edition view, expand the Entities > Employee node.
-
Select the Enrichers node, right-click and then select Add Plug-in Enricher.
-
In the Create New Plug-in Enricher wizard, enter the following:
-
Name: StandardizeEmployeePhoneNumber
-
Label is auto filled with: Standardize Employee Phone Number
-
Plug-in ID: Stambia MDM Phone Enricher - com.semarchy.engine…
-
-
Click Finish to create the Plug-in Enricher. The Plug-in Enricher: StandardizeEmployeePhoneNumber editor appears.
-
In the Description field, enter Standardizes the Employee phone number to the US national format using the built-in plugin.
-
Now, you must provide values for the plugin input parameters. To map the Input Phone Number plug-in input:
-
In the Plug-in Inputs table, select the Expression column for the Input Phone Number input and then click the
Edit Expression
button in the cell. The SemQL Editor appears. -
In the Expression, enter
PhoneNumber. You can alternately double-click this attribute in the Attributes list available on the left side of the editor to add it to the expression. -
Click OK to close the SemQL Editor.
-
-
Repeat the previous step to perform the following mappings:
-
Region Code:
'US'. This input indicates to the enricher that the input phone numbers are from the US. -
Enriched Phone Format:
'NATIONAL'. This input indicates to the enricher that the output phone numbers should be formatted in national format:(ddd) ddd-dddd.
-
-
Select the Region of Origin plug-in input and then click the
Delete button to remove it as it
is unused. -
Map the plug-in outputs:
-
Scroll down in the Editor, and in the Plug-in Outputs table, click the
Define Plug-in
Outputs button. The Define Output Bindings dialog appears. -
In this dialog, select the PhoneNumber attribute in the Available Attributes list and then click the Add >> button. This attribute is added to the Used Attributes list.
-
Click Finish to close the dialog. The PhoneNumber attribute now appears in the Plug-in Outputs table. It must be mapped to the output of the plug-in.
-
In the Plug-in Outputs table, click the Output Name column on the PhoneNumber plug-in output line. This column is a drop-down list from which you can now select Enriched Phone Number.
-
-
Press CTRL+S to save this editor and then close it.
De-duplicating Data
Now that we have defined the rules to augment/standardize the source data as well as the rules to check their quality, we will define how to handle duplicate customer records. This operation takes place in two phases: First, the duplicate records are detected in a phase called Matching. Afterwards, information from all these duplicates is assembled in a single master record. This second phase is called Consolidation.
Matching Records
Record matching consists of identifying two or more records that are duplicates. For example, an employee with a typo in his name in one of the applications may cause a duplicate in the golden data. Detecting this employee as a duplicate is key to obtaining real unique records in the MDM Hub.
A Matcher is made of multiple Match Rules that define several reasons for two records to be considered as duplicates:
-
Each rule can use a preliminary binning mechanism to accelerate the matching process. Binning consists of creating smaller sub-sets of records. Records within a sub-set will be compared according to the rule’s Matching Condition.
-
Each rule has a Matching Score. This score represents the percentage of confidence you put in a match that occurs because the matching condition was met. When two or more records match, the matcher computes a confidence score for the resulting group of matching records. This score is used later to decide the actions to take for the group.
To create a matcher:
-
In the Outline view, right-click the Customer > Matcher node and then select Define SemQL Matcher
-
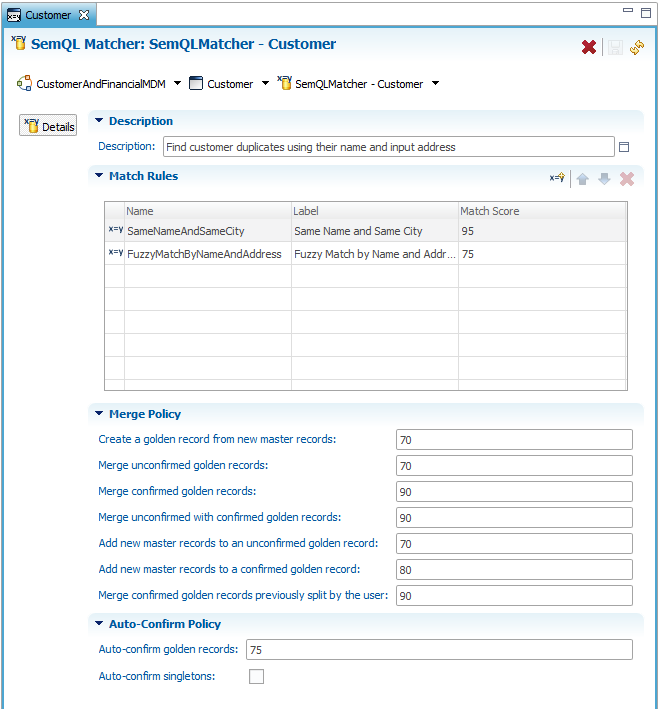
In the Create New SemQL Matcher wizard, enter the following:
-
Description: Find customer duplicates using name and address
-
-
Click Finish. The SemQL Matcher - Customer editor appears.
-
Click the
 Add Match Rule button in the Match Rules table. The Match Rules: New Rule editor opens.
 -
Edit your first match rule:
-
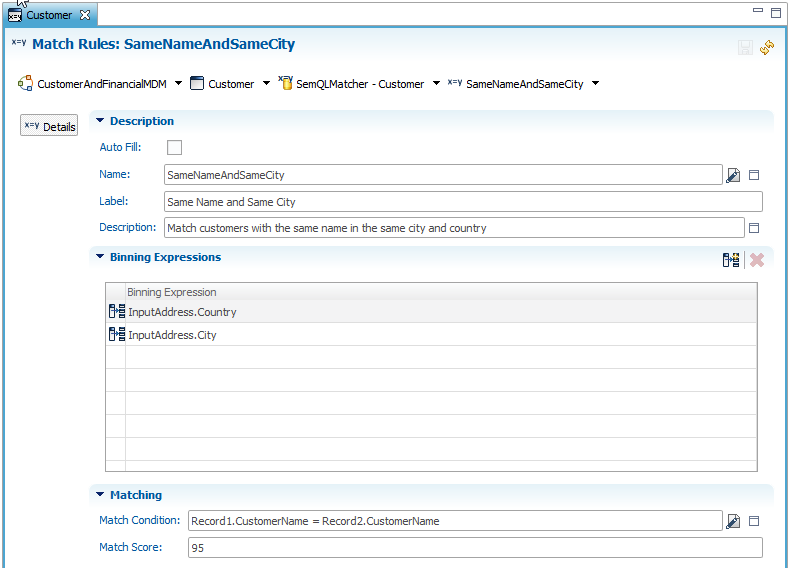
In the Name field, enter SameNameAndSameCity.
-
In the Label field, enter Same Name and Same City.
-
In the Description field, enter Match customers with the same name in the same city and country.
-
In the Binning Expressions group, click the
 Add Binning
Expression button. The SemQL Editor opens.
Add Binning
Expression button. The SemQL Editor opens. -
In the SemQL Editor, enter the following expression:
InputAddress.Country -
Click OK to close the SemQL Editor.
-
Click again the
Add Binning
Expression button. The SemQL Editor opens. -
In the SemQL Editor, enter the following expression:
InputAddress.City -
Click OK to close the SemQL Editor. We have now divided the sub-sets of possible matches by considering only customers within the same country and city as possible matching candidates.
-
In the Matching Condition field, click the
Edit Expression button.
The SemQL Editor opens. -
In the SemQL Editor, enter the following condition:
Record1.CustomerName = Record2.CustomerName
-
Click OK to close the SemQL Editor.
-
In the Match Score, enter
95.
-
Press CTRL+S to save this editor.
-
-
Use the breadcrumb on top of the editor to return to the SemQL Matcher - Customer editor.

-
Click the
Add Match Rule button to add a second match rule:-
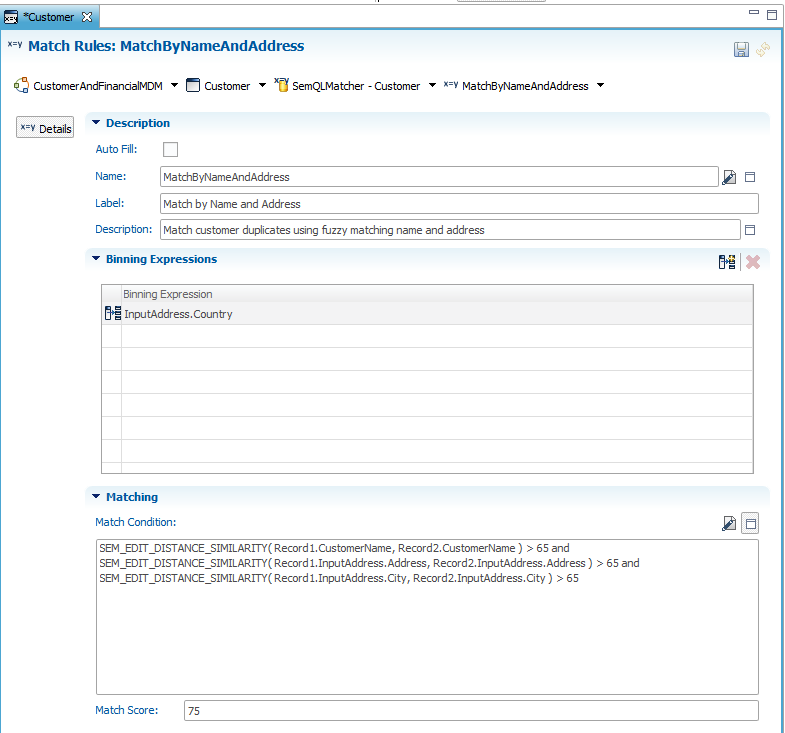
In the Name field, enter MatchByNameAndAddress.
-
In the Label field, enter Match by Name and Address.
-
In the Description field, enter Match customer duplicates using fuzzy matching name and address.
-
In the Binning Expressions group, click the
Add Binning
Expression button. The SemQL Editor opens. -
In the SemQL Editor, enter the following expression:
InputAddress.Country -
Click OK to close the SemQL Editor.
-
In the Matching Condition field, click the
Edit Expression button.
The SemQL Editor opens. -
In the SemQL Editor, enter the following condition:
SEM_EDIT_DISTANCE_SIMILARITY( Record1.CustomerName, Record2.CustomerName ) > 65
and SEM_EDIT_DISTANCE_SIMILARITY( Record1.InputAddress.Address, Record2.InputAddress.Address ) > 65
and SEM_EDIT_DISTANCE_SIMILARITY( Record1.InputAddress.City, Record2.InputAddress.City ) > 65
-
Click OK to close the SemQL Editor.
-
In the Match Score, enter
75.
-
-
Use the breadcrumb on top of the editor to return to the SemQL Matcher - Customer editor.
-
Press CTRL+S to save this editor and leave it open.
You have created a matcher with two rules:
-
Same Name and Same City: This rule matches all customers with the same name within the same city and country, and has a score of 95.
-
Fuzzy Match by Name and Address: This rule matches customers within the same country with a similarity of 65% for their customer name, address line and city name attributes. This rule has a score of 75.
The second rule uses the SEM_EDIT_DISTANCE_SIMILARITY function that implements the Levenshtein distance algorithm between two strings. You can of course use other complex rules and matching techniques such
as Jaro-Winkler distance, Name normalization or Soundex.
Suggesting, Merging, Confirming
When two or more records match, the matcher computes a confidence score for the resulting group of matching records.
Depending on the score of a match group, you may decide to suggest a group merge, perform the merge and optionally confirm the merged record.
-
Suggesting consists in indicating that matches have been detected, without actually consolidating the matches into a golden record.
-
Merging consists in consolidating the records that are matched in a group into a single golden record. This consolidation is performed according to the consolidation rule that we will define later.
-
Confirming flags a consolidated golden record as reviewed and validated by a data steward. Data stewards usually confirm, split or merge match groups using duplicate management workflows. It is also possible to have confident matches automatically confirmed by the matcher.
Whether you want the matcher to suggest or automatically match/confirm match groups depends on the confidence that you put in the detected matches. The higher the score, the higher the confidence. Now that the matcher is created, you can configure the threshold and situations into which groups should be automatically merged and confirmed according to the confidence score.
To configure the matcher’s merge and auto-confirm policy:
-
In the SemQL Matcher - Customer editor, scroll down to the Merge Policy section.
This section defines the scores required for automatically merging match groups. The overall score of a match group is computed from the score of the match rules that have caused records to match in the group. -
In this section, set the following values:
-
Create a golden record from new master records: 70
-
Merge unconfirmed golden records: 70
-
Merge confirmed golden records: 90
-
Merge unconfirmed with confirmed golden records: 90
-
Add new master record to an unconfirmed golden records: 70
-
Add new master record to a confirmed golden records: 80
-
Merging golden records previously split by the user: 90
-
-
The Auto-Confirm Policy defines the score required for a merged group to be automatically confirmed.
Set the Auto-confirm golden records threshold to 75 -
Leave the Auto-Confirm Singletons unchecked.
-
Press CTRL+S to save this editor and leave it open.
You have configured the behavior of the match groups for automatic merges. For example:
-
New records that matched with a score of at least 70 will automatically merge, based on the threshold set for the Create a golden record from new master records condition.
-
If new records join an existing group, this group will automatically be merged if the overall score remains above 70, because of the threshold for the Add new master record to an unconfirmed golden records condition.
-
If a group is already confirmed by a user/steward, new records may only join this group if the confidence score is above 80, which is the threshold for Add new master record to a confirmed golden records.
-
If two unconfirmed golden records have their data change in a way that make them match, they will be automatically merged if their score is above 70, because of the threshold set to Merge unconfirmed golden records.
You have also configured the behavior of the automatic confirmation:
-
Golden records merged with a score higher than 75 will automatically be confirmed, as if a user had validated them, because of the threshold set in Auto-confirm golden records.
-
Singletons, that is match groups consisting of 1 record, will not automatically be confirmed.
For more information about this configuration, see the Matching section of the Stambia MDM Developer’s Guide.
Consolidating Records
When a set of records is identified as a duplicates group, a single golden record is created out of it. The consolidation process consists of taking the best data from each record to create this golden record. For example, to build a golden customer record, we may take the address and phone number from the shipping application, and the financial numbers from the billing system. The resulting golden record would be a composite of information from several sources.
To create the Customer consolidator:
-
Expand Entities > Customer > Consolidator in the Model Edition.
-
Double-click the Consolidator - Customer node. The Consolidator - Customer editor appears.
-
In the editor, enter the following:
-
Consolidator Type: Field Level Consolidation. With this type, the consolidation strategy can be different for each attribute.
-
Description: Consolidate customer golden records - Field-level consolidation.
-
-
Define the consolidation strategy for CustomerName and AccountManager:
-
In the Field Level Consolidators table, press and hold down the control key (CTRL) and then click the CustomerName and AccountManager attributes to select them.
-
Click the
 Define Field Level Consolidation Strategy button.
 -
In the Define Selected Field-Level Consolidator wizard, select Most Frequent Value and then click Finish.
-
-
Define the consolidation strategy for the geographical attributes:
-
Select all the other attributes except TotalRevenue, that is all attributes starting with GeocodedAddress and InputAddress.
-
Click the
Define Field Level Consolidation Strategy button. -
In the Define Selected Field-Level Consolidator wizard, select Preferred Publisher and then click Next.
-
In the Publisher Ranking table, click the
 Add Publisher
Ranking button.
Add Publisher
Ranking button. -
Double-click DataEntry in the Available Publishers list to add it to the Publishers list.
-
Repeat this operation to add CRM, Marketing, Finance and then HumanResources in this order.
-
Click Finish and then Finish again to return to the Consolidator - Customer editor.
-
-
Define the consolidation strategy for TotalRevenue:
-
Double-click the TotalRevenue line. The Define Selected Field-Level Consolidator wizard appears.
-
Select Largest Value and then click Finish.
-
-
In the Additional Order By field, enter
SourceID asc -
Press CTRL+S to save this editor and leave it open.
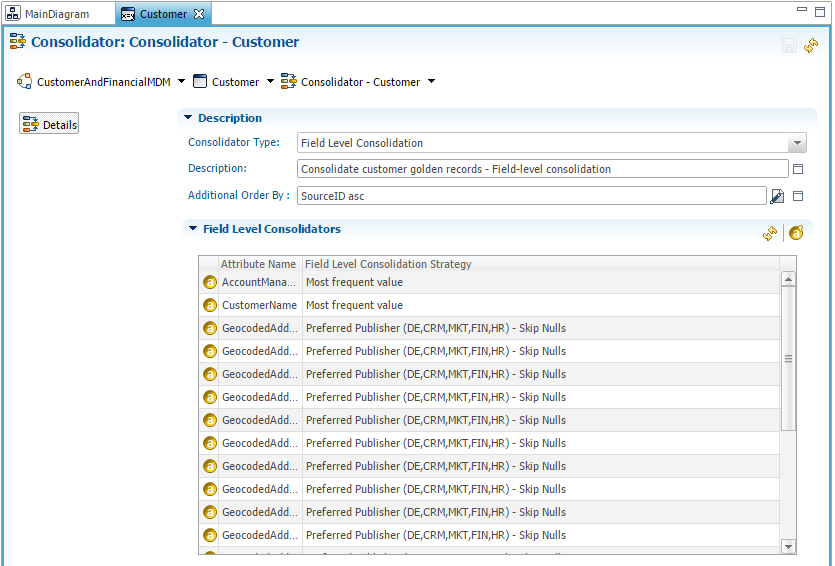
You have created a consolidation rule that arbitrates how golden data is created out of the source data when duplicates are detected. In this example, CustomerName and AccountManager will take the most frequent value from the duplicated records; Address information will preferably come from the Data Entry application, then - in order of priority - from the CRM, Marketing, Financial and HR applications. Finally, the TotalRevenue will be the largest value from all the duplicates.
Earlier, you created a reference from the Contact entity to the newly created
Customer. As a consequence, the Contact entity now includes a new field called Customer.
We must check that this field is consolidated as expected.
Update the Contact Consolidator:
-
Expand the Entities > Contact > Consolidator Node.
-
Double-click the Consolidator - Contact node. The Consolidator - Contact editor appears.
-
In the Field Level Consolidators group, click the
 Refresh button to refresh the attributes list and then double-click the Customer attribute.
 -
In the Define Selected Field-Level Consolidator wizard, select Preferred Publisher and then click Next.
-
In the Publisher Ranking table, click the Add Publisher Rankin button.
-
Double-click the DataEntry in the Available Publishers list to add to the Publishers list.
-
Repeat this operation to add CRM, Marketing, Finance and then HumanResources in this order.
-
Click Finish and then Finish again to return to the Consolidator - Contact editor.
-
Press CTRL+S to save this editor and then close it.
Congratulations! You have defined all the data quality, enrichment and match/merge rules for your Customer entity. You have also modified existing entities: A new phone enricher for the Employees, and an additional attribute consolidated for the Contacts.
Validating the Model
Stambia MDM detects errors or missing elements in the model. For
example, entities with no consolidation strategies will be detected.
Validating a model guides you in the process of designing a model. You
can perform regular validations to assess how complete the model really
is, and you must validate the model before deploying it.
To validate the model:
-
Close all open editors by right-clicking on any of them and selecting Close All.
-
Select the model node CustomerAndFinancialMDM [0.0] at the root of the tree.
-
Right-click and select Validate.
-
The validation process starts. At the end of the process, the list of issues is displayed in the Validation Report view.
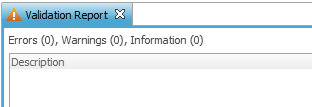
| At this stage in the tutorial, no error or warning should show up in the validation report. |
Working with Integration Jobs
When data is loaded in the hub by an ETL process, or when a user modifies data in the hub as part of a human workflow, Stambia MDM runs an Integration Job to enrich, validate, match/de-duplicate and consolidate this staged data and create golden records. This job uses the enricher, constraints, validations, matchers and consolidators defined in the model.
Integration jobs are already created in the model to certify the master records for the CostCenter, Employee and Contacts entities. As the Customer entity was added in the tutorial, it must be added to some of these jobs as a new task.
-
Expand CustomerAndFinancialMDM [0.0] > Jobs > INTEGRATE_DATA in the Model Edition view.
-
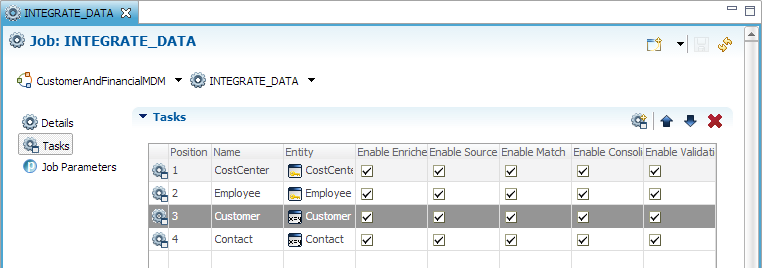
Double-click the Tasks node. The Job: INTEGRATE_DATA editor opens.
-
Click the
 Add Task button.
A Create New Task wizard opens.
Add Task button.
A Create New Task wizard opens. -
In the Entity drop-down box, select Customer [Entity]
-
Make sure that all check boxes are checked.
-
Click Finish to close the wizard. The Customer task is added at the end of the task list.
-
Select this task in the list, and use the move up button to move it before the Contact task.
-
Press CTRL+S to save this editor and then close it.
We also need to modify the job which handles Data Entry/Editing of Customers and Contacts.
-
Expand CustomerAndFinancialMDM [0.0] > Jobs > DE_CUSTOMER_CONTACT in the Model Edition view.
-
Double-click the Tasks node. The Job: DE_CUSTOMER_CONTACT editor opens.
-
Click the
Add Task button.
A Create New Task wizard opens. -
In the Entity drop-down box, select Customer [Entity]
-
Make sure that all check boxes are checked.
-
Click Finish to close the wizard. The Customer task is added at the end of the task list.
-
Select this task in the list, and use the move up button to move it before the Contact task.
-
Press CTRL+S to save this editor and then close it.
Ordering tasks in jobs is important because validations on certain entities depend on other previously loaded entities. In this example, Contact has a reference to Customer that mandates loading customer golden records before contacts.
Congratulations! You have successfully finished your first model! You can now proceed to deploy it to production!
Deploying the MDM Hub
In this chapter, you will deploy your hub to a data location and make it ready for execution.
Creating a Data Location
A Data Location is an Oracle schema into which several Model
Editions and Data Editions will be deployed.
A Model Edition is a Stambia MDM model deployed at a given
time. An MDM Hub model evolves over time, for example to include new
entities or functional areas. Model Editions reflect this evolution in
the structure of the MDM Hub.
Similarly, a Data Edition reflects the evolution of the data stored in
the hub over time. You can perform snapshots of the master data at a
given time to perform for example a what-if analysis. Data Editions
reflect the evolution in the content of the MDM Hub.
To create a new data location:
-
In the menu, select File > New > New Data Location.
-
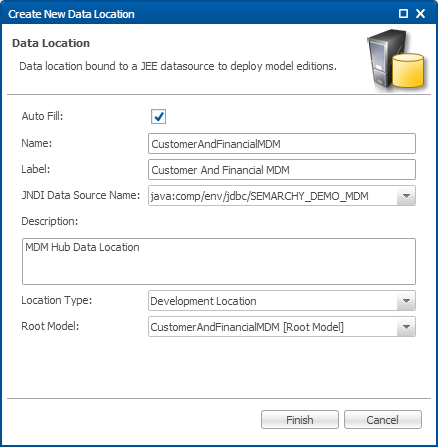
In the Create New Data Location wizard, enter the following values:
-
Name: CustomerAndFinancialMDM
-
JNDI Datasource Name: java:comp/env/jdbc/SEMARCHY_DEMO_MDM
-
Description: MDM Hub Data Location
-
Location Type: Development Location
-
Root Model: CustomerAndFinancialMDM [Root Model]
-
-
Click Finish to close the wizard. The Data Editions view opens.
Deploying a Model Edition
Now that the data location is created for the CustomerAndFinancialMDM model, it is possible to deploy the first edition of this model.
To install the model edition:
-
In the Data Editions view, select the CustomerAndFinancialMDM data location, right-click and select Install Model Edition. The Install Model Edition wizard opens.
-
In Model Edition, select CustomerAndFinancialMDM [0.0] [Model Edition]
-
Click Next. Stambia MDM generates the SQL code to create the physical database objects corresponding to this model edition. The code is displayed in the wizard and you can download this code to optimize it manually if you wish.
-
Click Finish to run this code and deploy the model edition in the data location.
The model edition deploys first the jobs and then runs the SQL code to create the physical objects. You can follow this second operation in the Console view at the bottom of the Workbench.
In the future, when we perform changes to this model’s structure, we will be able to create new editions of this model (For example [0.1], [0.2], etc.) and will be able to deploy these new editions in the same data location. These new deployments will generate patching scripts to bring the physical database objects to the level of the new model edition.
Creating a Root Data Edition
To create a data edition:
-
In the Data Editions view, select the CustomerAndFinancialMDM data location, right-click and select Create Root Data Edition. The Create New Root Data Edition wizard opens.
-
Click Next.
-
In the second wizard screen, for Deployed Model Edition, select CustomerAndFinancialMDM 0.0 [Deployed Model Edition].
-
Click Finish to create the first data edition.
This data edition is open. It means that we can perform loads and
changes to this edition.
Later on, we will be able to close this edition and open a new one.
Closing an edition freezes its content, creating a snapshot of the MDM
Hub content.
Congratulations! You have successfully deployed your model! You can now proceed and start publishing data!
Running the MDM Hub
In this chapter, you will publish data from various sources in the MDM hub and review the execution of the integration job.
Publish Data to the MDM Hub
| For this tutorial, we use fake operational applications that access sample source data stored in the MDM_DEMO_SOURCE schema. The tutorial also includes demonstration ETL scripts to load the MDM staging tables from the sample source data. |
To load the sample source data into the MDM Hub:
-
In the menu, select Help > Demo Environment > Open Sample Source Data. If you access the sample source data for the first time, click OK to install the sample source data when prompted. The Sample Source Data editor opens.
-
The Sample Source Data editor represents several source applications publishing to the MDM hub. These applications appear as tabs at the bottom of the editor.
-
You can edit or delete sample records from these tabs.
-
The Reset Sample Source Data button allows you to restore all the sample source data to its original state.
-
The Publish Data to MDM… button allows you to run the ETL script loading the sample source data into the MDM staging table.
-
-
Click the Publish Data to MDM… button in the editor toolbar.
-
In the Publish Data to MDM dialog, for Data Edition select CustomerAndFinancialMDM [0.0].
-
Click Finish to start the loading process.
-
A Data Submit Success dialog appears. Click OK to close it.
Within 10 seconds, the published data will be detected by the Stambia MDM and integrated by the INTEGRATE DATA job.
Viewing the Log
The execution of the integration job can be monitored in the log.
To review the job log:
-
In the Data Editions view, expand CustomerAndFinancialMDM > Deployed Model Editions > CustomerAndFinancialMDM 0.0 > Integration Jobs > INTEGRATE_DATA.
-
Double-click the Latest Logs node under the INTEGRATE_DATA job. The list of executed jobs opens.
-
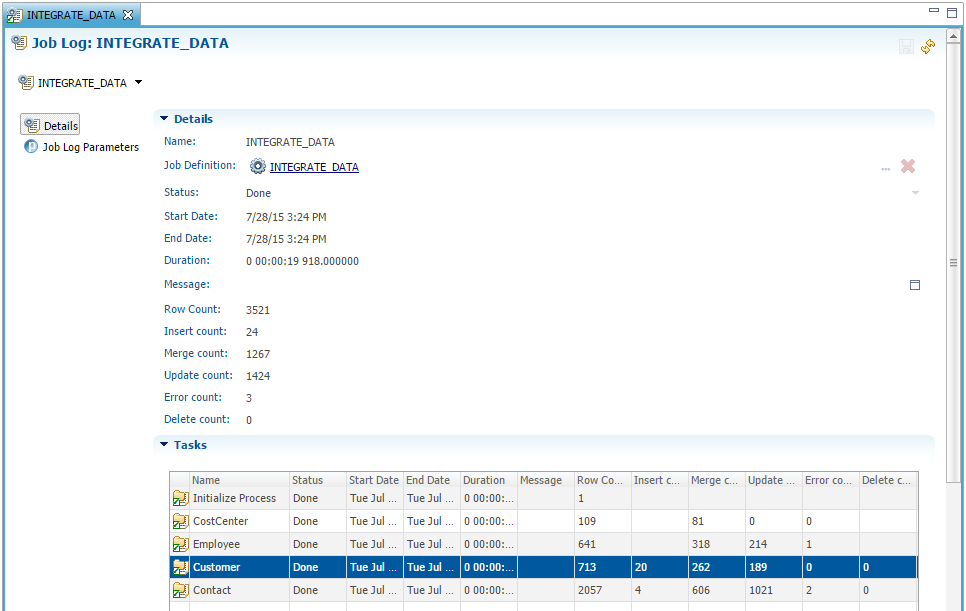
In the Latest Logs table, double-click the latest job log (according to the Start Date). The Job Log editor opens.
-
In this editor, you can review the statistics for the job and the number of processed rows.
-
Scroll down in the editor to see the list of tasks for this job.
-
In the list of Tasks, double-click the Customer task. The Task Group Log: Customer editor opens.
-
Scroll down to see the Task Log table. These tasks represent the successive processes the submitted Customer records have gone through to build golden records.
-
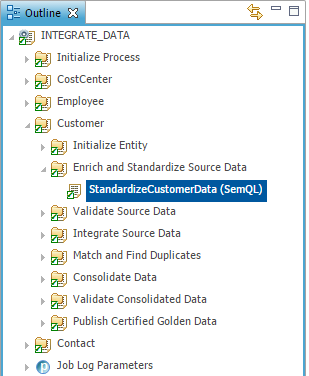
You can also use the Outline view to browse a job log. In the Outline, expand the INTEGRATE_DATA > Customer > Enrich and Standardize Source Data > StandardizeCustomerData (SemQL) node. It corresponds to your SemQL enricher.
-
Close all editors by selecting File > Close All in the menu.
Congratulations! You have successfully published and certified your
first data batch into the hub!
So far, we have modeled the data, the rules, deployed the hub and loaded
data into it. It is now time to design a friendly interface for the
business users and data stewards.
Creating an Application
Applications empower Business Users and Data Stewards with these abilities:
-
Browse and search data
-
Author new records
-
Edit existing records
-
Verify automatically detected duplicates
-
Manually match or split records
An application was already created in the model. This application must be modified to support the new Customer entity.
Creating Table Views and Form Views
We will start with the creation of the Views and Business Objects. These determine how data will be displayed to the data stewards and users.
Table Views
First, a new view must be created to define how the new Customer entity is displayed in a table layout.
To create a table view for the Customer entity:
-
In the top-right toolbar, select the Overview perspective.

-
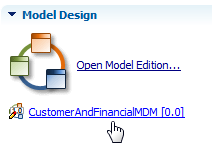
In the Overview screen, select the CustomerAndFinancialMDM [0.0] link. The Model Design perspective opens.
-
In the Model Edition view, expand the Entities > Customer node.
-
Right-click the Table Views node and then select Add Table View. The Create New Table View wizard opens.
-
In the Create New Table View wizard, the Name is automatically set to DefaultTableView.
-
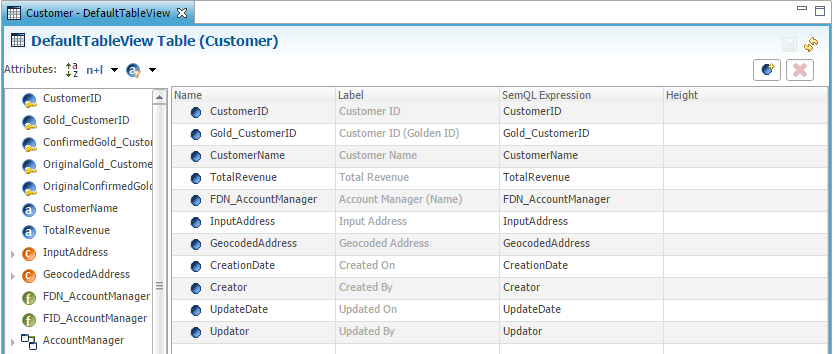
Click Finish to close the wizard. The Customer - DefaultTableView editor opens.
-
Press and hold the CTRL key to perform a multiple selection and click in the Attributes list the following attributes: CustomerID, Gold_CustomerID, CustomerName, TotalRevenue, FDN_AccountManager, InputAddress, GeocodedAddress, CreationDate, Creator, UpdateDate and Updator.
-
Drag the selected attributes to the table. They are added to the table view, in their order of selection.
-
If needed, reorder the attributes in the table using drag and drop.
-
Press CTRL+S to save the table view and then close the editor.
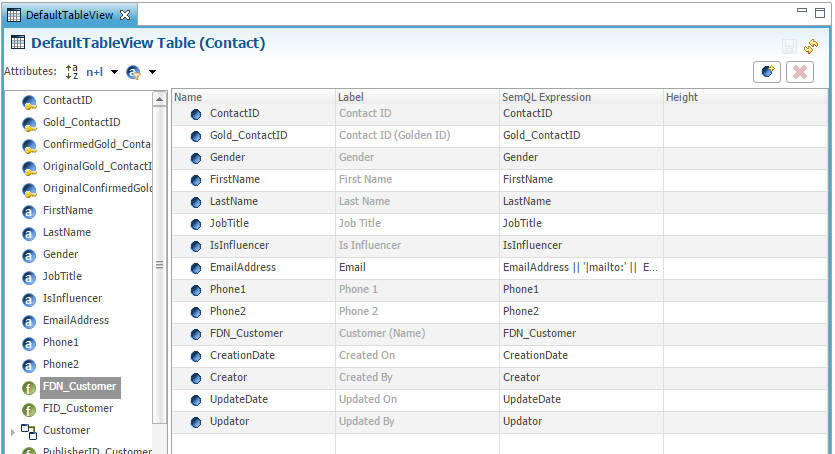
The Contact entity already has a table view into which it is necessary to add the Customer this contact belongs to.
To modify the table view for the Contact entity:
-
In the Model Edition view, expand the Entities > Contact > Table Views node.
-
Double-click the DefaultTableView node. The Contact - DefaultTableView editor opens.
-
Drag the FDN_Customer attribute from the Attributes list and drop it in the table between the Phone2 and CreationDate attributes.
-
If needed, reorder the attributes in the table using drag and drop.
-
Press CTRL+S to save the editor and then close it.
Form Views
Similar changes must be performed on the existing Contact form views to extend them with attributes from the new Customer entity.
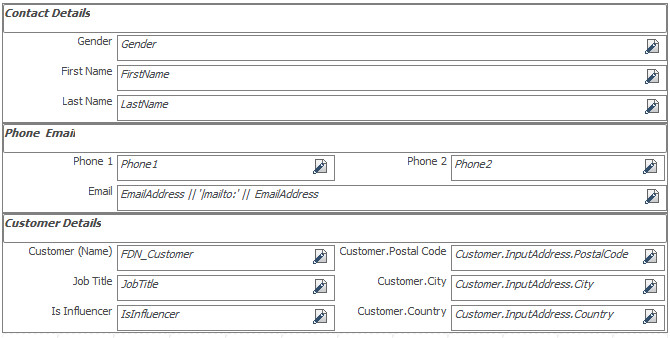
First, the DefaultFormView for the Contact entity must be extended to include the customer information. This includes the related customer (FDN_Customer), as well as the postal code, city and country of this customer.
-
In the Model Edition view, expand the Entities > Contact > Form Views node.
-
Double-click the DefaultFormView node. The Contact - DefaultFormView editor opens on the Grid tab.
-
Drag and drop the FDN_Customer attribute from the Attributes list to Customer Details section in the grid, above the Job Title attribute.
-
Resize the attribute using the
 and
and
 buttons and its label using the
 and
and
 buttons. You can also move this
attribute in the grid by using the buttons from the toolbar or by
dragging and dropping the attribute in the grid. The attribute should be
aligned with Job Title.
buttons. You can also move this
attribute in the grid by using the buttons from the toolbar or by
dragging and dropping the attribute in the grid. The attribute should be
aligned with Job Title. -
Drag and drop the Postal Code, City and Country attributes from Customer > Input Address in the Attributes list to the Customer Details section in the grid. Resize these attributes and their labels to have the form section as shown below.
-
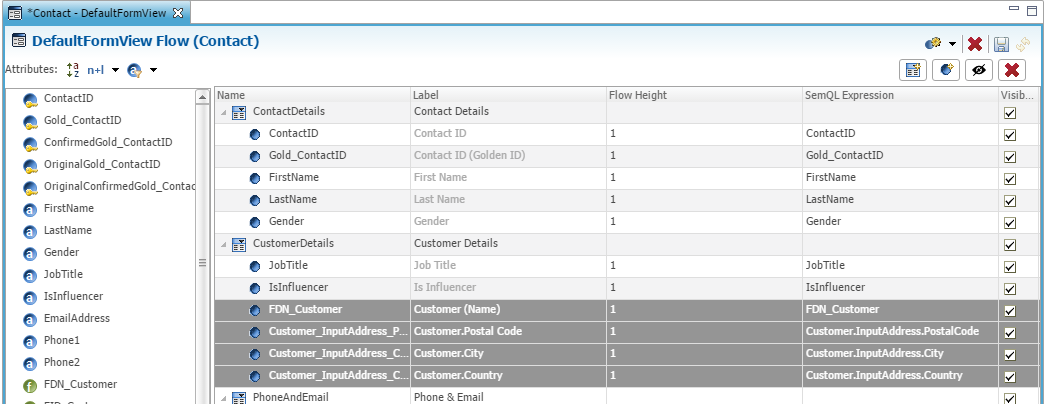
Select the Flow tab at the bottom of the editor.
-
The attributes added to the grid should also appear in the flow layout under the CustomerDetails section.
-
Press CTRL+S to save the form view and then close the editor.
The form view used for data entry in the Contact entity must also be modified to include a field to select the customer a given contact is attached to.
-
In the Model Edition view, expand the Entities > Contact > Form Views node.
-
Double-click the DataEntryFormView node. The Contact - DataEntryFormView editor opens on the Flow tab.
-
Drag and drop the FDN_Customer attribute from the Attributes list to Customer Details section in the grid, under the IsInfluencer attribute.
-
Press CTRL+S to save the form view and then close the editor.
In addition to these changes, form views must be created for the Customer entity:
-
A DefaultFormView used for general purposes (for viewing the Customer in a form)
-
A DataEntryFormView for entering customer data. The latter has some required fields such as the SourceID.
To create the DefaultFormView form view:
-
In the Model Edition view, select the Entities > Customer > Form Views.
-
Right-click and select Add Form View. The Create New Form View wizard opens.
-
Set the following value in the wizard:
-
Name: DefaultFormView.
-
Default Layout: Grid Layout.
-
Select User Layout Switch and Auto Layout Switch.
-
-
Click Finish. The Customer - DefaultFormView editor opens on the Grid tab.
-
Drag the
 Add Form
Section button from the toolbar to the upper-left corner of the grid. A
new section is created.
Add Form
Section button from the toolbar to the upper-left corner of the grid. A
new section is created. -
Click the
 Increase Height
button in the toolbar to make make this section 4 cells high.
Increase Height
button in the toolbar to make make this section 4 cells high. -
In the Properties view below the grid, in the Name and Definition option group, set the following values:
-
Name: CustomerDetails
-
Label: Customer Details
-
-
Drag the
Add Form
Section button from the toolbar under the previous section. A new
section is created. -
Click the
 Decrease Height
button in the toolbar to make make this section 2 cells high.
Decrease Height
button in the toolbar to make make this section 2 cells high. -
In the Properties view below the grid, in the Name and Definition option group, set the following values:
-
Name: CustomerAddresses
-
Label: Addresses
-
-
Drag the
Add Form
Section button from the toolbar at the right of the Customer Details
section. A new section is created. -
Click the
Increase Height
button in the toolbar to make make this section 7 cells high. -
In the Properties view below the grid, in the Name and Definition option group, set the following values:
-
Name: AccessMap
-
Label: Access Map
-
-
In the Properties view below the grid, in the Grid Layout option group, deselect the Display Label option. The title of this section disappears from the grid.
-
Drag and drop the CustomerID attribute from the Attributes list to Customer Details section in the grid at the top position.
-
Repeat this operation and add the CustomerName, TotalRevenue and FDN_AccountManager attributes to the Customer Details section.
-
Repeat this operation to add the InputAddress and GeocodedAddress complex attributes to the Addresses section.
-
Drag the
 Add Form Attribute into the AccessMap section (it appears now
without title).
Add Form Attribute into the AccessMap section (it appears now
without title). -
In the Properties view below the grid, in the Name and Definition option group, set the following values:
-
Name: GoogleMap
-
Select the Use Custom Label option.
-
SemQL Expression: Click the
Edit Expression
button at the right of the Google Map field in the grid. The SemQL Editor appears. Paste the code provided below and then click OK to close the expression editor.
-
-
In the Grid Layout option group, set the Label Position option to Hidden. The label of the attribute disappears.
-
In the Display Properties option group, set the Display Type to Embedded Content.
-
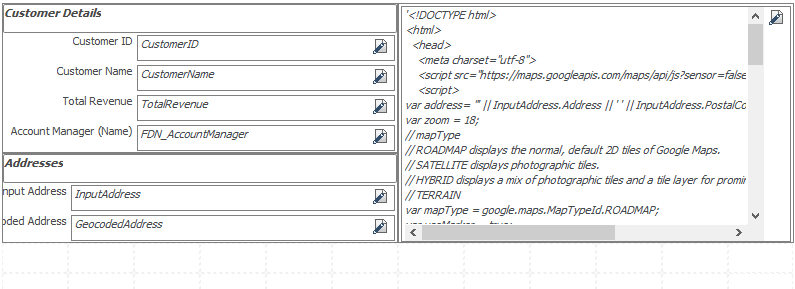
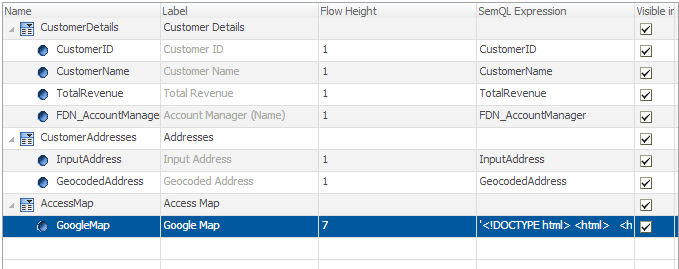
Resize and position this attribute to occupy all the space of the section. The grid should appear as shown below:
-
Select the Flow tab at the bottom of the editor.
-
Select the InputAddress attribute in the CustomerAddresses section. In the Properties view, in the Flow Layout option group, select the Expandable and Expanded by Default options.
-
Select the GeocodedAddress attribute in the CustomerAddresses section. In the Properties view, in the Flow Layout option group, select the Expandable option.
-
Select the GoogleMap attribute in the AccessMap section. In the Properties view, in the Flow Layout option group, set the Flow Height value to 7. The flow should appear as shown below:
-
Press CTRL+S to save the form view and then close the editor.
Copy and paste the code below in the SemQL expression editor of the Google Map attribute. It generates HTML and Javascript text to display a Map based on the InputAddress attribute. Back to the Customer Default Form View creation
'<!DOCTYPE html>
<html>
  <head>
    <meta charset="utf-8">
    <script src="https://maps.googleapis.com/maps/api/js?sensor=false"></script>
    <script>

var address= "' || InputAddress.Address || ' ' || InputAddress.PostalCode || ' ' || InputAddress.City || '";
var zoom = 18;
var mapType = google.maps.MapTypeId.ROADMAP;
var useMarker = true;
var map;

function initialize() {
        var geocoder = new google.maps.Geocoder();
        geocoder.geocode( { "address": address}, function(results, status) {
         if (status == google.maps.GeocoderStatus.OK) { displayMap(results[0].geometry.location); }
        });
        window.onresize = resize;
}

function displayMap(latlng) {
        var mapOptions = { zoom: zoom, center: latlng, mapTypeId: mapType }
        map = new google.maps.Map(document.getElementById("map_canvas"), mapOptions);
        if (useMarker) {
                var marker = new google.maps.Marker({ map: map, position: latlng});
        }
        resize("");
}

function resize(e) {
        var center = map.getCenter();
        map.getDiv().style.height = window.innerHeight +"px";
        map.getDiv().style.width = window.innerWidth +"px";
        google.maps.event.trigger(map, ''resize'');
        map.setCenter(center);
}

google.maps.event.addDomListener(window, "load", initialize);
    </script>
  </head>
  <body style="margin:0px;">
    <div id="map_canvas" style="margin:0px;"></div>
  </body>
</html>'
To create the DataEntryFormView form view:
-
In the Model Edition view, select the Entities > Customer > Form Views.
-
Right-click and select Add Form View. The Create New Form View wizard opens.
-
Set the following value in the wizard:
-
Name: DataEntryFormView.
-
Default Layout: Flow Layout.
-
-
Click Finish. The Customer - DataEntryFormView editor opens on the Flow tab.
-
Drag the
Add Form
Section button from the toolbar to the table. A new section is created. -
Select this section. In the Properties view, in the Name and Definition option group, set the following values:
-
Name: CustomerDetails
-
Label: Customer Details
-
-
Drag the
Add Form
Section button from the toolbar to the table under the Customer
Details section. A new section is created. -
Select this section. In the Properties view, in the Name and Definition option group, set the following values:
-
Name: Address
-
Label: Address
-
-
Press and hold the CTRL key to perform a multiple selection and click in the Attributes list the following attributes: CustomerID, CustomerName, TotalRevenue and FDN_AccountManager.
-
Drag and drop the selected attributes into the CustomerDetails section. They are added to the section in their order of selection.
-
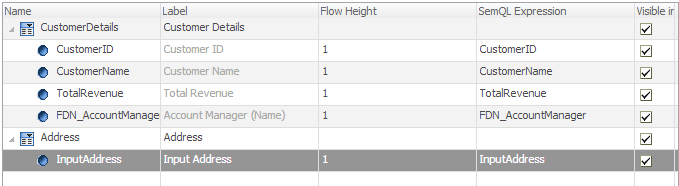
Drag and drop the InputAddress attribute from the Attributes list into the Address section. It is added to the section.
-
Select this form attribute. In the Properties view, in the Flow Layout option group, select the Expandable and Expanded by Default options.The flow should appear as shown below:
-
Press CTRL+S to save the form view and then close the editor.
Creating Business Objects and Business Object Views
A Business Object assembles several entities using their relations to create an object that talks to the business. For example, the Hierarchy of Employees or the Customers with their Contacts are business objects.
In an application, Business Object Views are created and display business objects with specific table and form views.
In this section, we will create:
-
Two business objects representing the customers and their contacts (CustomerBO) and the customers by account manager (CustomersByEmployeeBO).
-
Business object views to display these business objects and to edit the customers and contacts records.
Creating Business Objects
The first business object (CustomerBO) groups customers with their contacts through the ContactBelongsToCustomer relation.
-
In the Model Edition view, right-click the
 Business Objects node and select
Add Business Object. The Create New Business Object wizard
opens.
Business Objects node and select
Add Business Object. The Create New Business Object wizard
opens.-
In the Entity select Customer [Entity]
-
Click Next
-
-
Enter the following values:
-
Name: CustomerBO
-
Label: Customer
-
Plural Label: Customers
-
-
Click Finish to close the wizard. The Business Object: CustomerBO editor opens.
-
In the editor scroll down to the Transitions table.
-
Click the
 Add
Transition button. The Create New Business Object Transition wizard
opens.
Add
Transition button. The Create New Business Object Transition wizard
opens. -
In the Reference, select ContactBelongsToCustomer [Reference Relationship]
-
Click Next.
-
Select New Entity Object and then click Next.
-
Click Finish. The transition is added to the Transitions table.

-
Press CTRL+S to save the editor and then close it.
Another business object CustomersByEmployeeBO groups the account managers with their managed customers. Account managers are in the cost centers named `Executive', `Shipping' and `Sales'.
-
In the Model Edition view, right-click the
Business Objects node and select
Add Business Object. The Create New Business Object wizard
opens.-
In the Entity select Employee [Entity]
-
Click Next
-
-
Enter the following values:
-
Name: CustomersByEmployeeBO
-
Label: Customers By Account Manager
-
-
Click Next.
-
In the Root Filter, enter
CostCenter.CostCenterName in ('Executive', 'Shipping', 'Sales') -
Click Finish to close the wizard. The Business Object: CustomersByEmployeeBO editor opens.
-
In the editor scroll down to the Transitions table.
-
Click the
Add
Transition button. The Create New Business Object Transition wizard
opens. -
In the Reference, select CustomerHasAccountManager [Reference Relationship]
-
Click Next
-
Select New Entity Object and then click Next.
-
Click Finish. The transition is added to the Transitions table.
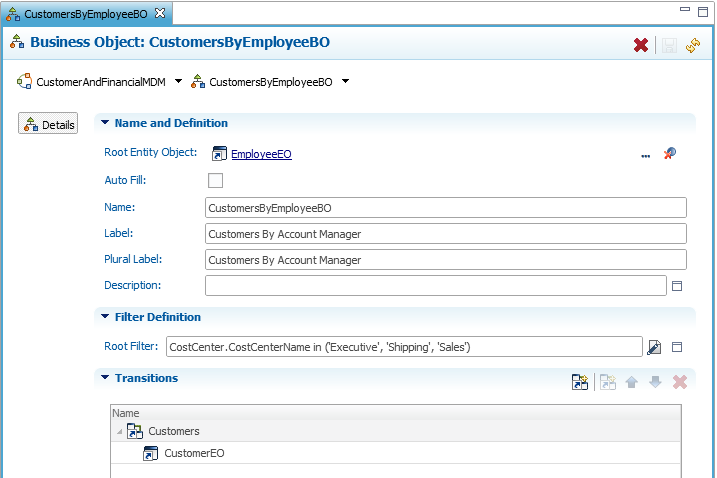
-
Press CTRL+S to save the editor and then close it.
Creating Business Object Views
The newly created business objects will be used in the
DemoApplication.
To use them, several business object views must be created to define how
these business objects will display. Business object views associate
form and table views to business objects.
The CustomersByEmployeeView is a view to display the CustomersByEmployeeBO business object: The employees and their managed customers.
-
In the Model Edition view, expand the Applications > DemoApplication > Folders node.
-
Select the CustomersAndContacts folder, right-click and select Add Business Object View. The Create New Business Object View wizard opens.
-
In the Create New Business Object View wizard, enter the following values:
-
Name: CustomersByEmployeeView
-
Label: Customers By Account Manager
-
In the Business Object, select CustomersByEmployeeBO [Business Object].
-
-
Click Finish to close the wizard. The Business Object View editor opens.
-
Scroll down to the Hierarchy table, and expand the nodes to review the form/table views used for the various entities involved in the business object that this view displays.
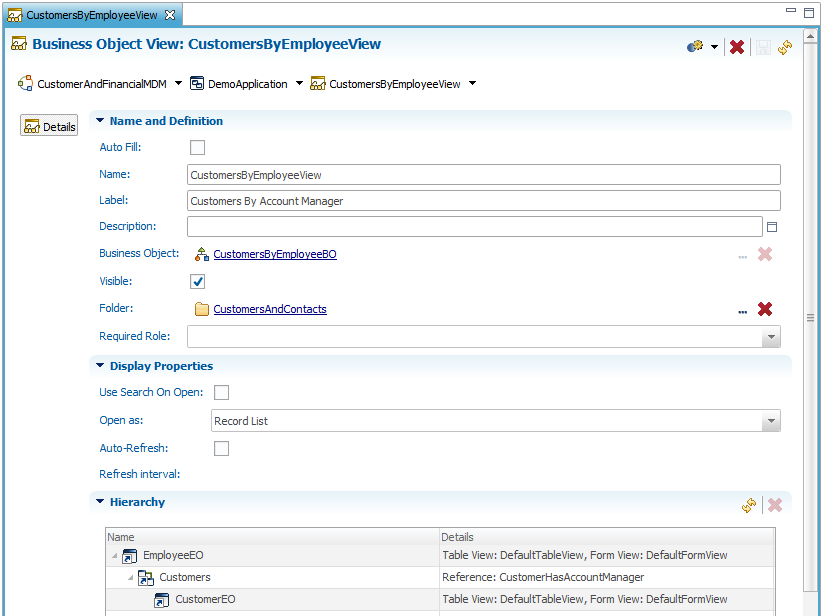
-
Press CTRL+S to save the editor and then close it.
The CustomersView is a view used to display and author the customers and their attached contacts, based on the CustomerBO business object.
-
In the Model Edition view, expand the Applications > DemoApplication > Folders node.
-
Select the CustomersAndContacts folder, right-click and select Add Business Object View. The Create New Business Object View wizard opens.
-
In the Create New Business Object View wizard, enter the following values:
-
Name: CustomersView
-
Label: Customers
-
In the Business Object, select CustomerBO [Business Object].
-
-
Click Finish to close the wizard. The Business Object View editor opens.
-
Scroll down to the Hierarchy table, and expand the nodes to review the form/table views used for the various entities involved in the business object that this view displays.
-
Select the line for CustomerEO in the Hierarchy.
-
In the Properties view, in the Name and Definition option group, click the … Select a Value button for the Data Entry Form View. A dialog opens to select one of the form views of the Customer entity.
-
Select the DataEntryFormView and then click OK.
-
Select the line for ContactEO in the Hierarchy.
-
In the Properties view, in the Name and Definition option group, click the … Select a Value button for the Data Entry Form View. A dialog opens to select one of the form views of the Contact entity.
-
Select the DataEntryFormView and then click OK.
-
Click the … Select a Value button for the Table View. A dialog opens to select one of the table views of the Contact entity.
-
Select the CompactTableView and then click OK. The editor looks as shown below:
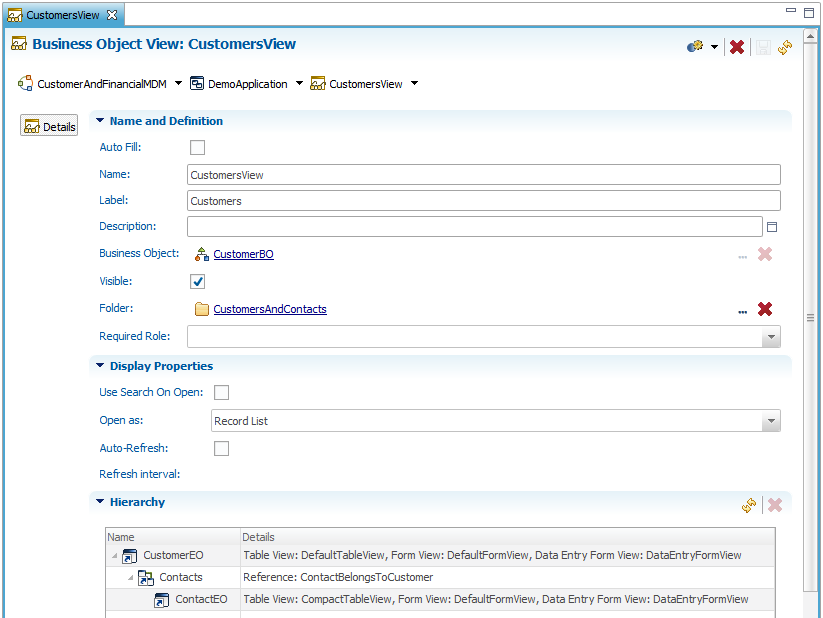
-
Press CTRL+S to save the editor and then close it.
Good Job! You have designed the various elements for viewing (and editing) customers.
Creating Human Workflows
Human Workflows enable business users to manage the data in the MDM hub via an application. In this section, we will configure two workflows to enter customers/contacts and to manage customer duplicates.
When users want to manage the master data, they initiate an Activity based on a human workflow. This activity follows the workflow through Transitions and Tasks which are assigned to roles, claimed, processed and then completed by users. The last task of a workflow can submit (or cancel) the data changes done in the activity, and start a data certification process with these changes.
There are two types of human workflows in Stambia MDM:
-
Data Entry Workflows: These workflows allow data stewards or business users to contribute to the hub as manual publishers. The data entered via these workflows goes through the data certification process to create golden data.
-
Duplicate Management Workflows: These workflows allow data stewards to override the decisions taken by the matchers running in the hub. Through these workflows, stewards can either manually match unmatched records, or split duplicate groups that were incorrectly matched (false matches).
Creating a Data Entry Workflow
Authoring data for the new Customer entity will be performed through a
new data entry workflow called CustomersCreationProcess.
This single-task workflow involves only users with the DemoDataSteward
role.
-
In the Model Edition view, expand the Applications > DemoApplication > Human Workflows node.
-
Right-click the Human Workflows node and select Add Data Entry Workflow. The Create New Data Entry Workflow wizard opens.
-
In the Create New Data Entry Workflow wizard, enter or select the following values:
-
Name: CustomersCreationProcess
-
Label: Edit Customers
-
Data Entry Publisher: DataEntry [Publisher]
-
On Submit Job: DE_CUSTOMER_CONTACT [Job]
-
Initiator Role: DemoDataSteward
-
-
Click Next. This step shows the various actions allowed in this workflow: Checkout actions allow editing existing records or fixing rejects. Create New Record allows adding records via the workflow. Leave all the actions selected.
-
Click Next.
-
In the Available Business Object Views list, double-click the CustomersView to add it to the Selected Business Object Views.
-
Click Finish to close the wizard. The workflow editor opens on the Diagram tab. The workflow was automatically created with a simple task.
-
In the workflow diagram, select the Edit Customers task.
-
In the Properties view, in the Name and Definition option group, set the following values:
-
Name: CreateOrModifyCustomerData
-
Label: Create / Modify Customer Data
-
Assigned to Role: DemoDataSteward
-
-
The workflow diagram appears as shown below.
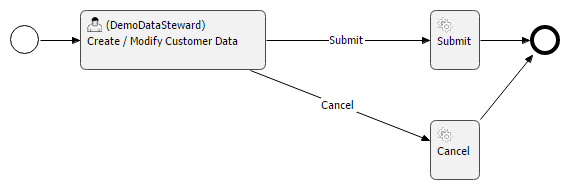
-
Press CTRL+S to save the editor and leave it open.
Data entry workflows support interactivity through enrichers and data quality validations triggered while entering data or moving the workflow to a new task.
We will configure validations and enrichers to run in the workflow using Field Exit. Field Exit triggers the enrichers when the focus leaves the data entry fields.
All enrichers and validations will trigger on Field Exit, except one email enricher, which will be triggered manually.
We will also configure validations to prevent users from submitting data that does not comply with certain validations, and we will warn them of errors before submission.
Configure the Task:
-
Select the Properties view (lower panel of the workbench).
-
Select the CreateOrModifyCustomerData task in the workflow.
-
In the Properties view, select the Enrichers tab. This tab shows the list of enrichers triggered while entering data in this task.
-
Select all the lines in the enrichers list, right-click and then select Field Exit.
-
Now select the GeocodeInputAddress and StandardizeContactEmail enrichers in the list, right-click and then select Manual.
-
Select the Validations tab in the Properties view.
-
Select all the lines in the validations list, right-click and then select Field Exit.
-
Press CTRL+S to save the editor and leave it open.
Configure the Transition:
-
In the workflow, select the transition that links the CreateOrModifyCustomerData task to the Submit task.
-
Select the Enrichers tab in the Properties view.
-
Select all the lines in the enrichers list, right-click and then select Execute Enricher.
-
Select the Validations tab in the Properties view.
-
Select all the lines in the validations list, right-click and then select Block.
-
Now select the Account Manager - Reference validation in the list, right-click and then select Warn.
-
Press CTRL+S to save the editor and then close it.
Creating a Duplicate Management Workflow
We will now create a CustomerDuplicatesProcess workflow which manages the customer duplicates.
-
In the Model Edition view, expand the Applications > DemoApplication > Human Workflows node.
-
Right-click the Human Workflows node and select Add Duplicates Management Workflow. The Create Duplicates Management Workflow wizard opens.
-
In the Create New Duplicates Management Workflow wizard, enter or select the following values:
-
Name: CustomerDuplicatesProcess
-
Label: Manage Duplicate Customers
-
Managed Entity: Customer [Entity]
-
On Submit Job: DE_CUSTOMER_CONTACT [Job]
-
Initiator Role: DemoDataSteward
-
-
Click Finish to close the wizard. The workflow editor opens on the Diagram tab. The workflow was automatically created with a simple task.
-
Click the diagram’s background. The Properties view displays the properties of the workflow.
-
Select the Managed Entity option group in the Properties view.
-
Click the … (Select a Value) button for the Table View. A dialog opens to select the table view for this workflow.
-
Select the DefaultTableView and then click OK.
-
In the workflow diagram, select the Manage Duplicate Customers task.
-
In the Properties view, in the Name and Definition option group, set the following values:
-
Name: VerifyCustomerDups
-
Label: Verify and Validate Customer Duplicates
-
Assigned to Role: DemoDataSteward
-
-
Press CTRL+S to save the editor and then close it.
Congratulations! Your first application is ready to go live!
Using the Application
In an Application, data stewards and business users can browse the MDM hub content using the Business Object Views. They can also author (create or modify) master data in the hub and manage duplicates using the Human Workflows.
Connecting to the Application
-
In the top-right toolbar, select the Overview perspective.
-
In the Overview screen, press the CTRL key and then click the Open Data Edition link under the Data Stewardship group to open it in a new tab.
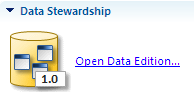
-
A new tab opens, showing the applications available. In the Available Applications section click the Demo Application [Latest] (CustomerAndFinancialMDM) button to open this application.

The application opens.
| At design-time, the application is generated every time you access it (the startup time is in fact the application generation time). In production, it is generated once. |
The Demo Application
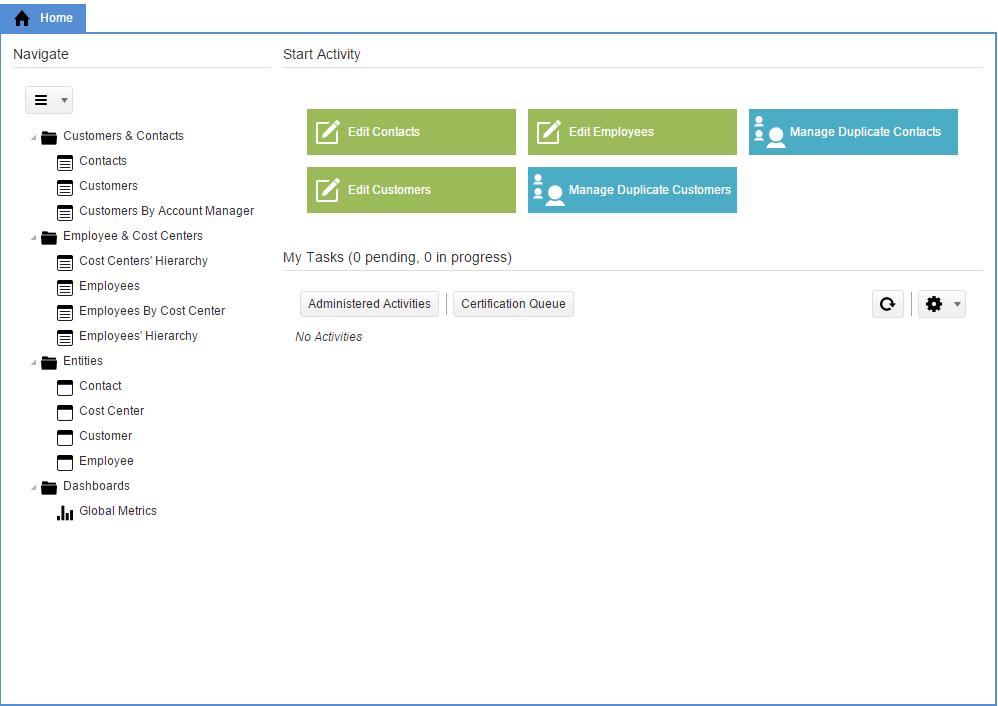
The application Home page provides an overview of the hub:
-
The Navigate view shows the business object views classified in their folders, as well as the list of the entities in the hub. Double-clicking on a business object view opens a new editor showing the data.
-
The My Tasks view is a summary of the human workflows in progress.
-
The Start Activity view contains shortcuts to start new workflows.
| Access to the data is secured by privileges. As the data steward, you can access all the entities, but other users have a more limited access as defined in the model security, which is not covered in this tutorial. |
Navigating the Master Data
In this section, we take the role of a business user who wants to browse the customer data.
Browsing
Let’s look for a customer record called GADGETRON.
-
Double-click the Customers view in the Customers and Contacts folder. A new editor opens showing the list of customer data certified in the hub in the Hierarchy view and in a table view.
-
In the editor toolbar, click the
 Display Settings
button and then select Show Lineage to disable the lineage.
Display Settings
button and then select Show Lineage to disable the lineage. -
Click the Customer Name column header on the table to sort records by customer name.
-
Use the
 Next Page and
 Previous Page buttons to move
from page to page until you see GADGETRON.
Previous Page buttons to move
from page to page until you see GADGETRON.
Quick Search
Another way to access GADGETRON is using a quick search.
-
Click the Quick Search field in the application header.
-
Enter
Gadin this field, and then press ENTER.

A dialog opens, asking you the business object view to search into. -
Select the Customers business object view and then click OK. The Customers editor opens with two records matching the search.
Advanced Search
Let’s try some advanced filtering. We will search for US customers with revenue greater than 10,000 and then export them.
-
Click the
 Search button in the
editor toolbar to open the Search dialog.
Search button in the
editor toolbar to open the Search dialog. -
The current <Quick Filter> is displayed with the current full-text search pattern:
Gad. -
Select Advanced in the search type dropdown box, in the upper right corner of the dialog.
-
Click the … (Select Attribute) button.
-
In the Select Attribute dialog that opens, select TotalRevenue and then click OK.
-
Select the greater than (
>) operator. -
In the value field, enter
10000. -
Click the Add button.
-
Select the … (Select Attribute) button.
-
In the Select Attribute dialog that opens, expand the InputAddress complex field, select Country under that node and then click OK.
-
Click the … selector button to select the country
USA. -
Click the Rename button to rename this filter to Important US Customers.
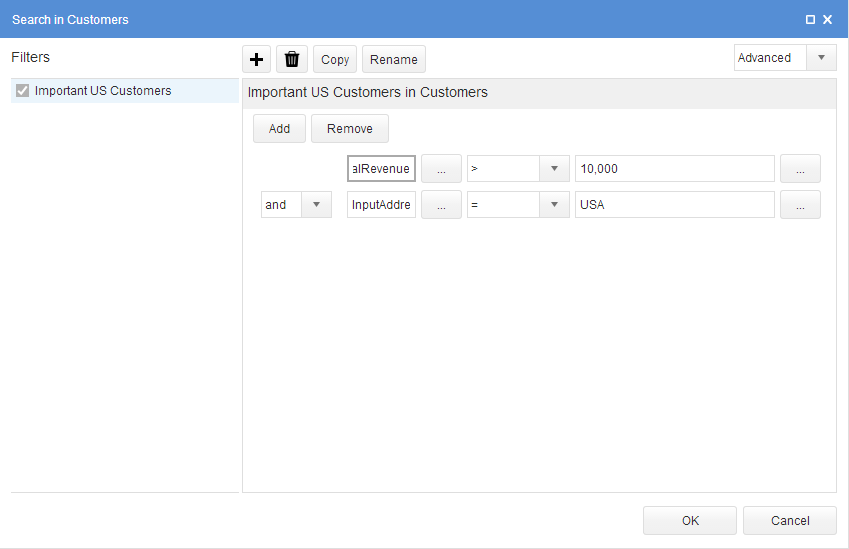
-
Click OK. The filter is saved, applied and only US customers with total revenue greater than 10,000 appear.
Exporting Data
-
Select More… > Select All and then More… > Export in the editor toolbar.
-
Select the suitable Export Format (Excel or CSV).
-
Click the OK button to download the data file and open it with the appropriate editor.
Customized Search
Stambia MDM allows you to define customized forms for searching. We use a customized form to search for a manager called Neena in our list of employees.
-
Select the Home tab.
-
Double-click the Employees view in the Employee & Cost Centers folder. An editor showing the list of employees appears.
-
Click the
Search button in the editor toolbar to open the Search dialog. -
The search dialog opens on a customized search form.
-
In this form:
-
Enter
neenain the Name field. -
Select the Is Manager checkbox.
-
-
Click OK to apply this filter. The only employee matching these criterial appears.
-
Close this editor.
| The customized search form that you have used can be reviewed in the model in Entities > Employee > Search Forms > SearchCustomers. |
Browsing References
-
Select the Customers editor.
-
In the list of customers, use the
Next Page and Previous Page
buttons to move from page to find the GADGETRON record. -
Click this record in the list. A page appears showing the details for this record. The Contacts tab shows the list of all contacts attached to this customer.
-
In the hierarchy, expand the GADGETRON > Contacts node to view the contacts attached to this customer.
-
Click the Britney Bell contact to open its form view.
-
In this form, click the GADGETRON link in the Customer Details section to go back to the parent customer record.
-
In the Gadgetron record, click the Matthew Weiss link to open the record of the account manager for this customer.
-
Return to the Customers editor.
Authoring Master Data
The same business user now wants to change GADGETRON’s total revenue and create a new customer called Stambia.
Creating and Modifying Records
-
In the GADGETRON editor toolbar click the
 Edit the Current Selection
button. A new activity automatically starts and an editor opens to edit
GADGETRON in this activity.
Edit the Current Selection
button. A new activity automatically starts and an editor opens to edit
GADGETRON in this activity. -
Change the Total Revenue value to
145000and then click Save. You return to the Edit Customer activity editor. -
Select the
 Create
New Customer button in the toolbar. An editor opens to create a new
customer.
Create
New Customer button in the toolbar. An editor opens to create a new
customer. -
Enter the following values:
-
Customer Name: Stambia
-
Total Revenue: 6946000
-
Account Manager: Click the
 More… button. The list of employees opens. Click Steven King in this
list. The list closes and this employee is set as the account manager.
More… button. The list of employees opens. Click Steven King in this
list. The list closes and this employee is set as the account manager.
-
-
In the Address section, enter:
-
Address: 750 Menlo Ave #250
-
Postal Code: 94025
-
City: Menlo Park
-
Country: USA
-
-
Click the Save button to save this entry.
-
Click the Complete button in the editor toolbar and then select Submit to complete this task. The data is validated and published to the hub.
| As you enter data in the forms, red markers indicate the various errors detected. If you move your mouse cursor on these indicators, the details of the error display in a tooltip. Data quality rules are enforced as part of the workflow, and you cannot submit incorrect data. |
| You can use the same workflows to import data in bulk from CSV or Excel files. |
Reviewing the Changes
Perform a quick search for the Stambia and GADGE customers to see the
new and updated customer records:
-
A new customer called Stambia must appear now.
-
GADGETRON must now have a Total Revenue of 145,000.
Data Stewardship
Data stewards are responsible for maintaining the data in the hub. In addition to the navigation and authoring operations, they use data lineage, duplicate management and rejects detection for governing the data.
Using the Lineage
The Lineage reflects the process that led to the master records and allows drilling down into the various stages of this process.
-
Select the Home tab.
-
Double-click the Customers view in the Customers and Contacts folder. A new editor opens showing the list of customers.
-
In the editor toolbar, click the
Display Settings
button and then select Show Lineage to enable the lineage. -
Sort the records by customer name and then use the
Next Page and
Previous Page buttons to move
from page to page until you see GADGETRON. -
Expand the node corresponding to a GADGETRON golden record in the Hierarchy.
-
Expand the Master Records node. The list contains the master records that led to the consolidated golden record.
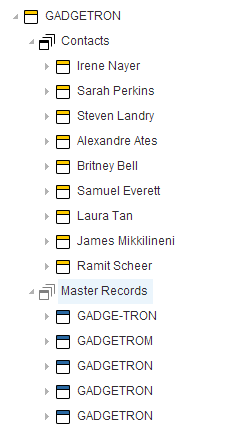
-
Click the Master Records node under the GADGETRON record in the Hierarchy. The list of master records appears.
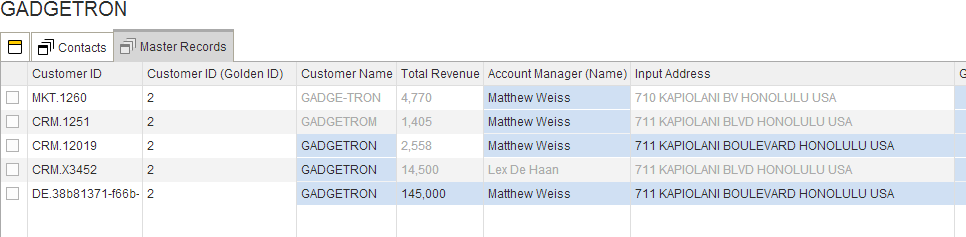
You can review the following:
-
The records displayed are duplicates coming from the CRM and MKT (Marketing) applications, plus one authored earlier in this tutorial. These have been matched by the Matcher created in this tutorial.
-
During the consolidation phase, the highlighted values have been taken to create the golden record as defined by the consolidator.
-
The Customer Name and the Input Address have been transformed to uppercase as per the SemQL Enricher.
-
If you have activated the Plug-in Enricher, the Geocoded Address is loaded. Otherwise it is empty.
Managing Duplicates
When the automated duplicates detection does not provide appropriate results, it is possible to split or merge duplicate groups.
A number of records, published from source applications, have been automatically matched and consolidated into the GADGETRON golden record. One of them was incorrectly merged. In reality, GADGE-TRON is in fact a different legal entity than GADGETRON. They share the same address, and the matching process interpreted the name and address similarity for a match. The data steward must fix this.
Un-Merging Duplicates
-
In the Master Records table for GADGETRON, check the selection box for the GADGE-TRON master record (Customer ID = MKT.1260).
-
In the toolbar, click the
 Duplicates Management button and then select Move to New Golden.
 -
A new Manage Duplicate Customers workflow opens. In the editor, the two records resulting from the un-merge operation appear.
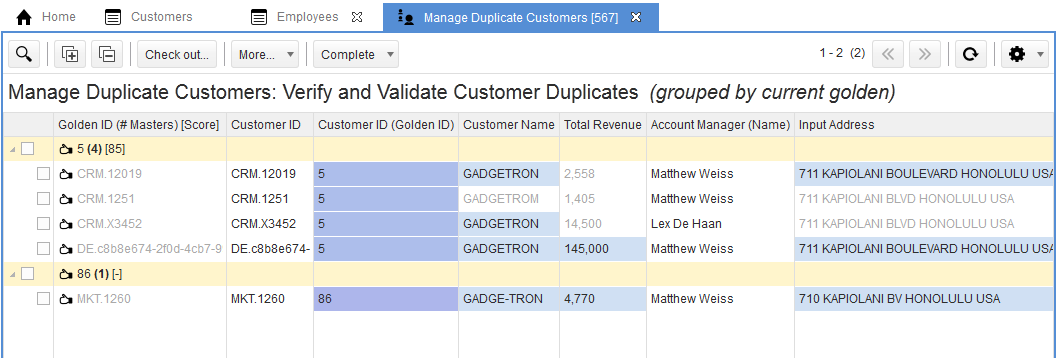
-
Select Complete > Submit in the editor toolbar to complete this task. The data is validated and published to the hub.
Merging Duplicates
We can revert this operation just as easily.
-
Make a quick search for
GADGEfor Customers. The GADGETRON and GADGE-TRON records that we have unmerged appear. -
Check the selection box for both.
-
In the toolbar, click the
Duplicates Management button and then select Merge. -
A dialog appears to select the golden record that will survive the merge. Select the GADGETRON record.
-
A new Manage Duplicate Customers workflow opens. In the editor, the record resulting from the merge operation is shown.
-
Select Complete > Submit in the editor toolbar to complete this task.
Perform a new search. You should find a single merged GADGETRON record.
| The duplicate management process allows confirming, splitting or merging detected duplicates. Note that the decisions taken by the steward are preserved in future loads and override any automated duplicate detection. |
Using Stambia MDM Pulse Metrics
After designing an MDM model and deploying it in a hub, it is necessary to perform measurements on the data managed in the hub. Pulse Metrics provides this capability. It gathers and historizes statistics for the hubs attached to a Stambia MDM instance. Statistics include Data Analysis (Master and golden records, duplicates, data quality, etc.) and Workflow Performance (volume, duration, backlog).
Configuring and Loading Pulse Metrics
To configure and load Pulse Metrics:
-
Select the Stambia MDM Workbench tab in your web browser. The workbench appears with the Overview screen.
-
In the top-right toolbar, select the Administration Console perspective.

-
In the Administration view, double-click the Pulse Configuration node.
The Pulse Configuration editor opens. In this editor, the CustomerAndFinancialMDM data location that you created appears in the list of Data Locations. -
Select the Active checkbox for this data location. With this data location marked Active, Pulse Metrics will gather statistics for the hub in this data location.
-
Press CTRL+S to save the editor.
-
Click the Load Pulse Metrics
 button in the editor toolbar to start manually the metrics load.
 -
Click OK in the Pulse Metrics Load Started dialog.
| You can schedule regular and automated loads from this editor by setting a Cron Schedule expression. |
Using the Dashboards
Various Dashboards, available from the application, expose the metrics for the hub.
The Global Metrics dashboard is the default dashboard:
-
Select the Demo Application tab in your web browser.
-
Refresh this tab by pressing the F5 key.
-
Select the Home tab.
-
Select Dashboards > Global Metrics in the Navigate section. The Global Metrics page opens.
This dashboard displays several sections:
-
Data Certification Jobs shows the status of the certification jobs in progress, queued or completed.
-
Data Location Statistics shows the aggregated metrics for all the entities of the MDM hub. If you select one entity in this list (for example: Contact), the detailed metrics for this entity are displayed in the Selected Entity Details section of the dashboard.
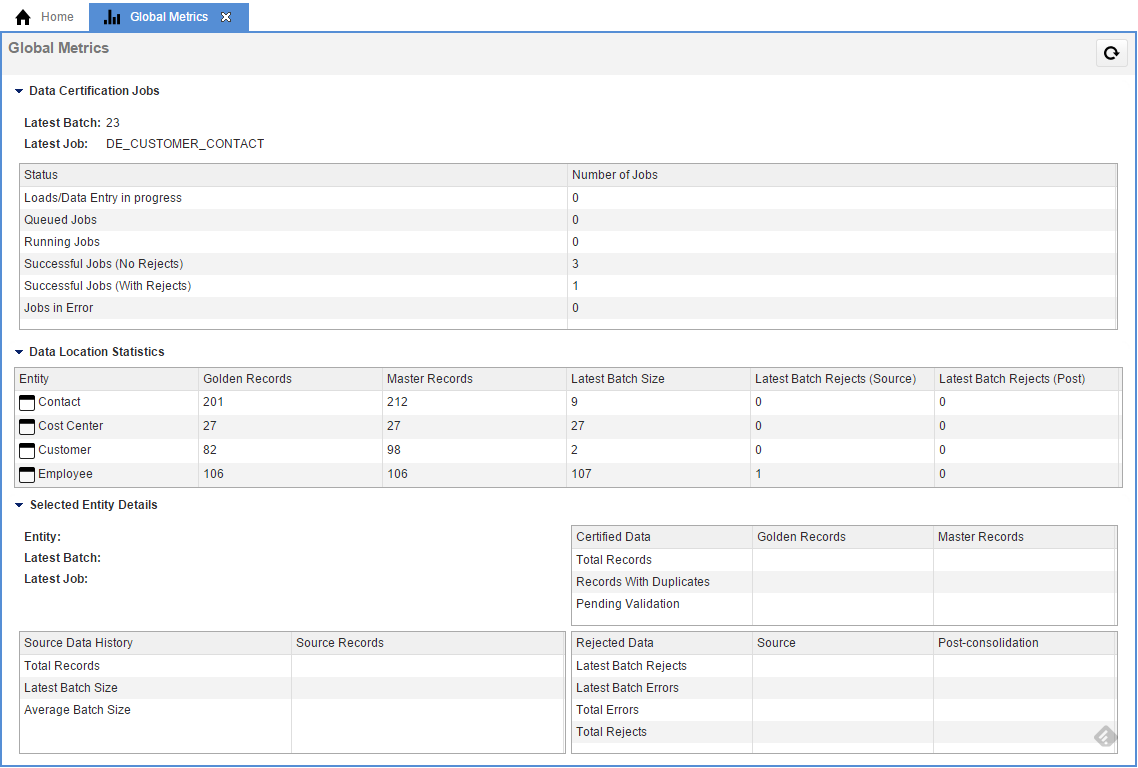
Using Stambia MDM Pulse Metrics, you gain access to graphical dashboards:
-
Select the Home tab.
-
Select Dashboards > Overview in the Navigate section. The Overview dashboard opens.
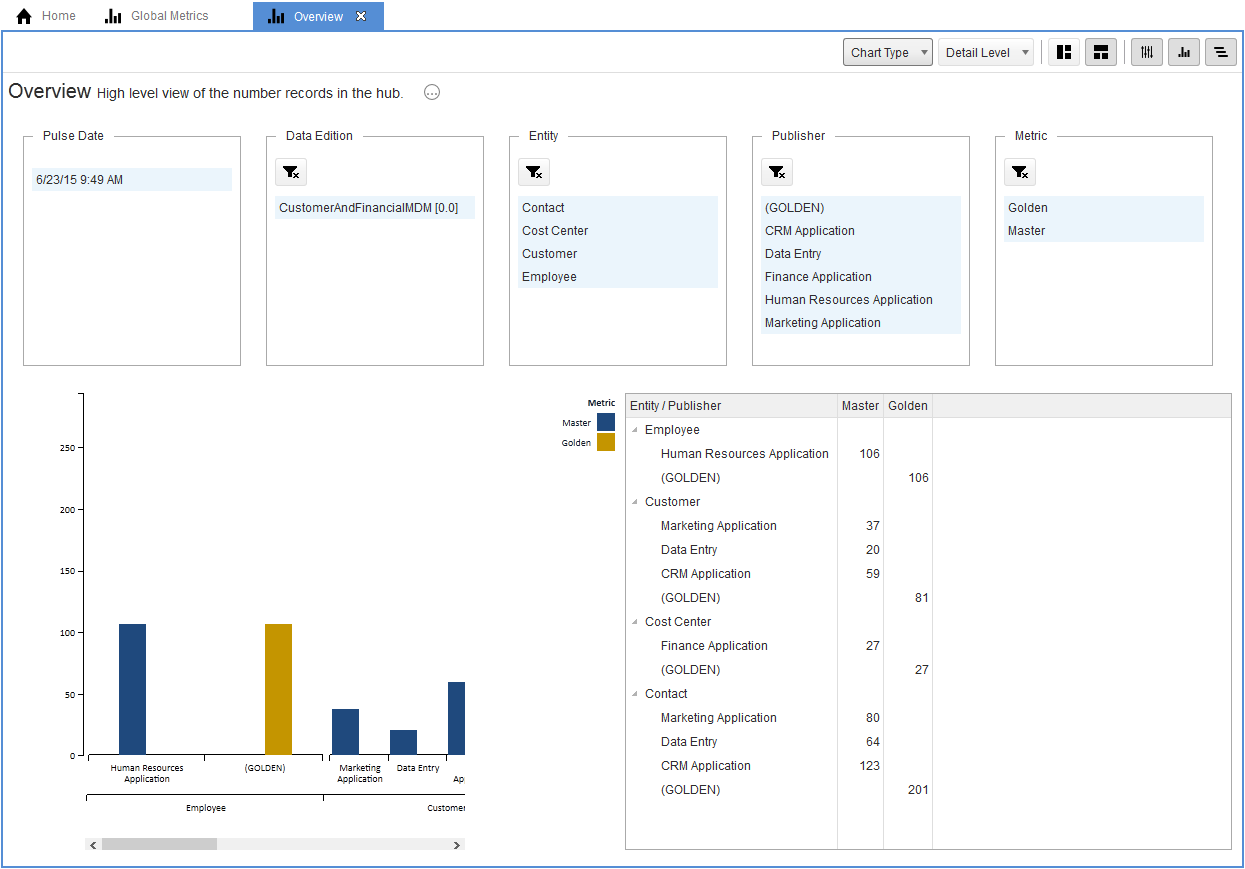
This dashboard displays the golden records count for each entity as well as the number of master records per publisher.
Using this dashboard, you see that:
-
All Employee records come from the Human Resources Application, with no duplicates.
-
Customer golden records are consolidated from duplicates detected among the following sources: Marketing Application, CRM Application and Data Entry (the data entry workflow).
Dashboards also allow you to monitoring the quality of the master data.
-
Select the Home tab.
-
Select Dashboards > Data Quality by Source in the Navigate section.
This dashboard displays the records sent by the publishers that violate the data quality rules. For example, you can see that one Contact record from the Marketing Application is referencing a Customer record that does not exist, and one Employee record from the Human Resources Application has no Cost Center set.
You can open the other dashboards to analyze the data managed in the hub.
Congratulations! As a data steward, you have successfully configured and used Pulse Metrics and the dashboards to analyze data in your Stambia MDM hub.
Summary
Summary
Congratulations! You have now completed your first MDM project with Stambia MDM.
In this tutorial, you learned how to:
-
Install Stambia MDM,
-
Design a model, including customized data types, entities, integration artifacts (enrichers, constraints, matchers and consolidators),
-
Deploy the Model in an MDM Hub,
-
Load the MDM Hub and automatically run integration jobs,
-
Create an Application for business users and data stewards to access and perform changes in the MDM Hub,
-
Use this application to orchestrate business processes and to navigate through your golden and master data,
-
Review the golden data certified by Stambia MDM and drill through the data lineage.
Going Further with Stambia MDM
You have learned how to use Stambia MDM for a typical MDM project. But Stambia MDM is capable of addressing any type of master data projects in many functional areas, including Products, Customer, Parties, Cost Centers, etc.
Stambia MDM includes the following features to support your MDM initiatives:
-
Comprehensive Logical Modeling for faster development and optimal reactivity to changes at a lower cost.
-
Data and Metadata Versioning to increase your confidence in data compliance, adhere to regulations and support what-if analyses.
-
Non-Intrusive MDM Hub allowing applications to seamlessly push data to Stambia MDM and consume certified data.
-
Generating Integration and Certification Processes guaranteeing fully certified data.
-
Leveraging the Power of Database Engines for high performance and maximum scalability for master data certification and access.
-
Web 2.0 and Cloud-Ready Solution providing the lowest cost of deployment on the market.
Learn More
| The Stambia MDM Documentation Library, which includes development, administration and installation guides is available online at the following URL: http://stambia.org/mdm/documentation |
In addition to the product manuals, Stambia provides other resources
including whitepapers, datasheets, and a complete set of videos
demonstrating the product features.
The resources are available on the Stambia
Website.
© Copyright Stambia 2015. All Rights Reserved.