

This article shows how to configure the JVM used by the Designer: specifying a given JVM installation path, or the RAM allocated to Java for running the Designer.
Note: The following instructions apply to DI Designer only. For changing the JVM used by the Runtime, simply set the STAMBIA_JAVA_HOME environment variable.
Specifying the allocated RAM for the Designer
The stambia.ini file (stambia32.ini when using the 32bits version) lets you specify the desired memory allocation for the Designer.
Simply change these lines:
-vmargs
-Xms512m   <= reflects the initial memory allocated to Java
-Xmx1024m  <= reflects the maximum memory Java will use
Finding the JVM used by the Designer
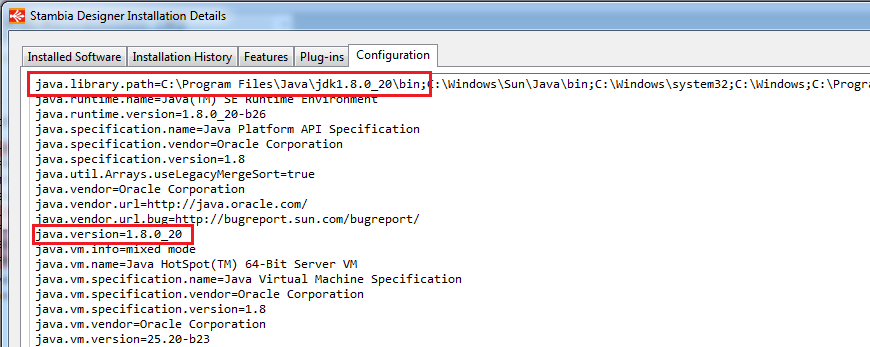
First, here is how to find which JVM is using the Designer at the moment.
Start the Designer, go to Help > About Stambia Designer > Installation Details > Configuration and search for the java properties
Passing the JVM path in the command line
Simply pass the desired JVM path as a command line argument when starting Stambia DI Designer:
- Windows example (64bits): stambia.exe -vm D:\apps\java\1.7.0_25_jre_64\bin
- Windows example (32bits): stambia32.exe -vm D:\apps\java\1.7.0_45_jre_32\bin
- Linux example: ./stambia -vm /apps/java_1.7.0_25_jre_64/bin
You can define a shortcut which sets this automatically for you. Linux users can also set a symbolic link ar an alias command.
Configuring the JVM path in stambia.ini
The JVM path can also be specified in the stambia.ini configuration file, which is located in the Designer's directory.
We suggest to make first a backup of the file, as it is very sensible and easily "breakable" (because of extra spaces or line breaks).
If you forgot backuping, you can still find the original file in the zip of the designer.
The argument to add is
-vm
C:\Program Files\Java\jdk1.8.0_20\bin\
Important
- It must be added at the beginning of the file, overwise it will not work
- The line break after -vm is necessary too, without any space character
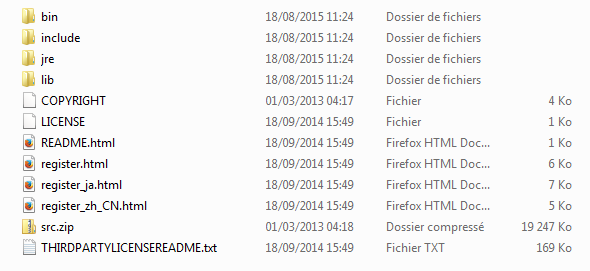
Installing a JRE folder in the Designer's folder
Another way to change the JVM of the Designer is to add a "jre" directory at the root of the Designer installation.
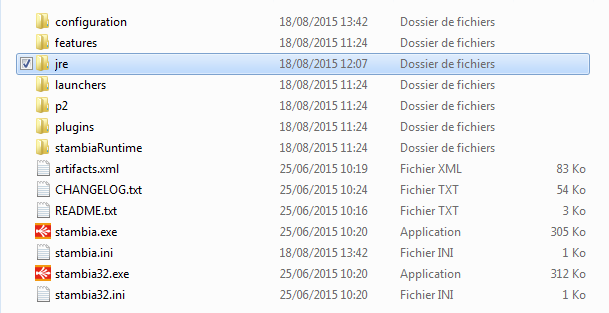
And then copy in this directory the content of the JRE/JDK folder.
Exemple of what we have in the <stambiaDirectory>/jre:
Configuring a JVM path with environnement variables
By default, the designer uses the JVM of the system (often defined in environment variables).
You can modify these variables to change the JVM used by the Designer.
Below are some examples on how to do that but it depends on your OS and your requirement (Changing the JVM used by all the OS ? By the user only ?). You can find more detail on the internet about the steps and explanations to do that.
On Windows
To change the JVM used by the system, you can use the PATH system variable.
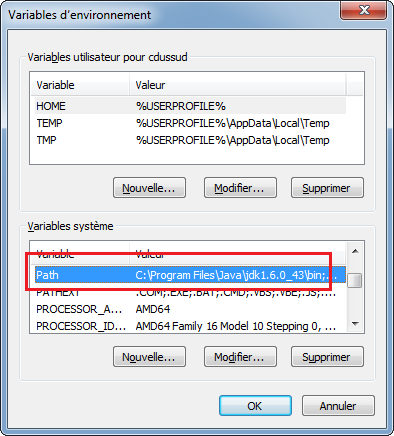
Like in the screenshot, add to your variable <path to JDK bin>;
On Linux
It depends on your distribution. Here is how we did it on ubuntu.
We have updated the PATH environnement variable to add the JVM we want. For that, we modified the .bashrc file of the user.
1) Make a backup of the ~/.bashrc file (with cp .bashrc .bashrc.old for example).
2) Open this file in your prefered editor, and add at the end of the file :
JAVA_HOME=<pathtotheJDK>/bin
export PATH=$JAVA_HOME:$PATH
Example

3) Logout and Login again
4) Verify with typing java -version in a terminal