Stambia CI/CD with Jenkins and Docker
Following the devOps principles, more and more organizations are building CI/CD chains to shorten the systems development life cycle and provide continuous delivery with high software quality.
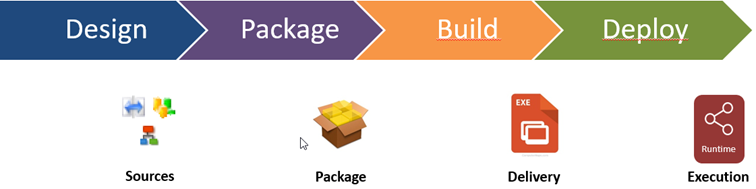
The delivery of a new version of development made in Stambia can be seen as a four-steps process :
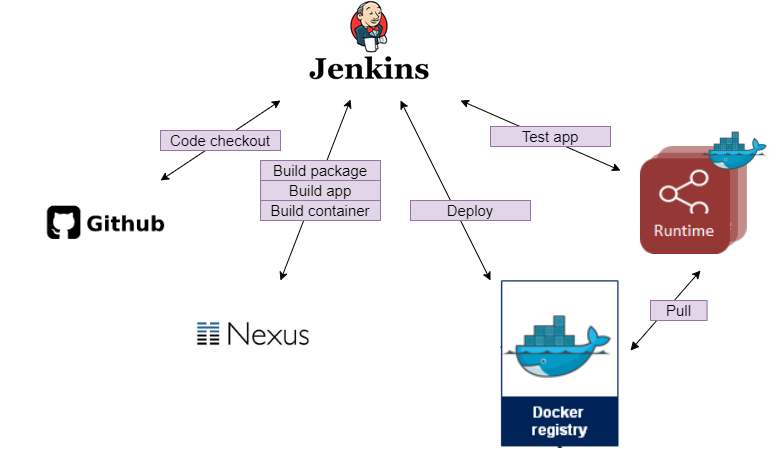
We will see in this article how Stambia can be integrated in a CI/CD chain using Jenkins, by deploying a sample application.
In this example, we will automate the build from sources to deployment on existing runtimes, using Jenkins as automation server and Docker for the deployment.
Prerequisites
GitHub account : You need a GitHub account to fork/clone the sample repository
Jenkins server : To automate the tasks
Nexus repository : To store the Stambia Designer and Stambia Runtime for building
Docker registry : To store the built images
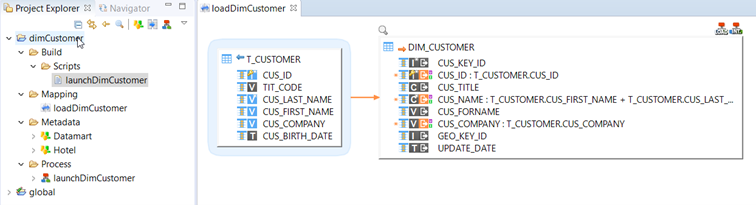
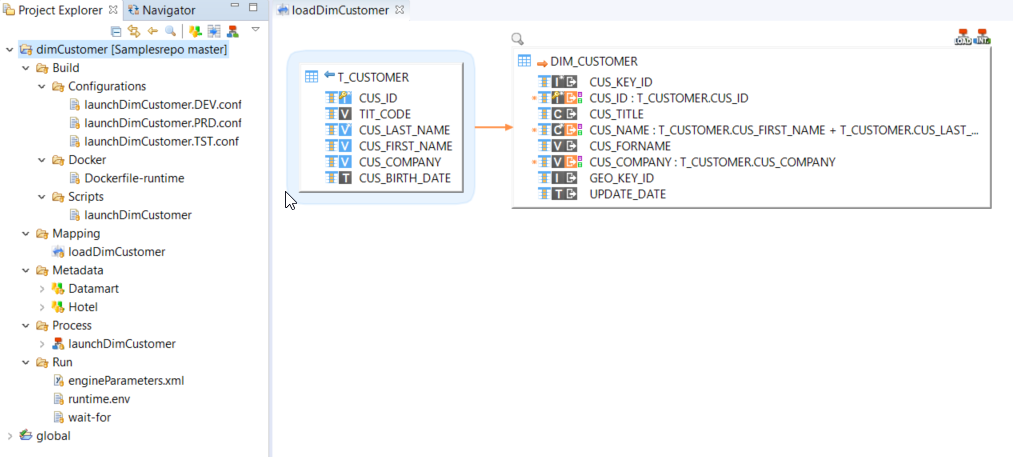
Sample application overview
The sample application launchDimCustomer is made of a simple process calling loadDimCustomer mapping, which loads data from customer table of Hotel database to Datamart database.
A lauchDimCustomer script is included in the project, to build the launchDimCustomer.pck package file.
Some configuration files have also been prepared for the DEV, TST, and PRD environements
The files needed to build the runtime container have also been added to the project : Dockerfile, engineParameters.xml etc.
You can clone this project ‘dimCustomer’ from github repository : https://github.com/stambia/samples
Environment setup
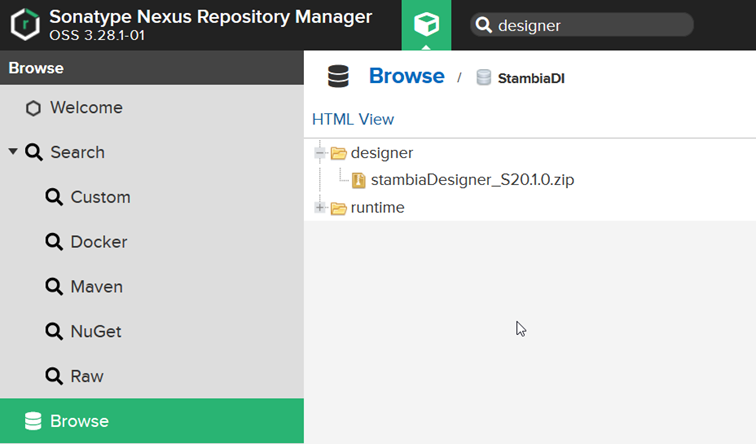
We will first upload the stambia designer and stambia runtime zip files – the ones you can download from Stambia.org- to a nexus raw repository :
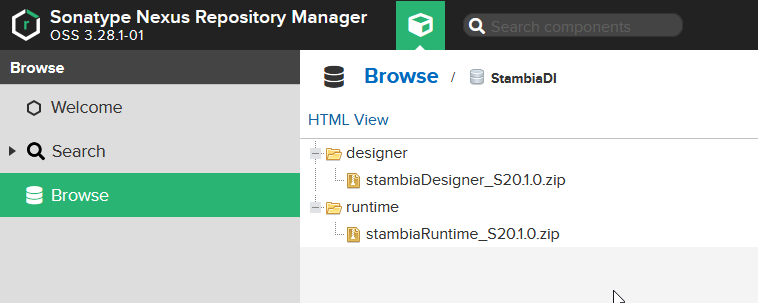
The resulting download URL will be http://nexus:8081/service/rest/v1/search/assets/download?name=designer/stambiaDesigner_S20.1.0.zip
Build the pipeline
Now that everything is in place, we can create the Jenkins pipeline to automate the deployment tasks.
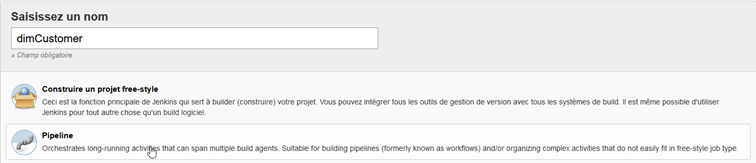
Create a pipeline project ‘dimCustomer’ :
Once created, we can create the pipeline script skeleton and set the environment variables :
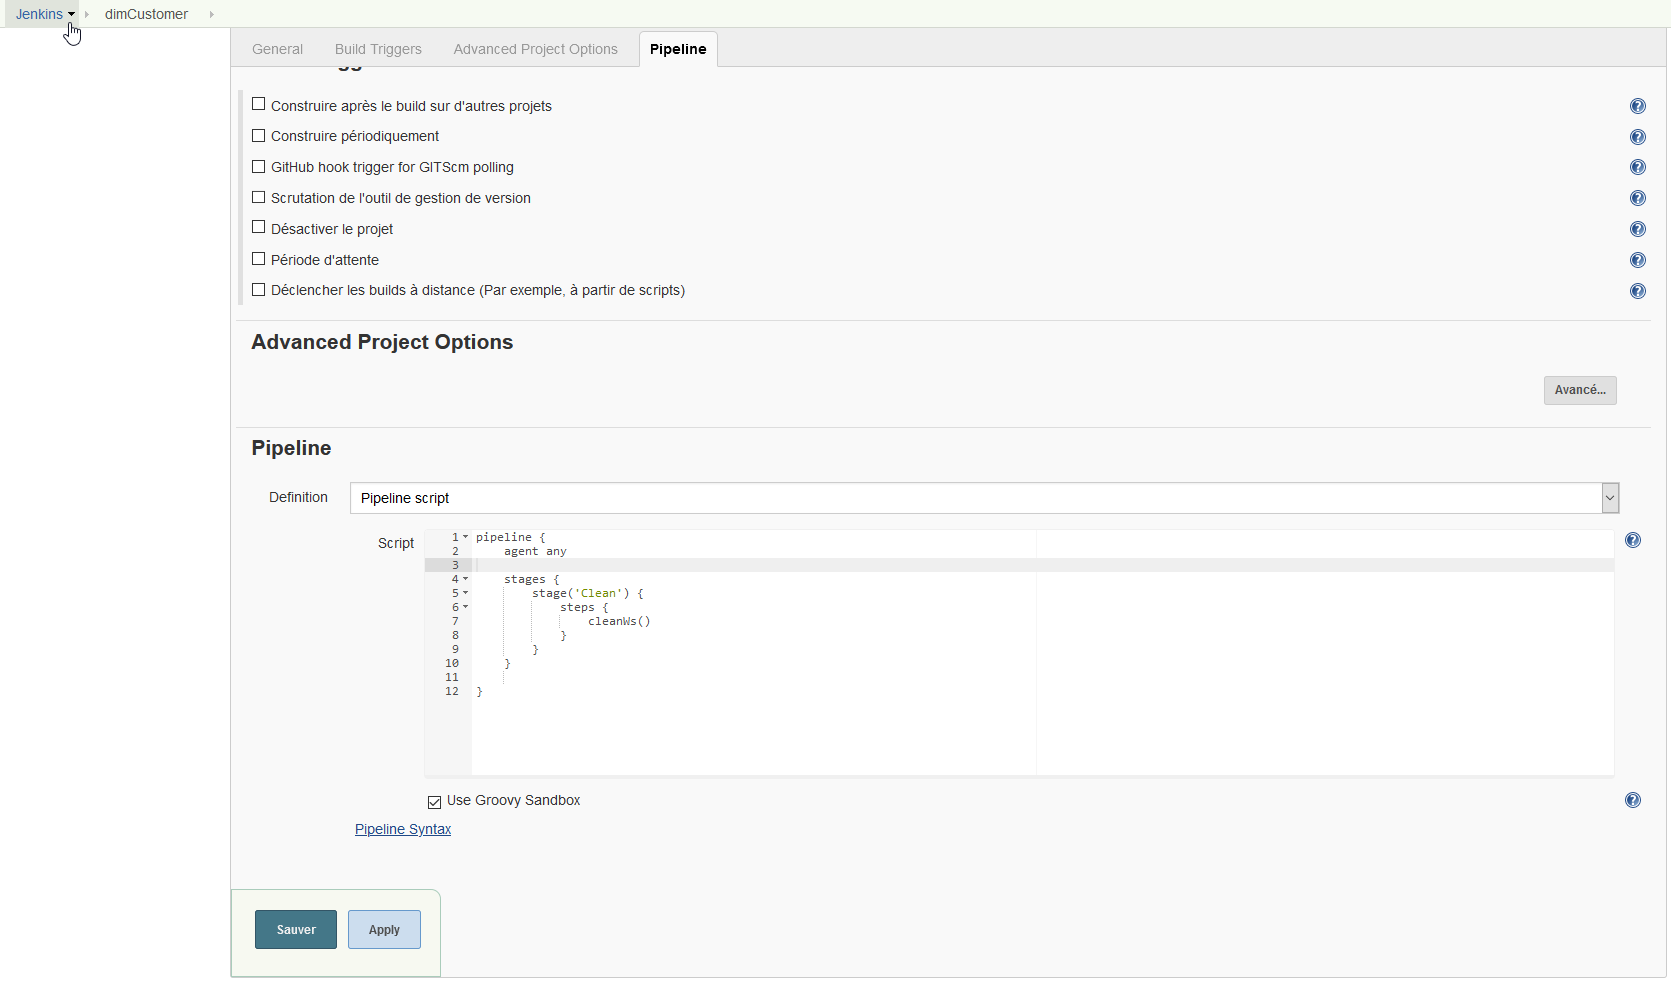
Add the variables :
pipeline {
    agent any

    environment {
        NEXUS_USER = 'nexus_user'
        NEXUS_PASSWORD = 'nexus_password'
        STB_PROJECT = 'dimCustomer'
	PKG_NAME = 'dimcustomer'
	PKG_FILE = 'launchDimCustomer.pck'
    }

    stages {
        stage('Clean') {
            steps {
                cleanWs()
            }
        }
    }
}
We can now add the necessary steps to build our pipeline, from the sources retrieval to the deployment on the three target environments
Checkout stage
Get the sources from the github repository :
git https://github.com/stambia/samples
Download the designer and runtime zip files :
sh 'curl -X GET -L --user "${NEXUS_USER}:${NEXUS_PASSWORD}" http://nexus:8081/service/rest/v1/search/assets/download?name=designer/stambiaDesigner_S20.1.0.zip -o designer.zip'
sh 'curl -X GET -L --user "${NEXUS_USER}:${NEXUS_PASSWORD}" http://nexus:8081/service/rest/v1/search/assets/download?name=runtime/stambiaRuntime_S20.1.0.zip -o runtime.zip'
Build package stage
Unzip the designer :
sh 'unzip ${WORKSPACE}/designer.zip -d ${WORKSPACE}'
Build package using script file :
sh 'java -Djava.util.Arrays.useLegacyMergeSort=true -jar ${WORKSPACE}/stambia/plugins/org.eclipse.equinox.launcher_1.5.100.v20180827-1352.jar -application com.indy.shell.application -data "." -script "${WORKSPACE}/${STB_PROJECT}/Build/Scripts/launchDimCustomer" -console -noSplash -importFrom "${WORKSPACE}/${STB_PROJECT}" -cleanProjects -rebuildCache'
Deploy to development stage
Prepare folder and files to build the container
sh 'mv *.pck ${WORKSPACE}/stambia/stambiaRuntime/build/packages'
sh 'mkdir ${WORKSPACE}/deliveries'
sh 'mkdir ${WORKSPACE}/buildRuntime'
sh 'mkdir ${WORKSPACE}/buildRuntime/modules'
sh 'mkdir ${WORKSPACE}/buildRuntime/deliveries'
Build the delivery file using Developement configuration file
dir("${WORKSPACE}/${STB_PROJECT}/stambia/stambiaRuntime/") {
    sh './buildDelivery.sh launchDimCustomer -conffile ${WORKSPACE}/${STB_PROJECT}/Build/Configurations/launchDimCustomer.DEV.conf -deliveryfolder ${WORKSPACE}/deliveries/'
}
Build container and push to the container registry
sh 'mv ${WORKSPACE}/runtime.zip ${WORKSPACE}/buildRuntime/stambiaRuntime.zip'
sh 'mv ${WORKSPACE}/${STB_PROJECT}/Run/engineParameters.xml ${WORKSPACE}/buildRuntime'
sh 'mv ${WORKSPACE}/${STB_PROJECT}/Run/wait-for ${WORKSPACE}/buildRuntime'
sh 'mv ${WORKSPACE}/${STB_PROJECT}/Build/Modules/* ${WORKSPACE}/buildRuntime/modules/'
sh 'mv ${WORKSPACE}/${STB_PROJECT}/Build/Docker/Dockerfile-runtime ${WORKSPACE}/buildRuntime/Dockerfile'
sh 'mv ${WORKSPACE}/deliveries/* ${WORKSPACE}/buildRuntime/deliveries'
sh 'docker build ${WORKSPACE}/buildRuntime -t stambiadev/runtime:DEV'
sh 'docker push stambiadev/runtime:DEV'
Test stage
We will run the delivery file from the newly built container to test our developement
sh 'docker run --rm --env-file ./demoProject/Run/runtime.env stambiadev/runtime:DEV /opt/stambia/stambiaRuntime/startdelivery.sh -name launchDimCustomer'
Deploy to test and production stages
Then we can deploy to test and production environments using the same steps as for development, changing the configuration file for each environment :
dir("${WORKSPACE}/${STB_PROJECT}/stambia/stambiaRuntime/") {
    sh './buildDelivery.sh launchDimCustomer -conffile ${WORKSPACE}/${STB_PROJECT}/Build/Configurations/launchDimCustomer.TST.conf -deliveryfolder ${WORKSPACE}/deliveries/'
}
sh 'mv ${WORKSPACE}/deliveries/* ${WORKSPACE}/buildRuntime/deliveries'
sh 'docker build ${WORKSPACE}/buildRuntime -t stambiadev/runtime:TST'
sh 'docker push stambiadev/runtime:TST'

dir("${WORKSPACE}/${STB_PROJECT}/stambia/stambiaRuntime/") {
    sh './buildDelivery.sh launchDimCustomer -conffile ${WORKSPACE}/${STB_PROJECT}/Build/Configurations/launchDimCustomer.PRD.conf -deliveryfolder ${WORKSPACE}/deliveries/'
}
sh 'mv ${WORKSPACE}/deliveries/* ${WORKSPACE}/buildRuntime/deliveries'
sh 'docker build ${WORKSPACE}/buildRuntime -t stambiadev/runtime:PRD'
sh 'docker push stambiadev/runtime:PRD'
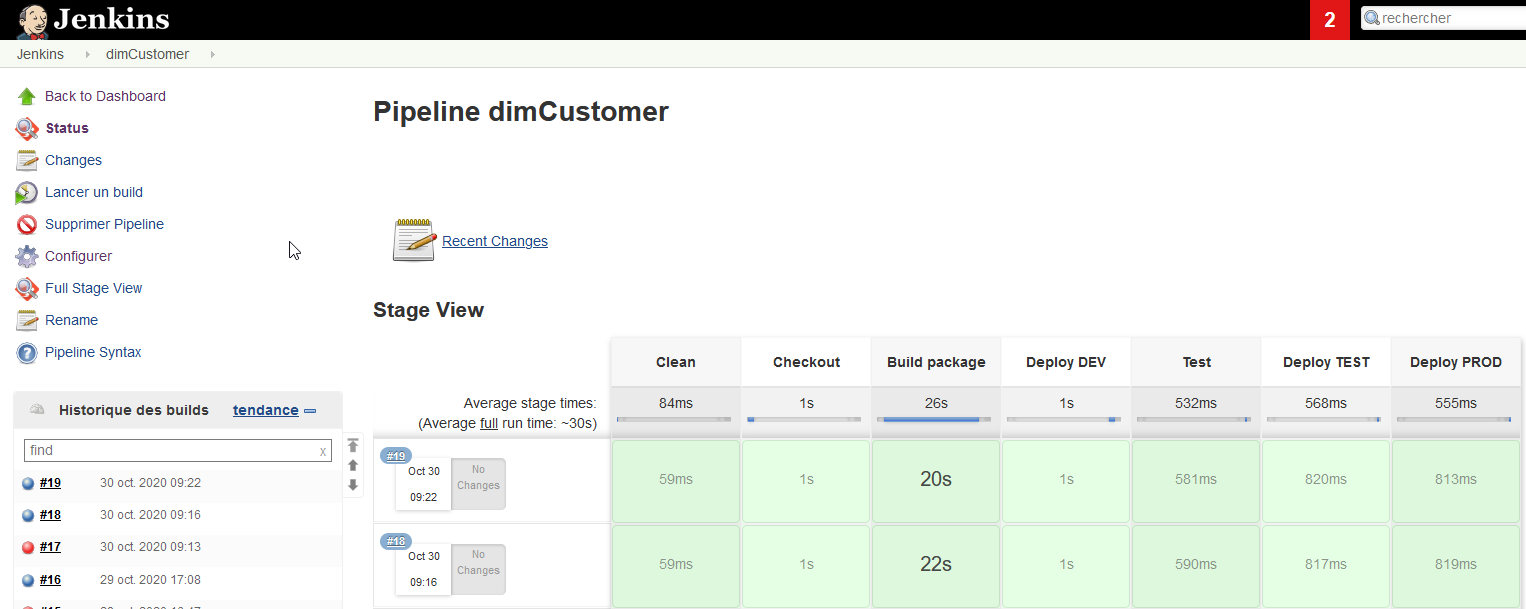
Test the pipeline
That’s it, we can now test the entire chain in Jenkins
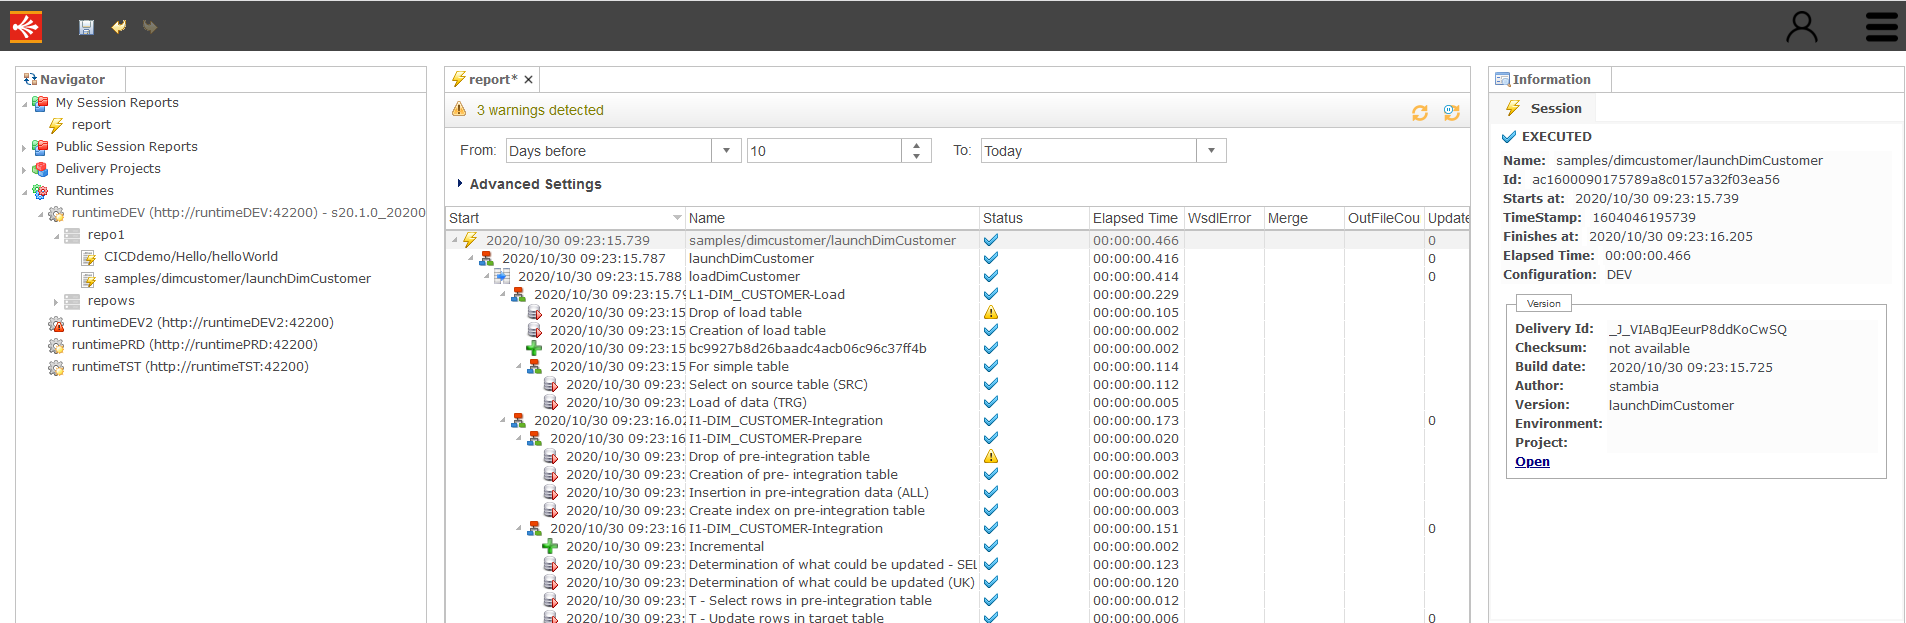
We can also check the execution logs of the test step using for example Production Analytics
The launchDimCustomer app is now available in Production ! In this example, the Docker containers have been pushed to a Docker registry, and can be started on demand, or deployed and started as services
You can find the full pipeline script here : document Pipeline script (3 KB)