

In this article, you will find the steps to migrate from Stambia DI Designer S17 version to S18 / S19
The whole procedure is described with additional notes and information about the major modifications you should have in mind.
The migration procedure will guide you to migrate to the new version and also explains the first step to follow after the migration is done.
There are dedicated articles for migration and upgrade procedure for the different major versions.
There are all summarized in the following article.
Do not hesitate to have a look at it.
About migration
This article is dedicated to the migration from Stambia DI Designer S17 to S18 / S19.
There are major differences between those which requires some additional information and migration explained in this article.
If you are simply doing a minor version upgrade, please refer to the corresponding article which will guide you to do it.
All migration / upgrade articles are summarized in the following article.
Upgrading the Designer? the Runtime? Analytics?
Stambia S18 / S19 new features are mainly focused on the Designer.
The Runtime is still with the version name "S17.x.x". This means that you can continue running your existing S17 Runtime for executing deliveries from S17 Designers as well as S18 / S19 Designers.
In the same way, Analytics does not need to be upgraded at all for receiving S18 / S19 Designer's packages, or to view their sessions.
So, feel free to make use of the new Designer, especially for your new developments!
Migration procedure
Here are the steps to follow to migrate Stambia DI Designer to S20.
Preparation
The first step is to prepare your old Designer and Workspace:
- Stop the local Runtime if it is running
- Close all the editors (Mappings, Processes, Metadata, SQL Editors...)
- Exit Stambia Designer
Backup
Next, back up all your work to avoid any loss in case of migration problem:
- Make a zip archive of your existing Stambia Designer installation
- Make a zip archive of your workspace(s)
Installation - Stambia DI Designer
Once everything is closed, stopped, and has been backed up, you are ready to install the new version:
- Download the new version of Stambia Designer
- Unzip this new version in a new directory
- Start the new Designer and select your workspace directory
- Launch a "Rebuild Cache" operation from the Impact view's menu
- Re-install your Versioning System's plugins, if you had any
Migration additional operations
Do I have to create a new workspace in S18 / S19?
No, when you will launch S18 / S19 on your existing workspace, Stambia Designer will start the upgrade Process.
Stambia strongly recommends to backup your S17 workspace before proceeding.
And then you can open your workspace with Stambia DI Designer S18 / S19. Carry on reading to know more about the main changes.
What is the "Internal Resource Management" prompt about?
When opening a S17 workspace for the first time with Stambia DI Designer S18 / S19, you will be prompted with this question:
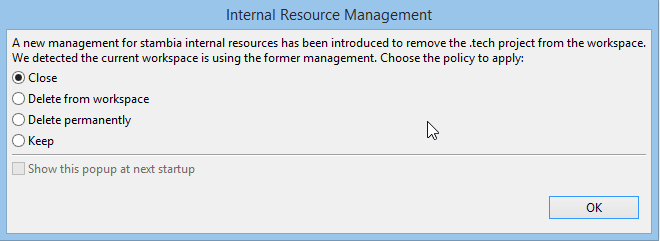
Internal Resources exist since the very beginning of Stambia. These resources define how the Designer can reverse a technology, transform Xpath expressions into SQL queries, convert datatypes, etc.
Before S18, they were stored in the ".tech" project which is hidden by default.
Stambia Designer S18 introduces a new storage for Internal Resources, which will give you more control on them.
So for now, you have to make a decision about what to do with your legacy ".tech" project:
- Close: the .tech project will be kept in your workspace, but in the "closed" state. Choose this if you know that you made modifications in your .tech which you don't want to lose for future reference.
- Delete from workspace: the .tech project is removed from your workspace, but not from your hard drive.
- Delete permanently: the .tech project is removed from your hard drive (and from your workspace too). Choose this if you did not know that it existed or you know you never modified it.
- Keep: the .tech project will remain active. Choose this option if you actually mode modifications in your .tech which you really need to keep enabled.
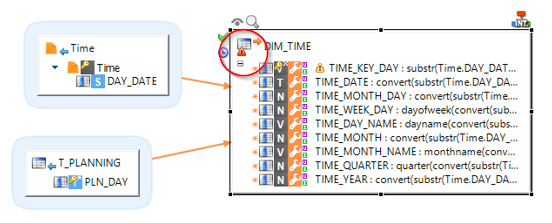
Why are there warning icons on my Mappings?
The upgrade Process leaves your existing Mapping files unchanged: only the internal build files are regenerated. This warning icon informs you about the Mappings that are still under S17's architecture. However, if you execute them (directly or by executing any parent Process) the generation will remain unchanged and continue to work exactly as in S17.
As soon as you will have edited and saved them, Stambia DI Designer will silently move them to the new architecture and this warning icon will disappear.
Note: the presence of non-migrated Mappings in a S18 / S19 workspace, may produce errors when trying to Move Metadata nodes to Sub-Metadata files. Thus, we recommend to migrate all the Mappings that use this Metadata before moving it.
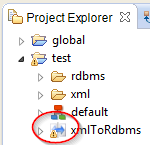
Upgrade and version controlled Workspaces
Stambia generates internal files in the indy.build folder. In S17, this folder existed as a sibling of each Mapping in a Project. In S18 there is only a single indy.build folder under the root of each project.
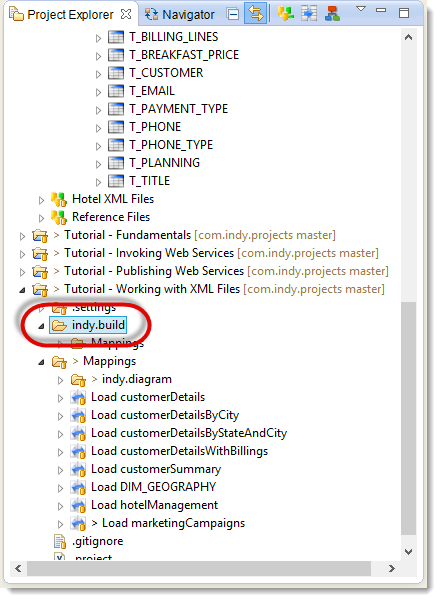
If your versioning system required to ignore the indy.build folders, you now have to configure it to ignore the new indy.build folder located at the root of the project.
Concerning Designers who share objects through a versioning system: all the Designers that share the same objects should be migrated together. A S17 Designer cannot open Mappings created or modified by a S18 / S19 Designer. We recommend to migrate at the same time all the Designers that work on the same projects.
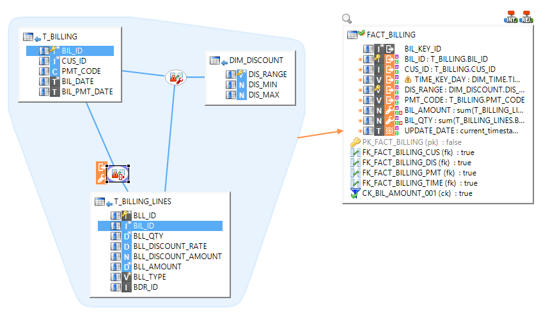
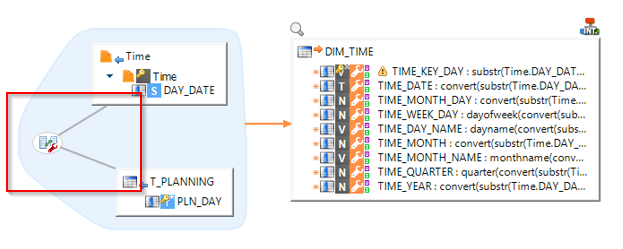
Source in more than one Load is detected
In S17, when a source table was used in more than one Load Template, the Mapping would silently compile - and sometimes produce undefined behavior at execution.
Stambia S18 / S19 prevent any misbehavior before compilation. The developer is now informed with a "Problem" icon on the join:
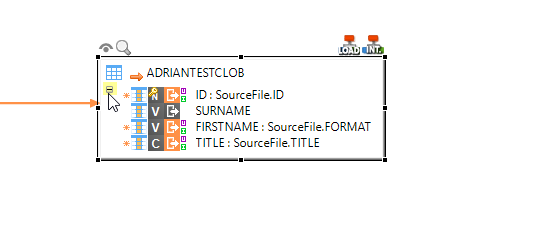
Cross Joins have to be designed
This paragraph only concerns Mappings with RDBMS targets.
In version S17, when dragging source tables without designing a Join between them, a Cross Join was generated.
In version S18 / S19, those Mappings will display with a "Problem" icon (red triangle) on the target:
This is normal: the new Mapping model requires that Joins are designed so that the table is identified as part of this target's source.
These Mappings should be modified in order to design the Join explicitly:
Mappings referencing Process parameters
If a Mapping contains expressions (Filters, Mapped fields, Joins, etc.) that reference the parent Process parameters using a relative path syntax such as ${../../../../MY_PARAM}$ it may have to be updated in order to take into account a new level introduced during code generation: ${../../../../../MY_PARAM}$
Note: Stambia discourages the use of relative path to reference parameters in Mappings and recommends using an absolute path such as ${~/MY_PARAM}$.
Processes referencing Template variables
If you have a Process which references a template variable, for example:
${~/mapping/I_TARGET_TABLE - INTEGRATION/T - Insertion of rows in target/SQL_STAT_INSERT}$
... then you will have to modify it in order to take into account a new level introduced during code generation.
Note: in this example, you may prefer to get the statistic using __ctx__.sumVariable("SQL_STAT_INSERT", "~/mapping")
Reinitializing Mapping diagram
After migrating projects created in version S17 you might encounter a problem that will prevent you from collapsing the list of fields on a datastore in a Mapping :
To solve this issue you should right click on the Mapping name in the "Project Explorer" and go to Advanced>Reinit diagram.
This will reinitialize the diagram file that is used by the Mapping. Please note that diagram files contain notes that you might have on your Mapping. Before reinitializing diagram, you might want to copy the content of your notes and recreate them once the diagram is reinitialized.
If you do not use notes on your Mappings you can simply remove all .map_diagram files from your migrated workspace. This way upon first opening of a Mapping in S18/S19 its diagram file will be recreated from scratch.
Consulting sessions of deliveries built in S17
Stambia DI Designer S18 / S19 brings a lot of changes when it comes to building a Process based on your Mappings.
The structure of this Process is so different that when you execute a delivery that contains a Mapping built in S17 the new designer won't be able to correctly associate the steps of the old Process to the new ones generated in a Process in your workspace.
As a result, you won't be able to see the details of the actions executed as part of the delivery generated in S17:
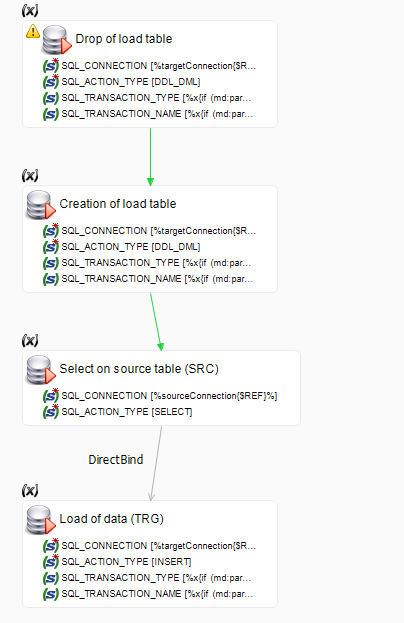
You can still consult the details of those sessions in Stambia Analytics.
Alternatively you can rebuild your deliveries in S18 / S19.
Post Migration Steps
Once you have finished following the migration guide, you can start using your fresh new Stambia DI Designer!
Refer to the release notes to discover all your new features!
After having checked that everything is OK, you can remove the old Designer's directory from your disk
You can check your Designer version in the menu Help / About Stambia Designer. The version number has this form: S99.9.9_YYYYMMDD_HHmmss.
Once a workspace has been opened with a newer version of Stambia Designer, do not try to re-open it with a previous version.
Troubleshooting
If you encounter issues while performing the migration, double check you have followed properly all the steps, and make sure you had a look on the getting started articles related to this new version.
Moreover, feel free to ask questions on the forum or to the Support Team.