Welcome Guest! Log in
Stambia versions 2.x, 3.x, S17, S18, S19 and S20 are reaching End of Support January, 15th, 2024. Please consider upgrading to the supported Semarchy xDI versions. See Global Policy Support and the Semarchy Documentation.

The Stambia User Community is moving to Semarchy! All the applicable resources have already been moved or are currently being moved to their new location. Read more…

Preparing the Runtime environment for using Oracle Sql Loader

    This article shows how to configure a Runtime environment for using Oracle Sql Loader.

    This is useful when the Runtime server has no Oracle software pre-installed.


    Download and install Oracle Instant Client

    Download "Oracle Instant Client" from the Oracle downloads website.

    Make sure to download the "Basic Instant Client" or the "Instant Client Light".

    And of course also download the "Tools Package" which contains the Sql Loader utility.

    Unzip all this material to a single directory, which will look like this:

    D:\apps\oracle\instantclient_12_2>dir
     Volume in drive D is Data
     Volume Serial Number is 2891-91F0
    
     Directory of D:\apps\oracle\instantclient_12_2
    
    12/12/2019  18:05    <DIR>          .
    12/12/2019  18:05    <DIR>          ..
    08/03/2017  14:34            19,968 adrci.exe
    08/03/2017  14:34            23,264 adrci.sym
    08/03/2017  14:35               512 BASIC_README
    08/03/2017  14:34           617,984 exp.exe
    08/03/2017  14:34           386,128 exp.sym
    08/03/2017  14:34           200,192 expdp.exe
    08/03/2017  14:34            99,520 expdp.sym
    08/03/2017  14:34            55,808 genezi.exe
    08/03/2017  14:34            56,264 genezi.sym
    13/01/2006  07:36               342 glogin.sql
    08/03/2017  14:34           310,272 imp.exe
    08/03/2017  14:34           107,016 imp.sym
    08/03/2017  14:34           208,896 impdp.exe
    08/03/2017  14:34           104,048 impdp.sym
    08/03/2017  14:27           778,752 oci.dll
    08/03/2017  14:27           731,816 oci.sym
    15/12/2016  08:56           152,576 ocijdbc12.dll
    15/12/2016  08:56            44,936 ocijdbc12.sym
    08/03/2017  13:58           565,248 ociw32.dll
    08/03/2017  13:58            96,456 ociw32.sym
    13/12/2016  23:40         4,036,257 ojdbc8.jar
    08/03/2017  13:47            71,680 oramysql12.dll
    08/03/2017  13:47            44,368 oramysql12.sym
    24/11/2016  04:52         4,709,888 orannzsbb12.dll
    24/11/2016  04:53         2,344,232 orannzsbb12.sym
    08/03/2017  13:19         1,026,048 oraocci12.dll
    08/03/2017  14:34         1,161,816 oraocci12.sym
    08/03/2017  13:41         1,064,960 oraocci12d.dll
    08/03/2017  14:34         1,137,064 oraocci12d.sym
    08/03/2017  14:31       195,298,304 oraociei12.dll
    08/03/2017  14:32        13,912,192 oraociei12.sym
    29/07/2016  00:42           252,416 oraons.dll
    08/03/2017  14:23           295,424 orasql12.dll
    08/03/2017  14:23            60,072 orasql12.sym
    12/01/2017  13:20         1,637,888 orasqlplusic12.dll
    08/03/2017  13:44         1,525,248 sqlldr.exe
    08/03/2017  13:44           257,432 sqlldr.sym
    12/01/2017  13:20         1,064,448 sqlplus.exe
    08/03/2017  14:36           176,288 sqlplus.sym
    08/03/2017  14:36               516 SQLPLUS_README
    08/03/2017  14:36               512 TOOLS_README
    08/03/2017  14:34            19,968 uidrvci.exe
    08/03/2017  14:34            23,264 uidrvci.sym
    12/12/2019  18:05    <DIR>          vc14
    08/03/2017  14:34            19,456 wrc.exe
    08/03/2017  14:34            22,080 wrc.sym
    26/01/2017  09:36            74,230 xstreams.jar
                  46 File(s)    234,796,049 bytes
                   3 Dir(s)  142,338,174,976 bytes free


    Create the tnsnames.ora file

    Create a directory and a text file named "tnsnames.ora". It will contain all your DB connection data strings.

    In my example, "D:\apps\oracle\network\admin\tnsnames.ora" :

    baseqa=(DESCRIPTION=(ADDRESS=(PROTOCOL=TCP)(HOST=qaoora11g2-01)(PORT=1521))(CONNECT_DATA=(SID=ORA112)))


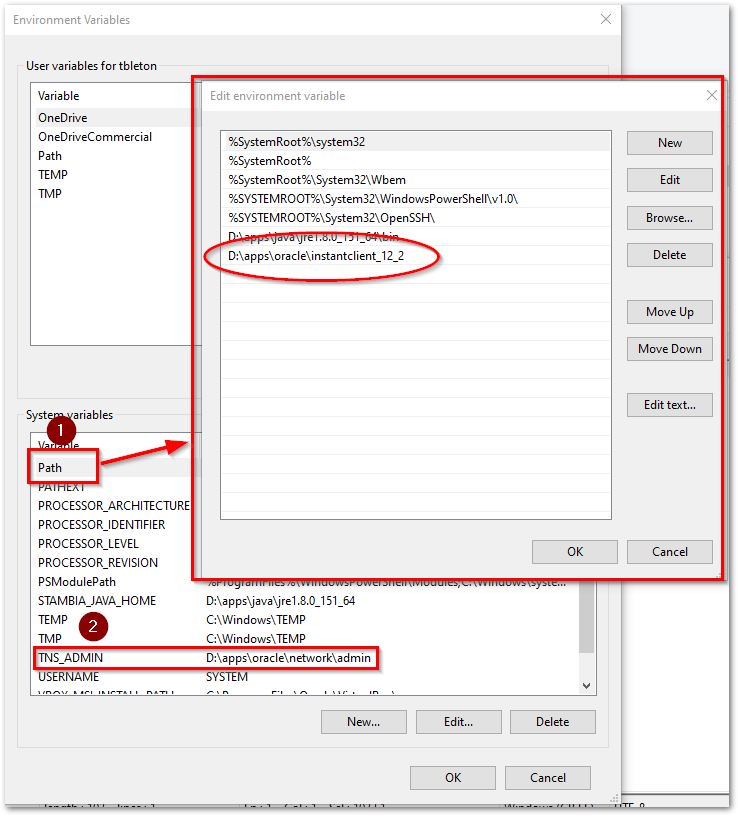
    Configure the Environment

    Add the "Oracle Instant Client" installation directory to the system's Path variable (1).

    And also add the new environment variable TNS_ADMIN to declare the location of "tnsnames.ora" (2).

     2019 12 16 15 52 33 D apps oracle network admin tnsnames.ora Notepad


    Design your Metadata and Mappings

    This is all you need to do in terms of Environment.

    Now you can Create / Reverse your Oracle metadata.

    Make sure the "Physical Name" of the oracle server reflects the database name in your tnsnames.ora file. In my example : "baseqa".

    And develop your mapping, selecting the templates which use Sql Loader.

    Stambia DI for Oracle

      Stambia Data Integration allows to work with Oracle databases to produce fully customized Integration Processes.

      The database structure can be entirely reversed in Metadata and then used in Mappings and Processes to design and adapt the business rules to meet the user's requirements.

      Read more: Stambia DI for Oracle

      How to use Slowly Changing Dimension with Oracle

        The Slowly Changing Dimensions (SCD) are used in DataWarehouses to track the changes in the databases.

        Tracking the updates of customers' addresses to keep a trace of it, for example.

        With SCD there are different ways of doing it:

        • Insert a new row every time the address is changed (historize)
        • Only update the row
        • Use a start date, end date, etc.

        For further information on what is SCD, there are good articles you can find on the internet.

        In Stambia, SCD can be used with the Oracle Metadata and Template. We will see in this article how to do that with some examples.


        Prerequisites

        1) The oracle templates are needed, and can be found in the specific templates here: 

        http://www.stambia.org/download/data-integration/stambia-di-templates

        2) An oracle metadata in which creation of tables and insertion of data is allowed.


        Goal

        We will use SCD to track the changes of the cities' names of the T_ADDRESS demo tables.


        Creating the dimension table

        The first step consists of the creation of a new table in oracle, the dimension table, in which we will track the updates.

        We put in this table the informations about addresses.

        Here is the code for our example:

        CREATE TABLE STAMBIA_TEMPLATE_ORACLE_DEMO.dim_geo
        (    
              id_geo INTEGER,
              ADR_id INTEGER,
              city VARCHAR2(200) ,
              zipcode CHAR(5) ,
              dim_version INTEGER ,
              start_date TIMESTAMP,
              end_date TIMESTAMP ,
              dim_comment VARCHAR2(200)
        )

        We will use a sequence for the id_geo column:

        CREATE SEQUENCE STAMBIA_TEMPLATE_ORACLE_DEMO.seq_dim_geo minvalue 0;

        Then, the table can be reversed on the oracle metadata.

        Note:

        SCD will be managed by Stambia and the Oracle Integration Template, this table is nothing more than a usual oracle table.


        Configuring the Metadata

        The next step is the configuration of the columns of the dimension table, directly in the metadata. The purpose is to indicate the SCD behaviour for each column.

        metadataSCD

        The different modes are:

        historizedIfModified If a change is detected on this column a new row will be inserted with the new value and this row will become the current one.
        updatedIfModified If a change is detected on this column the existing record will be updated with the new value.
        startDate The date or timestamp when the record was inserted.
        endDate The date or timestamp when the record was outdated for a newer version.
        recordVersion A flag indicating the status of the record (0=history, 1=current)
        surrogateKey A unique specific key to each record. This column will typically be loaded with a Sequence.
        naturalKey The key which identifies logically the record, regardless of the version that have been historized (typically the primary key of source table)


        And here is the modes used for our table:

        ID_GEO  surrogateKey
        ADR_ID  naturalKey
        CITY  historizedIfModified
        ZIPCODE  historizedIfModified
        DIM_VERSION  recordVersion
        START_DATE  startDate
        END_DATE  endDate
        DIM_COMMENT  updateIfModified


        Creating a mapping to load the table

        Mapping Overview

        mappingOverview


        Note:

        • CUS_START_DATE, CUS_END_DATE , CUS_VERSION are left empty. These columns are used for historization and will be managed automatically by the template.
        • The Integration Strategy has to be set to SlowlyChangingDimension and the Useless Update Detection Method to notExists.
        • We are using a sequence for the ID_GEO column. This expression must be executed on Target.


        After executing the mapping, the dimension is loaded with data.

        Exemple:

        mappingResult

        The DIM_VERSION is 1 and the END_DATE is null because it is the current version so it does not have yet an end date.


        Updating an historized field

        Our mapping is ready, we are now going to update a city, which is set to historizedIfModified mode in the dimension table.

        For that, we update the city in the in the T_ADDRESS table with an update statement in the SQL Editor for example:

        UPDATE HOTEL_MANAGEMENT.T_ADDRESS SET ADR_CITY='BOSTONnew' WHERE ADR_ID=1;

        Be careful, the dimension table is just used to track changes and is mostly used for historization.

        So the updates must still be done in T_ADDRESS in our example.

        Then we execute the mapping again, which will historize the changes of the source table.

        Here is an example of the result, after updating the city and executing the mapping:

        mappingUpdatedADRResult

        A new record has been added with the DIM_VERSION 1 and the old record has been updated with and END_DATE and its DIM_VERSION is set to 0.


        Updating an updateIfModified field

        We will now try to update the DIM_comment column, which is set to updateIfModified mode in the dimension table.

        This column is filled manually in mapping in this exemple so we have to update our mapping

        mappingUpdatedComment

        Example of result:

         mappingUpdatedCommentResult

        The comment has been directly updated in the current version of the record and no new record has been added.

        Conclusion

        We have seen in this article:

        • How to configure a dimension table in the metadata
        • How to use SCD in mappings with the oracle template
        • Examples of use

        It should help you to begin with SCD in Stambia with Oracle.


        Subcategories

        Articles

        Suggest a new Article!