

Git is a powerful version control system, which can be integrated and managed from Stambia DI Designer to control your sources.
This article explains how to install the required plugins to work with git directly within Stambia DI Designer.
Note: these plugins can also work with BitBucket which relies on git.
About EGit plugin
We will explain in this article how to install EGit plugin, which is the most used plugin to work with git in Eclipse based applications.
As Stambia DI Designer is based on Eclipse, this is the one we will use to work with git directly within Stambia DI Designer user interface.
You can find the official EGit documentation and website at this location.
Installation - Stambia DI Designer 20.4.0 or higher
Egit plugin is already installed by default on Stambia DI designer 20.4.0 or higher and the version installed by default is the recommended version to use.
Note:
You should use this recommended already installed egit plugin version because installing another version could lead to issues.
Installation - Stambia DI Designer 20.0.0 to 20.3.x
If you use Stambia DI designer 20.0.0 to 20.3.x you can find below EGit installation procedure.
For prior versions the procedure is described further in this article.
1. Starting the Designer on a new Workspace
The first step is to start Stambia DI Designer on a new empty workspace.
Installation works better when processing with an empty workspace as the installation will not be impacted by any other background operation on the workspace itself.
You will switch back to your usual workspace at the end of the installation process, and you will be able to delete this temporary workspace.
To start with a new workspace, you can simply choose a new empty folder on the workspace selection prompt when you start your Designer.
You can also use the menu "File / Switch Workspace" if the Designer is already started and specify a new empty folder in the prompt.
2. Installing EGit plugin
You have now your Designer started on an empty workspace, so you can install the EGit plugin.
For this simply open the installation wizard from the following menu:
"Help > Install new software..."
In the list select the EGit installation site, and then select only the "Git integration for Eclipse" plugin.
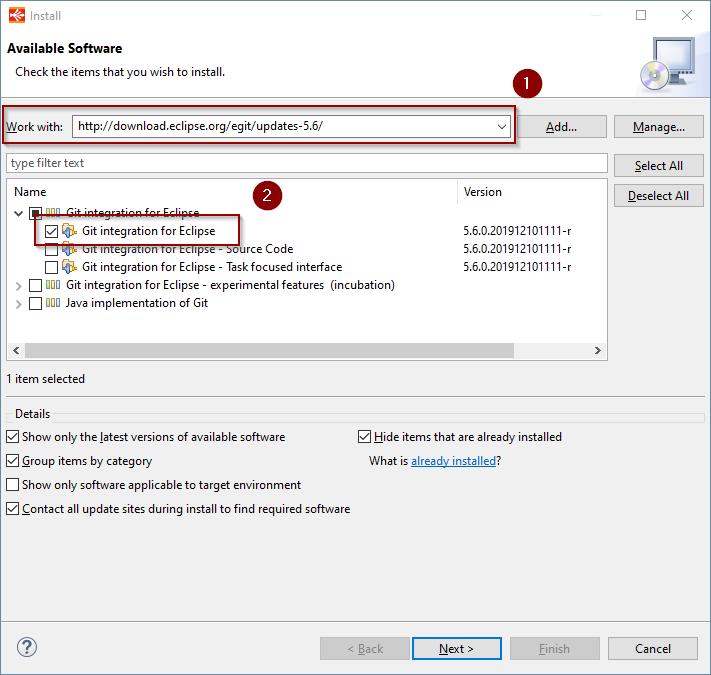
Now, you can proceed to the installation through Click "Next" button.
When the installation ends, it will ask to restart the Designer.
You can proceed, restart, and select your usual workspace.
That's it, you can now start using Git using the various Git Views in the Designer.
You can also remove the temporary empty workspace you created for the installation if want.
Installation - Stambia DI Designer versions prior to 20.0.0
You can find below EGit installation procedure for Stambia DI Designer versions prior to 2020.
1. Starting the Designer on a new Workspace
The first step is to start Stambia DI Designer on a new empty workspace.
Installation works better when processing with an empty workspace as the installation will not be impacted by any other background operation on the workspace itself.
You will switch back to your usual workspace at the end of the installation process, and you will be able to delete this temporary workspace.
To start with a new workspace, you can simply choose a new empty folder on the workspace selection prompt when you start your Designer.
You can also use the menu "File / Switch Workspace" if the Designer is already started and specify a new empty folder in the prompt.
2. Installing EGit plugin
You have now your Designer started on an empty workspace, so you can install the EGit plugin.
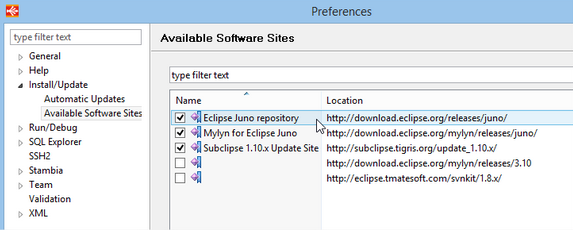
First, make sure the "Eclipse Juno Repository" software site is referenced in Stambia Designer preferences.
This is necessary for plugin dependencies.
If missing, you can add it:
- Name: Eclipse Juno Repository
- Location: http://download.eclipse.org/releases/juno/
This being done, you can now start installing the plugin.
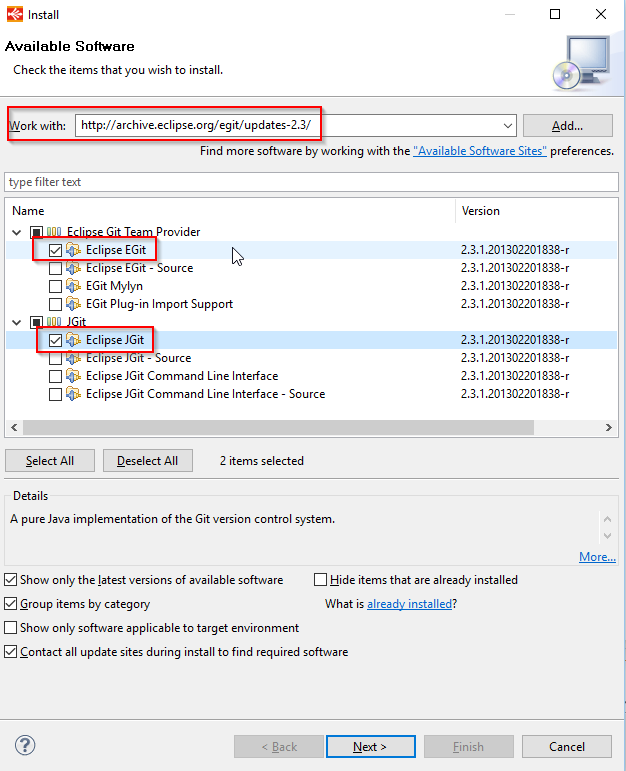
For this simply open the installation wizard from the following menu:
"Help > Install new software..."
In the list select the EGit installation site.
Paste this URL in the "Work with" field: http://archive.eclipse.org/egit/updates-2.3/
Then select only the plugins "Eclipse EGit" and "Eclipse JGit", DO NOT check the other ones:
Now, you can proceed to the installation through Click "Next" button.
When the installation ends, it will ask to restart the Designer.
You can proceed, restart, and select your usual workspace.
That's it, you can now start using Git using the various Git Views in the Designer.
You can also remove the temporary empty workspace you created for the installation if want.
Configuration and more information
The Git configuration is done in Stambia Designer Preferences, under "Team / Git".
Please ask your Git administrator for details on the configuration.
More information on EGit can be found on EGit user guide.
More information about versioning control in Stambia, with some tips about what should be synchronized can be found in the following article.
Troubleshooting
Installation issues
Under some combinations of Operating system / Java version, the installation process may produce errors or hang.
Please make sure that you are proceeding the installation with an empty workspace!
If your workspace is empty and you still have error/hang issues, then:
- make sure that the progress bar does not move any more
- kill the Designer process
- start the Designer from the command line: stambia.exe -clean