The purpose of this tutorial is to implement a top level load balancer distributnig the execution of Stambia Deliveries (published as WebServices) on a cluster of Runtimes.
Since Apache HTTP server can natively manage a proxy load balancer for HTTP/REST protocol, the tutorial will rely on this type of requests.
The used load balancing approach is round robin, but more sophisticated algorithms are available within Apache modules.
Architecture
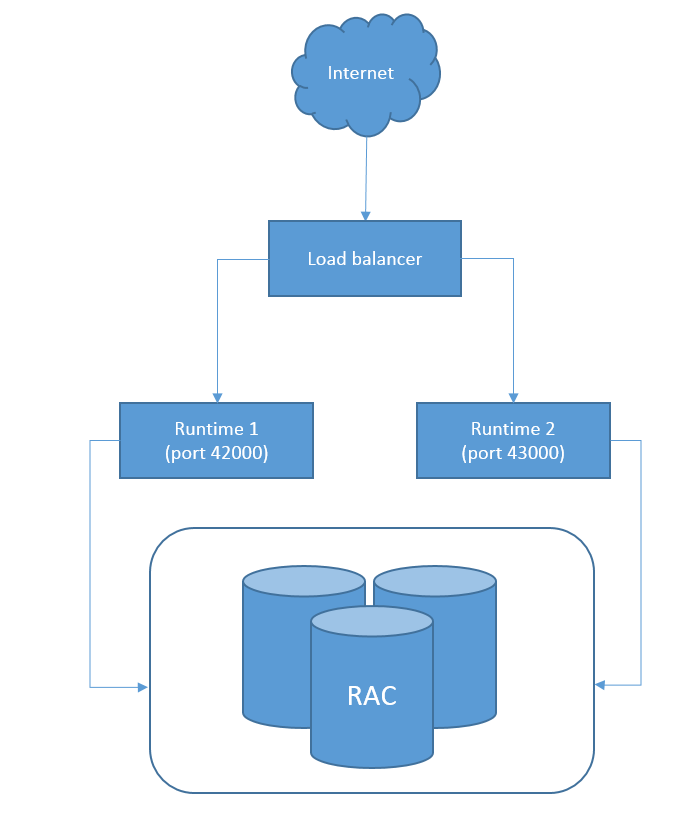
This simple image represents the architecture of an HA (High Availability) Runtime implementation.
There will be external invocations managed by an HTTP load balancer. The load balancer will then route the requests to one of the available Runtimes. Both the runtimes should be configured to use an HA Database installation to store the log executions. In a real HA implementation, all the components should be installed on different machines.
Prerequisites
1. Obviously, you'll need multiple runtimes to create the cluster.
For this example, we have set 2 runtimes on the same machine listening on different port.
Refer to this article to learn how to change the runtime default ports.
2. Using the same log database for all the runtimes is not required but is advised if you want to centralize all the logs.
Refer to this article to learn how to change the log database.
3. An Apache Server. Refer to the Apache documentation to install it.
Implementation
The first step after Apache installation is to modify the httpd.conf file placed under <ApacheInstallationDirectory>/Apache24/conf.
1. Uncomment the necessary modules.
Here is the full list:
LoadModule access_compat_module modules/mod_access_compat.so
LoadModule actions_module modules/mod_actions.so
LoadModule alias_module modules/mod_alias.so
LoadModule allowmethods_module modules/mod_allowmethods.so
LoadModule asis_module modules/mod_asis.so
LoadModule auth_basic_module modules/mod_auth_basic.so
LoadModule authn_core_module modules/mod_authn_core.so
LoadModule authn_file_module modules/mod_authn_file.so
LoadModule authz_core_module modules/mod_authz_core.so
LoadModule authz_groupfile_module modules/mod_authz_groupfile.so
LoadModule authz_host_module modules/mod_authz_host.so
LoadModule authz_user_module modules/mod_authz_user.so
LoadModule autoindex_module modules/mod_autoindex.so
LoadModule cgi_module modules/mod_cgi.so
LoadModule dir_module modules/mod_dir.so
LoadModule env_module modules/mod_env.so
LoadModule include_module modules/mod_include.so
LoadModule isapi_module modules/mod_isapi.so
LoadModule lbmethod_byrequests_module modules/mod_lbmethod_byrequests.so
LoadModule log_config_module modules/mod_log_config.so
LoadModule mime_module modules/mod_mime.so
LoadModule negotiation_module modules/mod_negotiation.so
LoadModule proxy_module modules/mod_proxy.so
LoadModule proxy_balancer_module modules/mod_proxy_balancer.so
LoadModule proxy_http_module modules/mod_proxy_http.so
LoadModule setenvif_module modules/mod_setenvif.so
LoadModule slotmem_shm_module modules/mod_slotmem_shm.so
2. Place this code at the bottom of the httpd.conf
<VirtualHost *:80>
        ProxyRequests off
        ServerName domain.com
       <Proxy balancer://mycluster>
                # RUNTIME1. Change the hostname and port to match the first runtime. E.g. http://stambiaps04:42200/rest/StambiaDeliveryService/2
                BalancerMember http://<runtimeHost1>:<runtimeHTTPPort1>/rest/StambiaDeliveryService/2
                # RUNTIME2. Change the hostname and port to match the second runtime.
                BalancerMember http://<runtimeHost2>:<runtimeHTTPPort2>/rest/StambiaDeliveryService/2
  #Security.
               #Technically we aren't blocking anyone but this is the place to make those changes.
                Require all granted
                # In this example all requests are allowed
 # Load Balancer Settings
                # We will be configuring a simple Round
                # Robin style load balancer.  This means
                # that all webheads take an equal share of
                # of the load.
                ProxySet lbmethod=byrequests
 </Proxy>
 # balancer-manager
        # This tool is built into the mod_proxy_balancer
        # module and will allow you to do some simple
        # modifications to the balanced group via a gui
        # web interface.
        <Location /balancer-manager>
                SetHandler balancer-manager
        # We recommend locking this one down to your your office
                Require host example.org
        </Location>
        # Point of Balance
        # This setting will allow to explicitly name the
        # the location in the site that we want to be
        # balanced, in this example we will balance "/"
        # or everything in the site.
        ProxyPass /balancer-manager !
        ProxyPass / balancer://mycluster/
</VirtualHost>
Change the balancer member host name with yours.
Once saved, go into $APACHE_SERVER_HOME/Apache24/bin and start the apache server typing:
httpd.exe -k start
Execution
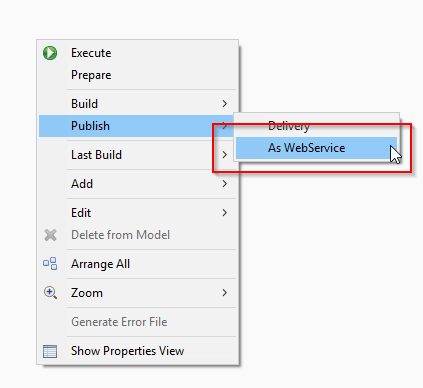
Now, you can perform WebService invocation using a web browser.
Before doing that, the delivery must be published as WebService in each Runtime being part of the HA cluster.
To do so, you can use both Stambia Designer or Stambia Analytics.
From the Designer:
From Analytics:
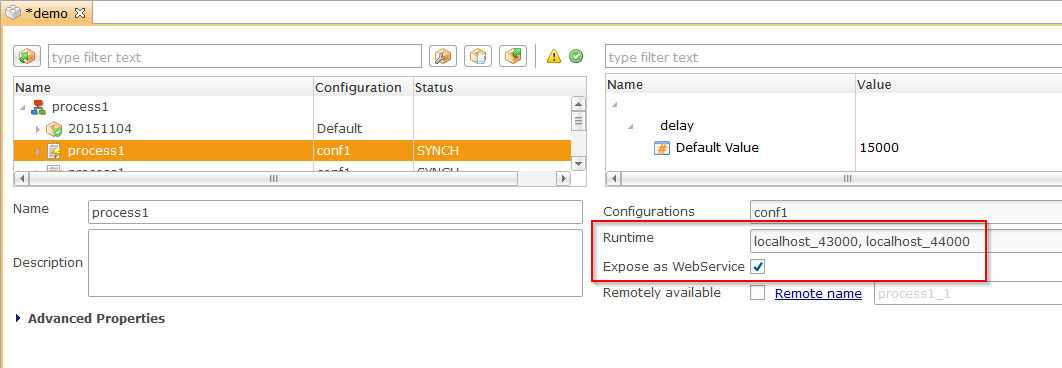
You can now invoke your delivery using a web browser typing
http://stambiaps04/job2
where stambiaps04 is the server where the load balancer is running and job2 the delivery deployed as WebService.
This http proxy load balancer listens to port 80, if you want to change this, modify the httpd.conf accordingly.
When shutting down one of the two runtimes, the WebService will still be reachable through the http proxy.
The objective of this tutorial is to create a cluster of Runtimes that share the same delivery schedule planning.
Since Stambia Runtime's scheduling is based on quartz it natively manages schedule clustering.
The only requirement is to create the configuration file properly.
Prerequisites
1. Obviously, you'll need multiple runtimes to create the cluster.
For this example, we have set 5 runtimes on the same machine listening on different port.
Refer to this article to learn how to change the runtime default ports.
2. An RDBMS schema in which all the shared information about the schedules will be stored.
3. Using the same log database for all the runtimes is not required but is advised to centralize all the logs.
Refer to this article to learn how to change the log database.
Creating the necessary tables
The first step is to create the tables that will be used by the schedulers.
For this, sample scripts for the most common databases are provided under <stambiaRuntime>/scripts/scheduler/*.sql. Execute the script corresponding to your database in the schema in which you want to create the tables.
Configuring quartz scheduling
Now it is possible to configure quartz to act as a cluster instead of standalone.
To do so, you have to create a file named engineScheduler.properties under <stambiaRuntime>/properties
Note: There is a sample file by default within any stambia runtime installation.
Example with an oracle database:
#============================================================================
# Configure Main Scheduler Properties
#============================================================================
# all the runtime installation must share the same instanceName
org.quartz.scheduler.instanceName = MyClusteredScheduler
# this parameter must set to AUTO
org.quartz.scheduler.instanceId = AUTO
#============================================================================
# Configure ThreadPool
#============================================================================
org.quartz.threadPool.class = org.quartz.simpl.SimpleThreadPool
org.quartz.threadPool.threadCount = 50
org.quartz.threadPool.threadPriority = 5
#============================================================================
# Configure JobStore
#============================================================================
org.quartz.jobStore.misfireThreshold = 60000
org.quartz.jobStore.class = org.quartz.impl.jdbcjobstore.JobStoreTX
org.quartz.jobStore.driverDelegateClass=org.quartz.impl.jdbcjobstore.StdJDBCDelegate
org.quartz.jobStore.useProperties = false
org.quartz.jobStore.tablePrefix = STB_
# this parameter must be set to true
org.quartz.jobStore.isClustered = true
org.quartz.jobStore.clusterCheckinInterval = 20000
#user stambiaRuntime as dataSource name
org.quartz.jobStore.dataSource = stambiaRuntime
#============================================================================
# Configure Datasources
#============================================================================
# Specify the connection to the Quartz tables
org.quartz.dataSource.stambiaRuntime.driver = oracle.jdbc.driver.OracleDriver
org.quartz.dataSource.stambiaRuntime.URL = jdbc:oracle:thin:@127.0.0.1:1521:xe
org.quartz.dataSource.stambiaRuntime.user = STAMBIA
org.quartz.dataSource.stambiaRuntime.password = STAMBIA
org.quartz.dataSource.stambiaRuntime.maxConnections = 5
org.quartz.dataSource.stambiaRuntime.validationQuery=select 0 from dual
You can next copy this file under every runtime installation that is part of the cluster and start (or restart) every runtime as well.
Note:
- When deploying a cluster on separate machines, be SURE that the clocks are synchronized. Use third part software to ensure this.
- In the Configure Datasources part, set the parameters accordingly to the database/schema in which the tables from the script have been created.
- You may also need to adjust some jobStore parameters to match your Rdbms product.
Additional properties for Microsoft SQL Server:
- org.quartz.jobStore.driverDelegateClass=org.quartz.impl.jdbcjobstore.MSSQLDelegate
- org.quartz.jobStore.selectWithLockSQL=SELECT * FROM {0}LOCKS UPDLOCK WHERE LOCK_NAME = ?
- org.quartz.jobStore.lockHandler.class = org.quartz.impl.jdbcjobstore.UpdateLockRowSemaphore
- org.quartz.jobStore.acquireTriggersWithinLock = true
Conclusion
Now, you can create a schedule, modify it or remove it, will be automatically shared among all the runtimes.
Every runtime sharing the same cluster configuration will get the schedules created in the cluster, even if the runtime is not started or doesn't exist at the time the schedule is created.
Note there is another way to use the scheduler with native load balancing and failover
Refer to this article for further information