This article describes the steps required for migrating to the new Google Sheet Component.
The whole procedure is described with additional notes and information about the points to have in mind.
The migration procedure will guide you to migrate to the new version and also explains the first steps to follow after the migration is done.
About migration
Stambia's Google Sheet Component was originally using Google's "v3 API" to communicate and operate with Google Sheet.
This API is planned to be removed by Google soon which advise to now use the currently supported "v4 API" instead.
You can find more information about the removal of this Google API at the following Google article, which explains when it will be removed.
We therefore worked on a new Component version which will use the new currently supported API.
This new Component version is available and will require some migration steps on your actual developments.
All the steps are explained in this article.
Prerequisites
This article is dedicated to Google Sheet Component migration for Stambia DI S17, S18, S19.
For Stambia DI 2020 (S20.x.x) or higher, refer to this article
Google Sheet Component now requires Java 8 or higher.
How will you be impacted?
Google "v3 API", used by the old Component, being removed gradually this 2020 year, the old Component will stop working.
You must migrate to the new Component for your developments to continue working.
Do I need to migrate?
If you are using Stambia DI Designer S17, S18, S19 and Stambia DI Runtime S17, you must have the following plugin installed:
- Google Sheet plugin 1.0.0 or higher
If you are using this Google Sheet plugin version or higher, you are already up to date with a version using Google's "v4 API".
If you don't have this plugin version or higher installed, you must follow this migration guide.
To find the plugins installed in your Designer installation folder, refer to this article which explains where they are installed depending on Designer versions.
Do not hesitate to contact support team if you have any doubt.
Migration procedure
Component installation
Google Sheet Component was originally already included in a default S17, S18, S19 installation.
It has been separated from default installation and is now proposed as a Component which must be installed separately.
The reason is to ease the update of this Component which can now be updated separately, avoiding having to wait a new Designer to be published, and to offer the possibility to use it on all installations.
First thing to do is to download the Google Sheet plugin from Components download page, and to install it.
Plugin installation procedure can be found in the complete Component installation procedure.
Once the plugin is installed, you can continue the migration procedure.
SQL Explorer JDBC Driver Configuration
The new Google Sheet Component is using a brand-new Stambia Google Sheet driver developed for Google's "v4 API".
You must therefore define it in your Designer in JDBC drivers Preferences to be able to use it in Designer.
For this, open the following menu: Window > Preferences > SQL Explorer > JDBC Drivers
From Stambia DI Designer S19.0.22, the new entry should be present and configured automatically on newly created workspaces.
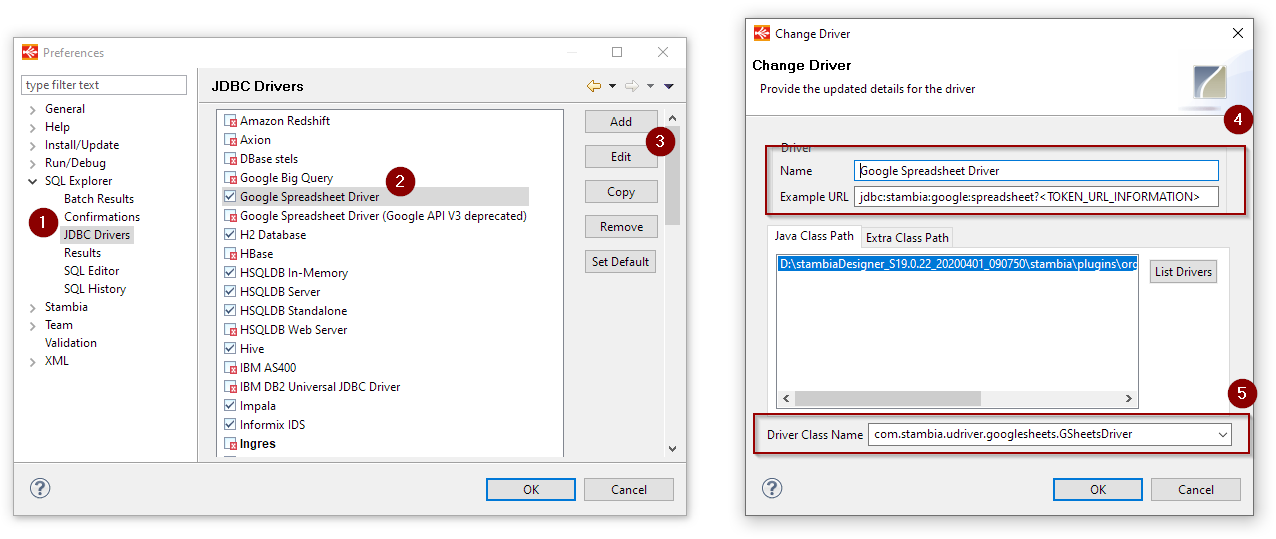
Note that if you are on an existing workspace, or if you are on a prior version, the driver will not be listed, and you will have to add it manually.
For this, click on the "Add" button, which will display a window to create a new driver.
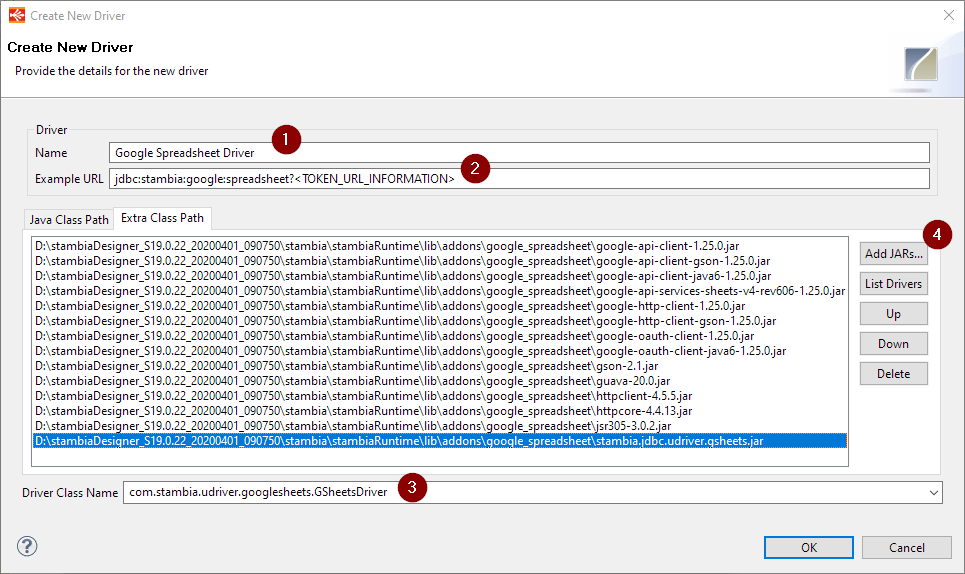
Then define the properties as follow:
| Property | Value |
| Name | Google Spreadsheet Driver |
| Example URL | jdbc:stambia:google:spreadsheet?<TOKEN_URL_INFORMATION> |
| Driver Class Name | com.stambia.udriver.googlesheets.GSheetsDriver |
Finally, in "Extra Class Path" tab, you need to add all the libraries which have been generated by the Component, by clicking on "Add JARs..." button.
They are generated at the following location:
<Designer Installation Folder>/stambiaRuntime/lib/addons/google_spreadsheet
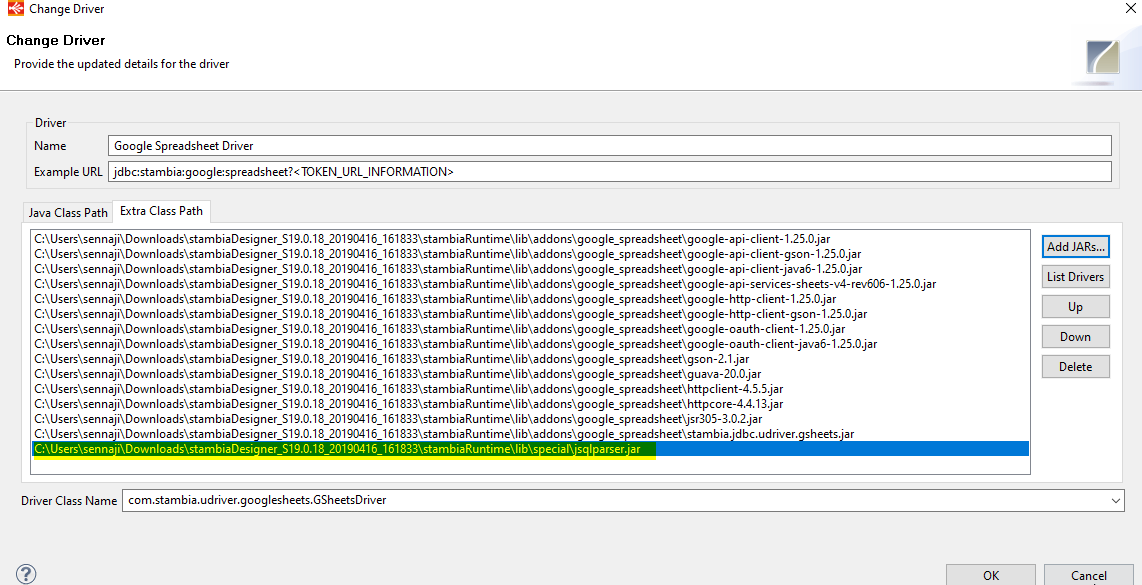
For Stambia designer version prior to 19.0.27, you will have also to add JSQLParser.jar library located in <Runtime Installation Folder>/lib/special.
Metadata migration
Next step is to migrate your existing Google Sheet Metadata.
You'll have to modify some parts for the new Component to work.
All the modifications to perform are listed below.
First difference with previous Component is that Google's "v4 API" does not allow to retrieve all the sheets of a given user as it was possible before.
Impact of this is that we cannot reverse for now all Google Sheets of a given user at once, as we cannot list them from Google's "v4 API" as it was possible before.
Moreover, we need to know the exact identifier of a Google Sheet to be able to perform operations on it.
Update the driver class used
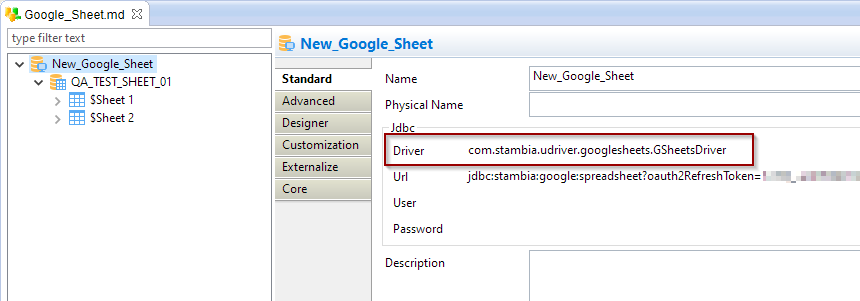
First modification to perform is to update the driver class which is used by your Google Sheet Metadata.
You have to change it to the new driver class name, which is the following:
com.stambia.udriver.googlesheets.GSheetsDriver
Update your Metadata by specifying the identifier of the Sheet in the catalog name
You have then to update the catalog name of your spreadsheet by specifying its identifier.
The Spreadsheet Identifier can be extracted from its URL.
This ID is the value between the "/d/" and the "/edit" parts of the URL.
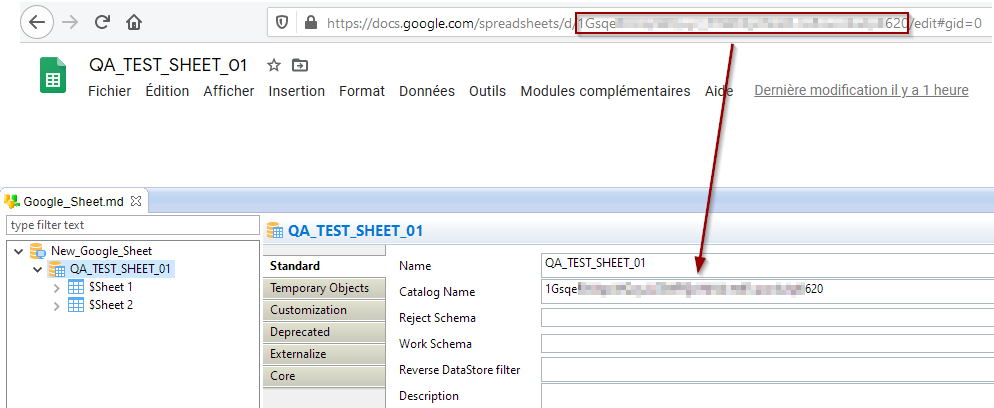
Finally, remove the "$" character which at the beginning of datastore names
The old Google Sheet Component was reversing the sheets prefixed with a "$".
The new Google Sheet Component now reverse and use the sheets with their name directly, so you have to remove this "$" from Metadata.
For this, simply remove the character in the name and physical name of datastores.
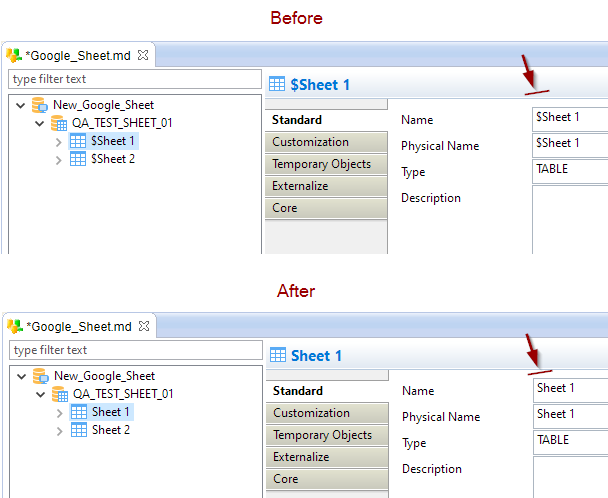
Developments migration
Once you have finished updating your Metadata, you will have to republish all deliveries corresponding to Mappings and Processes using it.
For this, you can proceed as you usually do to publish deliveries on your Runtimes.
Note that Runtimes on which you publish those new deliveries must have been updated with the new Google Sheet Component.
Runtime migration
Once you have installed the new Google Sheet Component in your Designer, you'll have at your disposal the necessary resources to update your Runtimes.
The necessary resources are extracted inside the Designer's internal local Runtime.
You can find all the libraries which need to be copied into your other Runtimes at the following location:
<Designer Installation Folder>/stambiaRuntime/lib/addons/google_spreadsheet
Copy / paste this folder in the same location in your other Runtimes and restart them.
They will then be able to work with developments using the new Google Sheet Component.
You can now publish your updated developments on those Runtimes.
Note that the new libraries dependencies of Google "v4 API" are pretty common dependencies such as httpclient, httpcore, or guava, which might conflict if you already have them with different versions in your Runtimes.
This can most notably happen when working with Hadoop Component, Amazon Component, and Google Cloud Platform Component which are known to use at least some of the same libraries.
Make sure you have a coherent set of libraries in your Runtimes to avoid conflicts and issues. You can contact support team if you have any doubt about this.
Limitations
Limitations of the new Component version are the following.
There are mostly due to the significant changes in the Google "v4 API".
We're working on unlocking them in an upcoming Component version update.
- When reversing Metadata, it is not possible for now to retrieve the list of all Google Sheets of the user, because of the changes of the new Google "v4 API" which does not allow do retrieve this list as it was possible before. We're working on another way to retrieve this list. The reverse is therefore performed one Google Sheet at once for now.
- When having Google Sheet as source, it is not possible for now to put a filter on it which is executed on "source" execution location, you must use "staging area" execution location. As for the previous point, this is due also to the changes of the new API which works significantly differently than the previous one.
Troubleshooting
If you encounter issues while performing the upgrade, double check you have followed properly all the steps.
Moreover, feel free to ask questions on the forum or to the Support Team.


