Stambia analytics on Docker

Docker is the leading container platform and can be used to run Stambia Analytics inside containers. This article explains how to build a Stambia Analytics container using Tomcat web server. The installation of a docker client and the detailed command options are out of scope of this article, please refer to official documentation at Docker docs
Prerequisites:
- stambia analytics zip archive from stambia.org
- Docker client environment ready
As Stambia Analytics needs to be deployed on a web server, we must use a proper base container such as tomcat:8.5.40. Stambia analytics deployment on JBoss wildfly was also tested (using jboss/wildfly base container), but this article focuses on Tomcat.
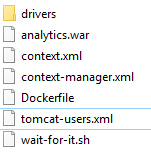
Before building the container we must prepare some configuration files for Tomcat. In the example below I use a tomcat-users.xml file to create a user to connect to Stambia Analytics, a context.xml file to declare an external database, and a context-manager.xml file for security purpose. You should also prepare the necessary jdbc drivers that analytics would need - I use a dedicated "drivers" folder for that.
Please refer to Stambia Analytics Installation Guide and Tomcat official documentation for more information regarding configurations.
Once you have gathered all the files, you can prepare a folder to build your container and add the analytics.war extracted from the Stambia Analytics zip archive :

The wait-for-it script can be used in case you need the container to wait for a particular HOST & TCP port to be reachable from the container before starting up the web server. You can find this script at https://github.com/vishnubob/wait-for-it If you don't need it you can remove the copy line for this file from the Dockerfile
The Dockerfile looks like this :
FROM tomcat:8.5.40-jre8-slim

RUN mkdir -p /opt/analytics/jdbc

COPY tomcat-users.xml /usr/local/tomcat/conf/

COPY context.xml /usr/local/tomcat/conf/
COPY context-manager.xml /usr/local/tomcat/webapps/manager/META-INF/context.xml

COPY ./drivers /usr/local/tomcat/lib

COPY wait-for-it.sh /opt/analytics

ENV STAMBIA_WEBAPP_HOME /opt/analytics

COPY analytics.war /usr/local/tomcat/webapps
An example can be downloaded here : document Dockerfile (406 B) (rename to Dockerfile)
From this folder type the following commands to build the container image :
>cd myDockerFolder
>docker build . -t <containername>
Example :
>docker build . -t myrepo/analytics
The output should look like this :

Then you can start your container interactively (-it) using the following command :
>docker run -it -p <hostport>:<guestport> --rm <containername>
By default Tomcat uses port 8080 for http communications, so if you want to expose the internal 8080 port of the Stambia Analytics container to the port 7000 on your host you can run the following command :
>docker run -it --rm -p 7000:8080 myrepo/analytics
To keep application data accross restarts you can externalize the application folder using the --mount option :
>docker run -it --rm -p 7000:8080 --mount type=bind,source=D:\Docker\runtime\sharedFolder\analytics,target=/opt/analytics myrepo/analytics


